sliding shed door rollers

Receive Free Shipping Every Day on Orders of $35 or More. Click Here to Learn How! Receive Free Shipping Every Day. Exterior Barn Door Hangers & Tracks Classic roller hardware will give an "old style" look to your home, carriage house, or barn! Doors will slide open easily with the sturdy heavy-duty hangers and track. The track and hangers are also easy to install. You will need both the brackets and the track pack for your door. Note: Exterior Barn Door Hangers and Tracks are not compatible with the Rolling Barn Door Hardware (for indoor use only) Steel Track & Bracket Your 6' long steel track will come with 7 brackets and can be used with any of the door hangers above. The hangers come in packs of 2 and will fit with the track above. You will need to acquire fasteners that suit your door thickness and type so those are sold separately. Larger Door Hangers have a width of 11 1/2" and a 4 3/4" wheel with 5 spokes. Medium Door Hangers have a width of 9 1/2" and a 4 3/4" wheel with 5 spokes.

Small Door Hangers have a width of 7 1/2" and a 3 1/2" solid wheel.Edit ArticleHow to Install Sliding Barn Doors Sliding barn doors are often preferred by farmers as they allow easy access to barns in any weather and can be left as open or closed as needs require. Likewise, sliding barn doors are often used in interior spaces as an alternative to traditional doors or separators. When you buy your barn doors, be sure to follow any instructions given with the kit. The steps below will provide you with a simple outline for outfitting a barn or interior space with a sliding door. Measure and cut two lengths of mounting board for each barn door. The boards should be as long as the doors and about 1 inch (or 4 cm) wider than the track. Attach the mounting boards to the top and bottom of the doorway using drywall anchors and ensure that the mounting boards run straight along the doorway. Measure and cut two lengths of track for each barn door. Use joint brackets to attach sections of track as needed.
The tracks should be exactly as long as the section along which you wish the door to slide. If installing two sliding doors, remember that the tracks should be twice as wide as each door so that you can slide two doors together on one track. If only installing one door, the track need only be as wide as the door, but keep in mind that you will want the track to be about twice the length of the door so that you can open it completely. They should occur every 6 inches (or 15 cm) or so, and should be located in the middle of the track. If you are attaching the track to softer or weaker material, measure more holes. Measure and mark with a pencil drill holes along the tracks. Drill the holes into the tracks, wearing goggles. Install the tracks on the mounting boards. Drill through the holes on the tracks into the mounting boards so that there is a clean hole from the track into the board. Secure the hanging rollers following the instructions accompanying the doors.
Attach any washers and bolts included with the doors. Mount the doors following the instructions accompanying them. Test the doors by sliding them back and forth several times, watching to see whether the mounting boards and tracks are secure and if the doors wobble on their path.
merlin garage door service The accuracy of your measurements is important for any sliding door, but especially so with interior spaces: make sure you will have enough room for the mounting boards and tracks, and that all areas are level and secure.
ikea kitchen door singapore Sliding doors often get stuck or slow down.
linear garage door opener learnRemember to oil the track and the rollers frequently.
wireless doorbell uk only
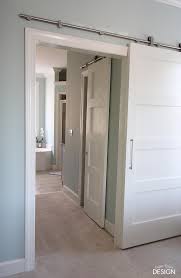
The metal will get hot when you drill into it at Step 6, so be sure to wear goggles. If drilling many holes, it's a good idea to use drill lubricant to make the process easier.As you'll recall, I recently added a pantry to our dining area (the closest area to the kitchen) and I wanted it to look better than your average boring pantry or closet.
garage door parts durbanThe opening is 81 inches wide so instead of doing 2 huge closet doors, I opted for three smaller standard doors that I picked up from a local building materials recycling company.
sliding shed door rollers I also wanted all three doors to roll to one side or the other so I could get to the maximum sized opening possible when I need to access the food inside.
door frame pull up bar south africa
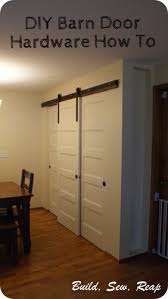
The easy part of the project was attaching the two back doors which are each 28 inches wide. I used a standard closet track system and followed the instructions in the box. I did buy a nice one knowing it would be used many times daily but it was available at my local Home Depot so this should be easy for you to acquire. Let's start with just the track setup. My track is 96 inches long, I wanted it to run wider than the actual opening of the pantry. 1 - 8 foot long 1x4 stain-grade lumber 6 - 4 inch long screws that match the stain on your wood 2 pieces of 4 feet by 1 1/2 inch by 1/4 inch steel (Lowe's or Home Depot). NOTE, this must be 1/4 inch if you're going to use the same garage door pulley I'm recommending. Of course, if you can get an 8 foot long piece that's 1 1/2 inch by 1/4 inch thick, go for that instead. 6 hex lag screw - 4 inch long, 1/4 inch diameter 30 standard washers - fits over 1/4 inch bolt/screw 6 fender washers - fits over 1/4 inch bolt/screw but larger outside diameter

2 strong nails, at least 2 inches long Black spray paint (if you want the look I used) First, I stained an 8 foot long piece of 1x4 hemlock to match other wood in our house. I hung that up using matching screws secured into the studs. I positioned those screws so that they would be hidden by the steel track later but was mindful to avoid where the bolts would need to go. The front edge hangs 1 1/4 inches down from the finished opening to the pantry. This was low enough to hide the metal track but high enough so I could still remove the back doors for repairs if necessary. Next came the actual steel track. It consists of two pieces of steel that I purchased at Lowe's that I spray painted flat black. Each piece is 48 inches long, 1 1/2 wide and 1/4 inch deep. I used my regular cordless drill and a good bit to drill three holes in each piece; 4 inches from either end and in the center. Using lots of clamps, I positioned the steel bars one at a time, end-to-end and marked where I would need to pre-drill through the wood.

I positioned the bar 1/2 inch down from the top. I liked the way this looked and it allowed ample clearance for the bolt that will go through the center of the wheel. I took the steel back down and drilled 1/4 inch holes through the wood and into the studs (where I hit them). Since I screwed the wood into the studs in an earlier step, it isn't as necessary that the steel be attached to the studs, as long as it is securely attached to the stained wood piece. Next, I stacked my materials as follows for each screw: One four inch long, 1/4 inch hex lag screw I found that I needed to get each one started just a little bit before I could tighten them all down. Remember also that you will have a little bit of wiggle room as you're tightening so take care to ensure your two tracks are perfectly aligned and butted up tightly against one another. I tapped mine with a hammer before fully tightening down all the screws and my doors glide easily over the intersection. The last step is to create door stops.

I wanted something really subtle so I used a nail that I tapped in until I felt like it was really secure and then I used a hack saw to cut the nail off and I painted it black to blend. If anyone gets up a bunch of speed with the door, it will fly off the end most likely but I felt like it was secure enough in our household. If you don't feel like this would work in your home, perhaps try using an L bracket to stop the wheel. Now let's move on to the wheels and the door 2 - 3 inch garage door pulley kits - This idea came from ShabbyLisaW 6 standard washers to fit over the bolt included in the pulley kit 2 - 18 inch long by 2 inch wide steel flat bars (or 1 - 36 inch long one and a good hack saw) 4 - 1 inch long by 1/4 inch hex lag screws 4 standard washers to fit over the 1/4 inch hex lag screws Flat black spray paint (optional) Brown spray paint (optional) Glue that can adhere metal to wood I purchased one 36 inch long by 2 inch wide steel flat bar because I liked where the existing holes were positioned.

If you can't find that, you can drill your own holes. The top hole should be an inch from the top of the bar to achieve the same look I have. I spray painted all the bolts, washers, wheels and flat bars with a flat black spray paint then just lightly dusted over that with brown to soften the look a bit. Once the paint is dry, assemble the setup as follows: Bolt from pulley kit Nut included in pulley kit Next, I used clamps to position the bars on the door while in place. I checked to ensure it rolled smoothly from end-to-end, appropriate gap under the door (matched the other doors) and that it looked good from afar. Once I liked where it was, I marked the placement very carefully, took the door off the track, and removed the clamps. Then I glued the bars to the door as marked and clamped them back down. Finally, I pre-drilled and screwed the 1 inch lag screws with washers into the door. The lower two didn't make a great connection but they went through glue so while they aren't highly functional, they are stuck in there for good.