sliding door tracks lowes

663 posts, read 1,777,551 times 26,535 posts, read 57,221,272 times 9,623 posts, read 36,820,937 times Originally Posted by Happs By using mechanical methodology and a process of elimination. 3,592 posts, read 5,493,566 times 10,425 posts, read 39,362,072 times 4,107 posts, read 8,487,817 times 20,423 posts, read 33,400,272 times 8,358 posts, read 4,613,546 times Not to be sarcastic or anything here, but if the door will not slide and is 40 y.o., it may be time to replace with a vinyl slider, as you may not be able to find parts to fit your old door. If the door is 40 y.o., you might also be facing a rehab issue too, with the header of the door framing. If it is sagging, it's probably because of settling of the home itself and warpage of the header, because years ago, they didn't really have stringent building codes like they have today. Your door header may consist of sistered/sandwiched 2x4's, and before replacing a slider or any door/window, you should check and see what type of materials was used in the door header.
In our old house, built in '52, we found that 2x4's were used in the window and door headers, we replaced all headers with sistered 2x8's. That's not the case in some homes though, some builders actually went the extra mile on some construction of old homes, but you definitely need to find out. 93 posts, read 135,250 times 3,312 posts, read 6,630,724 times I had a door that was bad. I used one of these - worked great. It is about 1/3 of the price on Amazon than anywhere in my town. Double check the size before ordering. Super easy and cheap fix. My door slides like new now. Small Sill Track Cover - 72 in long">Small Sill Track Cover - 72 in long Under $15 after shipping Please register to post and access all features of our very popular forum. It is free and quick. Over $68,000 in prizes has already been given out to active posters on our forum. Additional giveaways are planned. This door is easy to build to fit your opening. Once you know how big the door needs to be, adjust the length of the stiles and the top/bottom rails to the desired lengths.

The crossbar is cut to fit the actual door. The car siding is designed to have one board centered in the door panel and then fit the boards toward each side, all cut to fit the door as it is built. Cut the stiles (A) and top/bottom rails (B) to size (Project Diagram, Cutting List and Cutting Diagram). Sand the parts with 120-grit and 180-grit sandpaper. (A random-orbit sander makes quick work of this.) At the end of the top/bottom rails, drill pocket holes to receive the pocket-hole screws (Project Diagram, Drawing 1) using a pocket-hole jig. Good to KnowDrill pocket holes to leave space for the door hardware. On the top rail, drill two closely spaced holes near the bottom edge of the board. On the bottom rail, drill two holes about 1 inch from both the top and bottom edge of the board. Align the top/bottom rails (B) with the ends of the stiles (A) (Project Diagram, Drawing 1). Add glue and drive the pocket-hole screws to make the frame. Draw a centered line down the board for the crossbar (C).
Slip it under the frame and align the mark with the inside corner of the frame. At both ends, trace the shape of the frame on the crossbar. Clamp a pocket-hole jig to the stile near the corner and drill a pocket hole on the back face of the frame.
best garage doors hialeahRepeat on the diagonally opposite end.
toyota celica with lambo doors for sale Using a jigsaw, cut the crossbar and sand the edges smooth.
frameless shower doors 600mmThe bar does not have to be a perfect fit -- ease the edges where it meets the frame to create a rustic look that helps hide imperfections in the jigsaw cut. Glue and screw the crossbar to the stiles. Cut two 1 x 2 boards to match the height of the door for the edging (D).

Glue the edging to the sides of the door with the outside edge flush with the outside edge of the frame stiles (Project Diagram, Drawing 2). The edging creates a smooth edge along the door and conceals the edges of the siding boards. Cut car-siding boards to match the height of the door for the siding (E), and the siding filler strips (F). Measure the distance between the edging and subtract 1/4 inch from the overall width of the siding, this will allow the siding to install easier. To center the siding board pattern in the door opening (Project Diagram, Drawing 2) combine the widths of the five siding boards and mark equal amounts to be trimmed from the two siding filler strips (F) (Project Diagram, Drawing 2). Assemble the siding boards between the edging and secure them to the frame with 1-1/4-inch drywall screws. Use a scrap and mark a diagonal across the door going in the same angle direction as the crossbar. Use the line to position screws and drive to secure the siding boards to the crossbar.

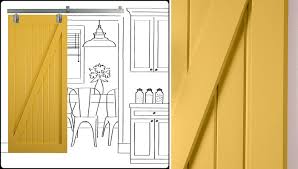
Tape around the area where you’ll notch the top of the door to receive the hardware. Mark out and cut the notches with a jigsaw (Project Diagram, Drawing 3). Position the roller bracket on the door, use the holes in the hanger to locate and drill holes for the bolts. Attach the hardware pushing the head of the bolts from the backside, and use the nuts and washers on the front. The rounded heads of the bolts protrude less on the backside preventing them from scraping the wall. Remove the hardware and sand any rough edges. If you are going to paint, apply a stain blocking primer prior to applying paint to seal any of the knots in the pine. Finish with the paint of your choice (Mark Twain House Yellow, #3011-3 shown). See More Sliding DoorsReplace AwkwardAwkward EntriesAwkward EntrySliding ModernDoors DetailedDoor ReplaceGain SpaceBarndoorsUpstairs BathroomForwardSliding barn door. Replace awkward entries and gain space in closets with sliding modern barn doors. Detailed instruction on how to install, what to buy and plans to build the door inexpensively.