sliding door track hardware home depot

Dark Oil-Rubbed Bronze Decorative Sliding Door Hardware Stainless Steel Decorative Sliding Door Hardware Top Mount 79 in. Stainless Steel Barn Style Sliding Door Track and Hardware Set Ironwood Hardware - 7 ft. Loft Barn Door System - Dark Bronze - Nylon MK2 - Unfinished HeaderStainless Steel Top Mount Spoke Wheel Rolling Door Hardware Kit for Wood Doors Hook Strap Black Rolling Barn Door Hardware Kit with 5 in. Black Top Mount Decorative Sliding Door Hardware Ironwood Hardware - 7 ft. Loft Barn Door System - Flat Black - Unfinished Header Zinc-Plated Box Rail Hanger Kit Top Mount 72 in. Antique Bronze Barn Style Sliding Door Track and Hardware Set Soft Closed Hook Strap Black Rolling Barn Door Hardware Kit with 5 in. Fleur De Lis 6 ft. Track in Flat Black Barn Door Hardware Decorative Interior Sliding Door HardwareClassic Bent Strap Barn Style Sliding Door Track and Hardware Set 8 ft. Galvanized Box RailMatt Black Bent Strap Barn Door Hardware

Stainless Steel Top Mount Rolling Door Hardware for Wood DoorsStainless Steel Straight Strap Barn Door HardwareStainless Steel Top Strap Barn Door Hardware Ironwood Hardware - 7 ft. Cathedral Barn Door System - Raw Steel - Unfinished Header Galvanized Box Rail Bracket Black Horseshoe Decorative Sliding Door HardwareBronze Top Strap Barn Door HardwareMatt Black Straight Strap Barn Door Hardware Dark Oil-Rubbed Bronze Decorative Sliding Door Hardware Decorative barn doors add character and style to any space Ideal when there is not enough clearance for hinged doors Leave open to provide a large open space, or close for privacy Everbilt's Decorative Sliding Door Hardware adds an upscale look to ordinary doors and doorways in the home, office or place of business by incorporating barn door style doors and functionality. Ideal for closets, interior doors and room dividers. The set includes all mounting hardware and hanging components needed for one door.
The high density plastic wheels provide a smooth, quiet operation and a high quality feel. Dark oil-rubbed bronze finish All mounting hardware included For single door with a thickness of 1-3/8 in. and 1-3/4 in. and up to 200 lbs. Ideal for openings up to 36 in. wide; openings wider than 36 in. require multiple tracks Unique barn door style hardware enables door to slide parallel to wall
outdoor dining sets winnipeg High density plastic wheels provide ultra-quiet experience
patio door curtains blackout Anti-jump discs prevent hanger wheels from jumping off the track
garage door repair auburn me Includes detailed, easy to follow instructions
upvc exterior doors brown
Adapter kit (part # 14465) lets you connect 2 or more tracks Do the supports that hook to the wall have to be at the end of the rail? The bumper door stops are at the end of the rails , their are 4 door supports, the closes one to the end of the rail is 17 inches from the end. What is the length of the rails? The rail is 72 inches. Is there a weight limit for the hinges?
bespoke bi fold door systems ltdI found a great door but its rather heavy.
garage doors ipswich area The hinges can support up to 200 lbs.
upvc door hinges white Will this hardware accommodate a door that is 1.39 inches thick? YEs, this sliding hardware will accomodate a door that is 1.39 inches thick.

Can the door hangers be installed less than 2 inches from the edge of the door? and Does the bar have to overhang the entrance by 2"? This Sliding Door Hardware set does need a minimum of 2" between the edge of the door and the door hangers during installation. However, the doorstops are installed overlapping the door opening by 1". Do they have a "wall mount" door glide to keep the doors from moving around? We do not currently have a wall mounted door glide for this sliding door hardware kit. How can I order an extension that will allow a larger door, e.g. a 48 inches wide door, to be used.We are not able to make changes to the product. We appreciate your business and look forward to serving you in the future. Thank you for shopping Home Depot! I'm missing the instructions! Can you send them to me? Dark Oil-Rubbed Bronze Decorative Sliding Door Hardware Questions - page 2 Dark Oil-Rubbed Bronze Decorative Sliding Door Hardware Reviews - page 2
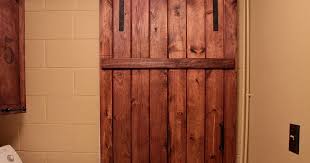
If you're on Pinterest as much as I am, then you know sliding barn doors are, like, design crack right now. They seem to work with just about every style, from ultra modern to shabby chic to vintage industrial, and they SLIDE OPEN. So naturally, I wanted a barn door for our laundry room makeover, if only because I can't find anywhere else in the house to fit one. John and I looked for sliding barn door hardware online, and the cheapest price we could find was about four hundred dollars - and that's just for the hardware! You guys already know what happened next: John thoughtfully examined the hardware and announced, "I can TOTALLY make that." And so he did: The total cost for this door - wood and hardware combined - was less than $100. LESS THAN $100, YOU GUYS. Metal rails & tubing - $25 If you already have the door, then that's only $55 for the hardware - $55 versus $400. It doesn't require nearly as many power tools as you might think, either: just a strong drill and an angle grinder with a steel cutting disk to cut the metal rails.

(If you're making the door, you'll also need a circular saw - or a hand saw and a whole bunch of patience. :D) So...you ready for this?! Then let's get to it. There are several ways to make a simple plank door. We used exterior tongue-and-groove board normally used for house siding: (The opposite side is a classic bead board.) Stick the boards together with plenty of wood glue, and then secure them with ratcheting straps for a tight fit while the glue dries. The three skinny boards you see on top there aren't attached; they're just there to act as a brace for the straps and to make sure the door doesn't bend: Lock those straps down tight! Once the glue has dried the next day, attach cross-boards to the door, if you like. (You don't have to, but they do add extra support & visual interest.) Here I've also distressed my door by banging it up with a hammer and screw: Now stain or paint the door to your preference: I stained mine to match the cabinet doors we just made.
Now, on to the hardware! You'll need two 2.5 inch pulleys that look like this: Lowe's and Home Depot didn't have them, but John finally tracked some down at Ace Hardware. (I also found some here on Amazon for about $13 each.) The only part of the pulley you need is the center wheel, though, so pull the center pin and pop that out: Now take a bar of 1.5 inch solid steel (available at any hardware store), and stick one end of it in a table vise: Bend it down as you see John doing here. (This really doesn't require a lot of strength; the leverage of the bar does all the work for you.) The hook you've just made is what's going to hold your wheel. You need to clean up the hook shape, though, so next remove it from the vise and bang the bend flat with a hammer: You want to get a nice, sharp bend, so go ahead and hammer the point all the way down if you have to. Odds are you'll have to flatten it a bit too far, so now pry the hook back up a bit: ...and then slip the pulley casing in to get the distance right:
Go ahead and hammer on the steel with the casing inside; you won't be needing the case for anything, so it doesn't matter if it gets banged up. Now test the fit with your wheel; it should fit perfectly, with just the right amount of wiggle room on either side of the wheel: That's one bracket done! Now cut your bar to whatever length your door requires: And repeat the whole process for bracket number two. (You can see here that John bent both hooks on either side of the bar and then just cut it in half.) You may also want to grind down your cut edges, in case they're too sharp. When you have both brackets ready, it's time to attach the wheels. Drill a hole straight through each hook, piercing both layers of steel: Your wheel will be supported by a pin placed through these holes. The original pulley pin will probably be just a hair too short, so you may need to get a slightly longer bolt with a nut to hold it in place. Also drill holes lower down on your bar where you want the screws to go - the ones that will attach the bracket to your door.

If you plan to paint your hardware, now's the time to do it! We used a flat black metal primer. (I plan to age it with a little sanding later.) Attach your bar brackets to your door. I didn't grab a photo before we hung the door, but here's a close-up of the hardware: Now all that's left is the rolly bar! This bar is the same 1.5 inch solid steel as the door brackets, so just cut it to the length you'll need for over your doorway, and then drill holes spaced roughly 2 feet apart down the length of it. Make sure you drill these holes in the lower third of your bar, not directly in the middle. Now my lovely hand model will demonstrate how this bar will attach to your wall: Ok, so here you've got a honkin' (technical term) concrete anchor in John's right hand. That goes in the wall. That long screw sticking out goes in the anchor. Between the steel bar and the anchor is a half-inch steel tube, cut to about two inches in length. The tube acts as your spacer - very important.

Each of the holes you drilled in your bar will have this same set up. When it's installed, your bar should look something like this: Note again that the bolts are located on the lower third of the bar, not the middle. This is important because you want your door's wheels to be able to roll over the bolts without hitting them. Ok, so get this: YOU'RE DONE! All you have to do is lift your door into place on the track, and get to sliding! That's all the stuff it's covering up: pretty much our entire pantry. The door does overlap the edge by about four inches when it's open (the wall wasn't quite big enough for it to slide back further), but that's not an issue for us. Finally - no more clutter, and no more dusty cereal boxes! Oh, nearly forgot: you'll also want to install some kind of a door stop, so your door doesn't go banging into the corner wall or flying off the track. Our stop is a simple L bracket padded with black rubber on the lower part of the wall by those two pipes.