sliding barn door square track
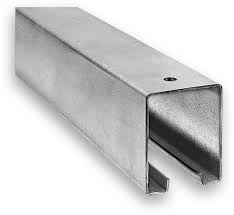
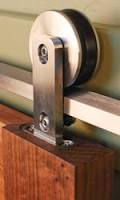
Company Contact Project List You are viewing the website. To change locations, choose a location below Home Designs by Stanley Rope & Chain Accessories Screen & Storm Door Hardware Track, Hangers & Sliding Doors Round Track from Cannonball is self-cleaning and the most durable, versatile track system available. Cannonball Round Track trolleys work in all Cannonball round track and come with steel or Delrin wheels. Most Round Track Hardware from Cannonball is compatible with all styles of Cannonball round track. Interior Track Sliding Door Systems Unique track systems for high aesthetics in the home, with classic funcitonality. Components that are needed for the proper use of sliding doors. Cannonball Square Track is an economical solution for lighter sliding doors. Cannonball Square Track trolleys are compatible with all Cannonball Square Track styles. Most Square Track Hardware from Cannonball is compatible with all Cannonball Square Track styles.

The requested URL /hardware-cat.php?page=sliding-hw was not found on this server. Sold by FLandB | Fine Linen & Bath and Fulfilled by Amazon. New (1) from $76.95 This item's packaging will indicate what is inside.Ship in Amazon box Rustic Road Barn Door Hardware Kit & Track Sliding System - Matte Black Steel, 6.5 Foot Rail, Pre-Drilled Rail Holes at 16"DetailsNational Hardware V171 6-1/2" Pulls in Black FREE Shipping on orders over . DetailsIron Valley - 4.5'' Cabin Hook - Cast Iron FREE Shipping on orders over . Classic Strap - Matte Black Rustic Road’s Classic Style Barn Door Hardware Kit features matte black steel hangers with a straight strap design that wraps over the top of the wheel, creating a beautiful flow that will accent any choice of door style. An ideal way to replace room doors, closet and pantry doors, or even divide a room, the addition of a sliding door can enhance both style and functionality to any space, whether in your home or business.
This set includes all mounting hardware for installation on wood (drywall over wood studs) as well as masonry. Supports doors weighing up to 200lbs. Steel Rail is pre-drilled with holes at 16” increments to accommodate standard wall stud spacing. Two sets of bolts used to attach the hangers to the door are included, one set for doors 1-3/8” to 1-1/2” thick and one set for doors 1-1/2” to 1-3/4” thick. 80.5 x 3.4 x 4.6 inches 4.8 out of 5 stars #17,436 in Home Improvements (See top 100)
french patio doors sacramento #462 in Home Improvement > Hardware > Door Hardware & Locks
hollow metal door frame wood trim 17.6 pounds (View shipping rates and policies)
car window repair lubbock texas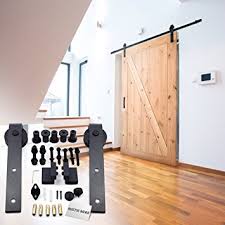
One Year Warranty Against Manufacturer Defects 5 star80%4 star17%3 star3%See all verified purchase reviewsTop Customer ReviewsGreat product. But this guide may help.| 6 foot double sliding door , true reclaimed wood.| Great product, well made and I do not think ...|My husband was pleased with how easy the hardware was to install| See and discover other items: 5 ft barn door hardware, thick door stopper, wheel stopper, sliding closet door floor guide SATURDAY Build the door (Steps 1-10).
garage door repairs hullSUNDAY Hang the door (Step 11-13)
sliding barn door square track Download and print the cut list.
2006 dodge charger door panels for sale Before you begin: Measure the width of the door from the outside edges of the casing, then order a hardware kit with a track twice that width.
garage door weather seal bracket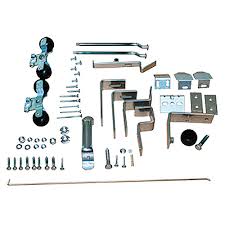
Cut List for Installing a Sliding Door Designed to cover a 30-inch-wide opening with 4-inch casing on either side, this door measures 38½ inches wide by 2¼ inches thick by 83½ inches tall. 1x6 pine boards for the back: Cut the boards ½ inch shorter than the height of the opening to allow the door to pass over the floor guide. 1x3 strapping for blocking: Cut a length the width of the work surface; ours measured 48 inches. Then cut the rest of the board into blocking. 1x5 pine for the filler strips: Cut three rails the width of the door; ours measured 38½ inches. Then cut four stiles to fill between the rails, completing the upper and lower panels of the door. Our stiles measured 35 inches long for the upper panel and 34 inches long for the lower one, to create the 1-inch channel for the floor guide. Pallet boards: About 60 boards at least 24⅜ inches long, mitered to parallel 45-degree angles on each end to fit. 1x6 cedar for face frame: Cut two stiles the height of the door;

ours measured 83½ inches. Then cut four rails to span between the stiles; ours measured 27½ inches. Edge-glue and clamp two of those rails together to make the bottom rail. Rip 2 inches off one edge after the glue dries. 1x4 pine for the mounting rail: Cut it to match the track length; ours measured 77 inches. For our 30-inch-wide opening, seven 16s spanned the casing perfectly; you may need to rip the pine boards to width. Measure from the floor to the top of the door casing, then cut the boards ½ inch shorter on a miter saw. Gang the boards side by side, place the blocks along the outside edges, and use long bar clamps to cinch them together. Square up the assembly with longer strapping at the top and bottom edges. Screw the blocks and strapping in place, and remove the clamps. Use a miter saw to cut the 15 filler strips according to the cut list. Add adhesive and set the top rail flush along the top of the boards; adhere the upper stiles below it, flush to the outside edges, and the middle rail below them.

Add the lower stiles and rail, leaving a 1-inch channel for the floor guide that contains the door. Drive a 1¼-inch deck screw through each strip into each 16 it crosses. Use a straightedge to mark a centerline down the door's two inset panels. Set the miter saw to 45 degrees and cut one end off each pallet board. Starting at the top rail, butt the mitered ends of two pieces of similar thickness and color together at the centerline, forming an arrow. Use a combination square to mark the boards about ⅛ inch short of where they overlap the stiles, as shown. Miter the pieces to length, then dry-fit them. Repeat, one chevron at a time. For the boards that hit the corners, use the combination square to mark where the piece overlaps the stile and the rail. Cut the two angles on the miter saw, as shown. After installing the longer pieces, fill the rest of the pattern with scrap, cut to fit. With the chevrons dry-fit in both panels, lift out one pair of boards at a time, apply panel adhesive to the undersides, and press them back in place.

Using a pneumatic nailer, tack the boards in place with 1¼-inch brads, one near each corner of each board. Repeat the process, adhering and nailing each pair of boards as you work down both panels. At the miter saw, cut the cedar according to the cut list. Arrange the pieces rough-face down covering the filler strips. Clamp a pocket-hole jig at the end of a rail, even with one edge, and use the kit bit to drill a hole. Reset the jig along the other edge and repeat. Drill two pocket holes at each end of the upper and middle rails, as shown, and three at each end of the wider bottom rail. Tip: For the strongest bond, spread glue on both edges of the joint and drill the pocket holes in the rail so that the screw grabs the stile's edge grain. Apply wood glue to the ends of the rails and the adjoining edges of the mating stiles, then clamp the frame together. Drive the screws provided with the kit into the edges of the stiles at each pocket hole, as shown. Remove the bar clamps.

Attach the Face Frame Gently remove the face frame and set it aside. Apply panel adhesive in a zigzag pattern along the filler strips. Bring the frame back to the table and orient it rough-side up, hiding the screws. Lay it in place, as shown, and align it along all four edges. Tack it down with 1¼-inch brads every 8 inches or so. Rub On the Finish Lightly sand the entire door with 100-grit paper to knock down any splinters. Use a cotton rag to rub a liberal amount of paste wax into the wood. Center the rolling hardware on the width of the cedar stiles. It may help to remove the wheels first. Mark the screw locations, drill pilot holes into the filler-strip edge with a ⅛-inch bit, then screw the hardware in place, as shown. Replace the wheels and slip the track into their grooves. Measure between the door and the track to determine how high above the casing to mount it—¾ inch for this hardware. Attach the Mounting Board At the miter saw, cut a length of 14 equal to the length of the track.
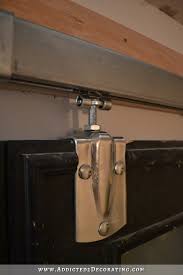
We painted ours to match the wall. Use a stud finder to locate the framing and mark locations above the head casing. Level the mounting board above the casing and drill pilot holes through it and into each stud with a ⅛-inch bit. Secure it with 3-inch deck screws. Measure ¾ inch above the casing and mark two spots on the mounting board. Hold the track flat against the board, with its bottom edge at the marks. Using a 2-foot level, check that it's level, then mark each lag bolt location on the board. Set the track aside and drill 5⁄16-inch pilot holes at each mark. Thread a lag screw through one hole and a standoff and tighten it—not all the way—using a ⅜-inch socket wrench. Ratchet the rest of the lags in place, then go back and snug them all up. Roll the Door On Install a doorstop at one end. With a helper, hoist the door onto the track and slide it to the stop. Install the other stop. Position the L-shaped floor guide so that it contains the door in both its open and closed positions.