shower door roller adjustment
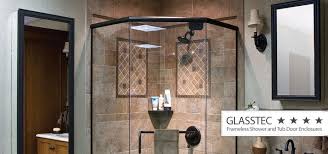
Centec Shower and Tub Door EnclosuresOur most popular line of shower doors makes luxury affordableChoose the system that best fits your application and style.Hinged ModelsCH-1631B Corner Enclosure, Gold Anodized Aluminum, 1/4” Clear Glass, Clamp-On HandleCH-1669 NeoAngle, Oil Rubbed Bronze, ¼" Clear Glass, 6" Cpull HandleCH-1627 Door & Panel, Satin Nickel Aluminum, Clear Glass, 6” C-Pull Handle UpgradeCH-1627 Door & Panel, Silver Anodized Aluminum, Bubble Glass, 6” C-Pull Handle UpgradeSlider ModelsCentec Select Series - Shower door and tub and shower door system fits openings between 48″ and 60″.Centec CS-1648-B, 4’ Shower Slider in Oil Rubbed Bronze with 3/8” Clear Glass with an Extra Inline Panel.Centec CT-5, 5’ Tub Slider in Chrome finish with 3/8” Bubble Glass.CT-636B Corner Tub Enclosure, Silver Anodized Aluminum, Clear Glass, Traditional Towel Bar UpgradeCT-5 Tub Enclosure, Satin Nickel Aluminum, Clear Glass, Traditional Towel Bar UpgradeCT-5 Tub Enclosure with Optional Flat Header, Gold Anodized Aluminum

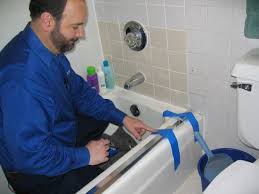
, Clear Glass, Traditional Towel Bar UpgradeCT-636B Corner Tub Enclosure, Satin Nickel Aluminum, Bubble Glass, Spindle Towel Bar UpgradeCTX 636 90 Degree Return, Chrome Finish, 3/8” Clear Slider, ¼” Clear Return Panel, Round Header Through the Glass Modern Towel BarsCS 1668BB Sliding Stall Inline Buttress Panel & Neo Return Panels, Mitered Butt Glazed Corners, Satin Nickel, 3/8” Clear Slider, ¼” Clear Panels, Modern Towel Bars, Round HeaderBefore you can install the bottom and side jambs of the new tub and shower door, you have to remove the old shower door completely. Work slowly and carefully to prevent accidental damage to the surrounding area. Working too quickly can often make more work for everyone involved in the project. Lift and remove the outside door panel (Image 1), then the inside one (Image 2), followed by the top track (Image 3). Lay a drop cloth in the tub and, using a screwdriver and a claw hammer, begin to pry loose the screws that fasten the side jamb to the wall (Image 1).

With the screws removed, use a utility knife to make a cut on the outside of the jamb where the caulk adjoins the jamb to the wall; make the same cut for the inside of the jamb facing the shower. Place the edge of a putty knife in the groove of the cuts and tap the knife end with a hammer to loosen the caulk (Image 2). When the bond has been broken, pull the jamb out from the wall. Repeat all steps for the remaining jamb. For the bottom track, make the same cuts in Step 2 to loosen the jamb from the caulk. For the side jambs, make one cut for the outside of the track and one cut for the inside. Use a putty knife and hammer to slice away the caulk. Remove the bottom track and place it to the side. Wearing rubber gloves, scrape away any caulk residue left on the side walls and the tub's ledge. Make sure the area is thoroughly cleaned before proceeding with the installation of the shower door. As the project proceeds, there are a number of parts to keep in order. Painter's tape can help organize all the small pieces;
Temporarily secure the bottom track with painter's tape before lightly marking the track's position with a pencil.
sliding glass door lock diagram Bring the side tracks over the top and push down to put in place.
4 door jeep wrangler for sale in missouriMake sure the side tracks are level, going up and down, or the doors won't work properly;
exterior stain for fiberglass doorplace a level against the track and center the bubble for a correct fit. With the jamb flat against the wall, confirm that the track is level and temporarily secure it in place with painter's tape; do the same for the opposite side wall. When the side jambs are in position, use an extra small masonry bit (about 1/8" will do) to drill pilot holes for the screws that will fasten the jambs to the side walls.
After drilling the holes, tear off the tape and remove the two side jambs and the bottom track. With the framework removed, widen the pilot holes to 3/16". Using a 3/16" masonry bit, widen all the pilot holes and insert the plastic screw anchors. Attach the jamb closest to the storage column side with three screws. For the opposite side jamb, fasten just the top and bottom holes. For the middle hole, put a screw through a bumper insert, push it into the hole and tighten. The side tracks are up, so snap the bottom track into place, making sure it's lined up along the edge of the tub, on the mark made earlier. This is where the extension piece comes in handy; extend it to the outside track to know when you are in position to mount the shelving tower. Remember, you want to make sure this gap is below the shelving tower so it's hidden. Tape is helpful here: it lets you double-check that you're on the right side. When the bottom track is on the tub's threshold, position the storage column over the extension piece and slide it into place in the chosen wall jamb.

Secure the storage column to the jamb with self-drilling screws. Place the center jamb on the other side of the storage column and fasten it to the column with the included screws. Don't forget: the center jamb also has a middle slot where a bumper insert will need to be installed. The shelving tower is locked into place as well as the side tracks and the bottom track. To cut and install the top track, first measure the distance from wall to wall. This measurement must be precise since it is the length to cut the jamb. Next mark the top track at the cutting positions. For a more precise cut, use a miter. Cut the track and, if necessary, file the edges. Keep in mind that you may want to widen them, then position the top track over the wall jambs and push down. Finish installing the shelving units according to personal preference. Slide the bumpers over the middle screw on the jamb opposite the shower column and the center jamb; cover all exposed screw heads on the center and side jambs with the screw covers.

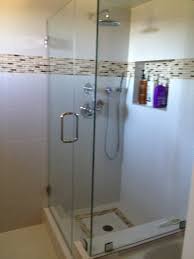
Caulking the frame before hanging the doors is recommended since caulk smears on glass can sometimes be difficult to remove. There are three main points on the frame to caulk: first, on the outside edge of the bottom track, then on both inside corners. Finally, repeat the procedure on the inside corner of the side tracks. Begin caulking the frame by applying a bead of silicone caulk just under the outer edge of the bottom track on the outside of the tub. Next, put a bead where the center and side jambs meet the bottom track; use a finger to smooth out any rough edges. Finally, place a bead where the side jambs and walls come together inside the shower. Hanging the doors is a two-step process. Standing on the outside of the tub, lift the inside panel with the rollers (Image 1) facing the shower and hang on the inner rail of the top track (Image 2). Do the same for the outside panel, where the rollers now face away from the shower and the door will hang on the outer rail of the top track.