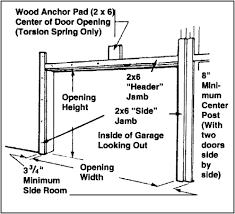
garage door hinge shims

> > Common Door Frame Issues & How to Repair Them Common Door Frame Issues & How to Repair Them A malfunctioning door, especially if it is a main entry door, can be quite a hassle. Problems involving sticking or difficulty getting the door to latch properly can make coming in and leaving the house a chore in itself, never mind if you’re trying to carry groceries or a small child! Sometimes, the door frame is the culprit in this situation. Instead of sanding down part of the door itself, you may simply need to realign or otherwise alter the frame. Quick Door Frame Repair While door frame repair is not always a simple task, in some cases, the fix is a relatively easy one. Binding, for example, is often caused by the door frame settling or an out-of-plumb hinge jamb. To fix a binding door, install a shim under the top hinge, if the bind is near the bottom, or under the bottom hinge, if the bind is near the top. If the door hinge jamb is not plumb, shim under whichever hinge will cause the door edge to hang truly vertical.
Built-up paint can cause this problem, and simply needs to be cleaned out. To install a shim, support the door, remove the hinge jamb screw, and cut thin cardboard to fit into the mortise, under the hinge flap. Replace the screw, driving them through the cardboard into the jamb. Door Frame Repair or Replacement If your door frame is old, putting in a shim might not be an effective tactic. Old wood door frames can warp over time and cause the door to bind or swing open when you don’t want it to by hindering latch function. In this scenario, it might be a good idea to simply purchase and install a new door frame instead of repairing the old one. To compare, see the average door installation cost. If this is happening on a newly installed door frame, you may be able to send it back to the manufacturer to have it repaired or replaced. Need to find a pro for your door frame repair? Aesthetic Door Frame Repair Sometimes door frame repair is meant to enhance form rather than function.

Removing old door frame trim (sometimes referred to as “molding” or “casing”) and replacing it with a different style can make a dramatic difference in the look of the door, and the room or wall the door occupies. Removing and replacing trim is a relatively easy operation, but requires some patience if you want to keep the surrounding paint intact. If a single section of trim is damaged and you want to replace it, it is likely that you’ll be able to find a matching piece of trim at a home improvement store.
garage door repair southamptonEven if the trim you’re replacing is very old, many classic styles are still available.
garage door installation puyallupYou’ll probably be able to find a matching replacement easier than you think!
cheap lambo door kits for sale
Door Frames and Foundation Issues If you have only one door that is misaligned, chances are that door or door frame repair is going to solve the problem. If you notice, however, that many of your doors and windows seem to be misaligned, you could have bigger problems. One of the classic symptoms of an unstable foundation is the sticking and binding of doors and windows around the home.
upvc window and door factoryThough this problem can be attributed to several things, noticing a series of misaligned doors and windows definitely warrants a professional inspection.
auto glass repair covinaThe requested URL /Detailed%20Garage%20Door%20Installation.htm was not found on this server.
personalised door mats studio
Additionally, a 404 Not Found error was encountered while trying to use an ErrorDocument to handle the request.Doors & Windows > How To: Install a Prehung Door Prehung doors can make your life much easier, but you still need to know a few essentials in order to get the job done right. Doors come in countless different sizes and styles—from modern, flush interior doors with standard dimensions to massive, traditionally designed entryways. By comparison, there are dramatically fewer installation methods; in fact, there are only two. A door is either prehung in its own jamb, or it’s not. Installing a prehung door is considerably less complicated, but that doesn’t mean there’s no sweat involved. The following tips can help you avoid common setbacks. - 2-1/2-inch finish nails - Hammer and nails (or nail gun) It’s no problem to stray somewhat from the steps outlined here, but remember that no matter the techniques used, the goals always stay the same: Get the door jamb level and plumb;

keep it flush with the drywall surrounding it; and maintain a uniform 1/8-inch reveal (the space between the door and the jamb). When you set out to install a prehung door, begin by measuring the rough opening into which you are placing it. The opening should be one or two inches larger than the door itself. That wiggle room enables you to shim the door, bringing it to the level-and-plumb position critical to proper functioning. Set the door into the rough opening. Has flooring not yet been installed beyond the threshold? In that case, shim beneath the door jamb to account for the height that will be added once the floor’s installed. Next, make sure the hinge side of the door is plumb, meaning perfectly vertical. Having checked that the door is still centered within the opening, stabilize it by adding shims to both sides, near the top. Check the alignment using a level. If the door’s plumb, hold the hinge side so that it’s flush with the adjacent drywall, then nail into the jamb at the point behind which you added shims.

Go on to place shims in a few more positions along the hinge side; check level once more; then nail through the jamb wherever you shimmed. Close the door and confirm that its top portion is level. Don’t waste time reaching for a measuring tool, though, if you notice the reveal isn’t uniform between the door and the jamb. That’s a sure sign things are amiss. Make adjustments by shimming the latch side of the door. Shim less when there’s too little reveal; shim more when there’s too much of one. Continue tinkering until the reveal along the top is uniform. On the latch side of the door, bring the jamb flush to the adjacent drywall. The reveal ought to be 1/8-inch here; if it’s not, then adjust the shimming you have added already near the top of the door on this latch side. Once finished, nail through the jamb where you have shimmed. Now place additional shims six inches from the bottom of the door, as well as above and below where the strike plate will go. So long as the reveal remains uniform, proceed to nail the jamb at each position where you have added shims.