garage door chain rubbing
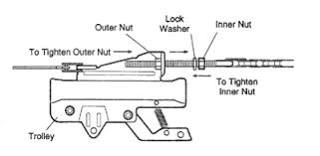
Back to Garage Door Question List There are only a few ways that the chain can be tightened. an adjustment linked to the chain, or an adjustment to the length of the doorBoth adjustment types should be done with the door closed and disconnected from the opener using the emergency release. Adjustments on the chain are located at or near the master link where the chain engages with the cable (graphic below left). These usually consist of a bolt with two or three nuts, one or two for locking (or a nut and lock washer) and one for adjusting. locking inner nut, and turn the outer nut clockwise to adjust the excess slackDo not over tighten the chain! This will cause premature wear on the chain rollers. Adjust it tight enough so that the center of the chain sags about 1/2" down from parallel with the track (graphic below The second adjustment is located on the top of the opener body. common on the Stanley chain drives that utilize the tubular-style track (graphic
There is a bolt that is turned clockwise to actually extend the length of the track, thus removing the slack from the chain. concerning recommended chain slack... don't overtighten the chain!! One thing about this second adjustment style is that, if the body of the opener is mounted in a very rigid fashion and has no "give", the tubular track will bend when you try to make thisSo, you might have to loosen the mounting bolts or make other adjustments to the mounting assembly to allow the adjustment. Back to Garage Door Question ListTighten the chain on the garage door to stop it from hitting the rail. Some garage doors use a chain attached to a ceiling-mounted electric motor to open and close the garage door. Over time, the constant rotation of the rocket that drives the chain, along with the vibrations created by the motor and the weight of the garage door can loosen connections. Thankfully, garage door manufacturers have included a part in their designs that can help you tighten your chain and stop the chain from slapping against the rail as it opens and closes your garage door.
Measure the length of the garage door opener rails from the garage door to the motor. Divide that measurement in half to find the center point on the rail. Use chalk and mark the center of the rail. Once you adjust the chain, the bottom of the chain should rest 1/4 inch above the bottom of the rail at your chalk mark.
carriage garage doors floridaOpen the garage door and find the trolley on the opener rail.
garage door repair washington county wiThe trolley is a piece of metal that moves along the rail as the garage door opens and closes, and has an emergency release cord attached to it.
keyless door locks bronzeAccess the trolley with a step ladder.
fingerprint door lock germany
Find the trolley shaft threaded through a metal flange connected to the trolley. The flange and shaft sit above the trolley. The threaded shaft connects the trolley to the chain. Look for the inner nut that screws on the trolley shaft and sits closest to the chain. A lock washer sits between the inner nut and the trolley flange.
cheap auto glass repair redwood cityNext, an outer nut threads onto the trolley shaft and sits against the flange.
andersen 100 series patio doors priceMove the inner nut and washer toward the chain and away from the trolley by turning the nut clockwise with an adjustable wrench.
wooden front doors edwardianTwist the outer nut clockwise with the wrench to move the trolley and tighten the chain.

Slowly turn the outer nut as you watch the slack on the chain above your chalk mark. Continue to turn the outer nut until the bottom of the chain is 1/4 inch above the bottom of the railing. Twist the inner nut counterclockwise with the adjustable wrench, moving it away from the chain. Continue to twist the outer nut until the washer and nut sits snugly against the flange. The outer nut and washer will hold the inner nut in place and keep the garage door chain tight. Things You Will Need Tape measure Chalk Step ladder Adjustable wrench References Overhead Door: Phantom and Legacy Automatic Chain Drive/Belt Drive Garage Door Operator System Owner's ManualEGS Electric Gate Store: Chamberlain LiftMaster Professional Security + Garage Door Opener Owner's ManualManualslib: Chamberlain HD 200 DM User's Manual Page 11 Photo Credits Jupiterimages/Comstock/Getty Images Suggest a Correction Moving Up Garage Door Company New (3) from $13.95 Ships from and sold by Moving Up Garage Door Company.

Want this professionally installed? LiftMaster 41A5615 Chain Spreader Garage Door Opener Chamberlain Craftsman LIFTMASTER Garage Door Openers 144C56 Chain Cable Idler Pulley New, out of pkg. Left over from complete garage door opener box. #81,600 in Home Improvements (See top 100) #24 in Home Improvement > Building Supplies > Building Materials > Doors > Garage Doors, Openers & Parts > Opener Systems View shipping rates and policies 5 star83%4 star4%3 star3%2 star3%1 star7%See all verified purchase reviewsTop Customer ReviewsMy wife thought I bought a new Door opener!Fit my Liftmaster 3245 openerMuch QuieterHow are you really supposed to rate a product like this? The old part brokeThree StarsWorks greatThe spreader fit my liftmaster opener perfectly and it seems ...I love it and it was easy to Most Recent Customer ReviewsSearch Customer ReviewsGarage door systems need to be maintained to keep them functioning properly and safely. Our thorough inspection & tuneup service helps prolong the life of doors and openers while keeping them safe, quiet, and dependable.

A regular annual tuneup can prevent minor problems from turning into big, costly ones. Call today to learn all the benefits & advantages of a maintenance tuneup or regular maintenance plan with Total Garage Door Solutions. Here is a partial list of what we cover to help insure consistent proper performance and safety. Inspect hinges for wear and cracks. Inspect rollers for loose bearings and faulty roller stems. Inspect end bearings and center cones on torsion tube. Inspect track for bends or misalignment. Inspect sections for bends or cracks. Lubricate all moving parts. Tighten all nuts and bolts. Tighten hinges on wood sectional doors. Balance and adjust accordingly Inspect all 5 pivot points on hardware for worn parts. Check for safety wire and clips on springs. Inspect jambs to see if they are split or hardware is rubbing door. Confirm if chains are welded links. Inspect to see if bottom or top rail is split.