front door red paint valspar

FREE SHIPPING ON QUALIFYING ORDERS $49 OR MORE Prices, promotions, styles, and availability may vary. Our local stores do not honor online pricing. Prices and availability of products and services are subject to change without notice. Errors will be corrected where discovered, and Lowe's reserves the right to revoke any stated offer and to correct any errors, inaccuracies or omissions including after an order has been submitted. Valspar Door and Trim Spanish Tile Semi-Gloss Oil-Based Enamel Interior/Exterior Paint (Actual Net Contents: 32-fl oz) Item # 760530 Model # 410.0015352.005 for pricing and availability. Durable oil enriched enamel Resists scuffs and scratches Soap and water cleanup No sanding or priming needed Indoor and outdoor application Actual Net Contents (Fluid Oz.) Maximum Coverage Area (Sq. Feet) Number of Coats Recommended Minimum Temperature for Use (Degrees) Maximum Temperature for Use (Degrees) Paint and Primer in One

Recommended Sprayer Pressure (PSI) Recommended Sprayer Tip Size For Use on Barn and Fence For Use on Concrete For Use on Decks For Use on Porches and Floors For Use on Siding For Use on Stucco For Use on Swimming Pools For Use on Window Shutters For Use on Aluminum For Use on Doors For Use on Fiberglass For Use on Garage Doors For Use on Metal For Use on Vinyl For Use on Wood Community Q & APainter QuotedDuramax Paint1Day ProjectCoats It SValspar DuramaxRed ValsparVestibule RedoValspar Premium40 VsForwardMy new Red door. Yesterday I decided to try my hand at repainting my front door. I used Valspar Duramax Paint+Primer in Heritage red. It only took two coats. It's a very easy 1day project at a coat of $40 vs the $545 a painter quoted me.How To: Paint an Exterior Door Follow these steps for painting an exterior door to increase curb appeal and update your home inexpensively. Share your take on this idea!

Upload your photo here. Sometimes, all you need to do is complete a small, inexpensive update to fall in love with your home all over again. By painting a front door a vibrant color, you get the most bang for your buck and it's easily changed for future updates or owners. Get our FREE front door color chart! How to Paint an Exterior Door High-density foam mini rollers and brushes 1 quart adhesion primer 1 quart satin or semigloss exterior paint (Valspar's Sassy Green is pictured) 1. Remove the door and place on sawhorses outside or in a well-ventilated area. Tip: Allowing your door to properly dry between coats may mean letting it dry overnight. Screw a piece of cut-to-size plywood into existing hardware holes to cover the door opening if necessary.) 2. Remove the hardware and hinges. Cover any glass accents or windows with painter's tape (right). 3. Clean the door by scrubbing the surface with a wet sponge (right), then lightly sand the surface.

4a. Apply adhesion primer to the door using a foam roller (right). 4b. Use a foam brush to paint any raised or depressed panels (right). 5. Using the same technique, apply paint, starting at the center and ending with the sides (right). Apply a second coat for a flawless finish. 6. Hang the door and reattach hardware. Ideas to Boost Curb Appeal Foolproof Front Door Colors Trend Spotting with BHG: Front Doors Curb Appeal Tips: Ranch Home Ideas Explore Exterior Colors with My Color Finder
window dressing for bifold doors 20 Ways to Add Curb Appeal
garage door repair mount vernon wa Quick & Easy Exterior Fixes
used external doors sheffield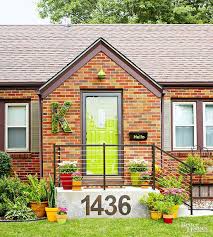
Valspar HouseValspar PoshRed ValsparValspar PaintValspar Red Paint ColorsValspar LowesFront Door Paint ColorsRed Front DoorsThe DoorsForwardRed Front Door - paint color - Posh Red, Valspar. Not the kick plate, I like the number on the doorFaucets HardwareBrass FaucetsBrass DoorknobsKitchen Cabinet HardwareKitchen CabinetsRefinish Brass FixturesRedo Light Fixture DiyHow To Paint A Light FixtureMetal Door MakeoverForward#14. Use Rust-Oleum to paint outdated brass faucets, hardware and fixtures!
rv entry door 26 x 80-- 27 Easy Remodeling Projects That Will Completely Transform Your Home |
garage door opener jaguar Well, I promised a how-to on painting doors, and I’m here tonight to tell you lucky ducks how it’s done.
upvc doors direct co uk
Hold on to your seats, this is probably the MOST exciting post you will ever read. I showed you my front door transformation here: I also painted the inside of that front door months ago, and I showed you that project here. I’ve painted a few doors in my day, and there’s a few things I’ve learned along the way. Hopefully this post will help you if you decide to do the same! OK, so the first thing you’ll want to do is test to see if your current paint is oil-based or latex paint.
car window repair suffolk vaI’m not sure about interior doors, but I’d be willing to bet most exterior doors are oil-based. The thing is, you can paint oil over oil and latex over latex, but not latex over oil. But, I don’t do oil-based paint. I just don’t – latex is SO much easier to work with. Oil takes longer to dry – and that was the kicker. I didn’t want to take the door off the hinges and I knew I’d need to shut it (at least a few times) during the process.

Oil-based would make that harder to do. Not to slam oil paint though -- it is probably best for an outdoor surface. It holds up great! But I wanted to stick with my latex, so I needed to do a couple steps first. To make sure the door was painted in oil, like I thought, I used denatured alcohol: You’ll just need a bit – rub some on the door with a rag, and if the paint comes off, it’s latex. If it doesn’t, it’s oil-based paint. I knew once I tested it that ours was the latter. Because of that, I needed to prime with shellac-based primer: I use BIN for just about everything now – it is VERY thin and it goes on easily because of that. It’s stinky – so make sure to ventilate the area you’re working in. I love it because it dries CRAZY fast – so it is perfect for a door. And an impatient do-it-yourselfer. When it comes to doors, I have a plan of attack that works for me – it cuts down on brush marks: This is my method – I have no idea if this is the right method.

I start with the areas around the panels by using a good angled paint brush: The folks at Purdy sent me a set to use and I was in heaven. I used the 1.5 inch angled brush for the little insets in the door: Purdy brushes are the best – hands down. And I’m not saying that cause I got a set. I love them and use them all the time! The BIN primer is so thin, you don’t have to worry too much about brush strokes: I didn’t take the hardware off to paint the back of the door – I just taped around it and it worked out pretty well. I wish I would have taken if off, but that’s a whole other post. I finished up the door with the primer and let it dry: I use a small roller for the raised panels and the area around them. (Steps 2, 3 and 4 on the pic above.) I started the same process again with my black paint. I use Black Suede from Behr for all of my black paint projects and LOVE it: My friend Kate has mentioned to use Floetrol to cut down on brush strokes:

I used it about half way through, and it was weird -- I didn’t notice a difference at all: (One side had it, one didn’t – I’m pretty sure the left didn’t and the right did.) I added the exact amount it called for, but it didn’t help much, as far as I can tell. I will try it again though. It sounds like it (usually) helps tone down brush strokes quite a bit! Even with the tinted primer (I have my BIN tinted a tad), it still took a total of THREE coats to get it completely covered: But it was SO worth it. So worth it, in fact, that I am going to try out a few more black doors inside. When I did the front of the door, I made sure to clean it really well before starting: I just used my cleaning wipes, and then wiped it down with a damp towel after that. I also took off the hardware between coats: I left them off as long as possible after each coat, but you’ll see later why I had to keep putting them back on. I believe I took that hardware off about 15 times.

I used the same process with the primer as the inside, and if there were any brush marks, I just knocked them down a bit with some sanding between coats: Then…my lesson in reds started. I don’t know what lesson I learned, other than the one I already knew. Get a sample of your paint! Paint it on a poster board, then hang it on your front door. I started with a random match to a red that had the word “brick” in it – and it was not brick. It was more of a corally orange. I never knew what coral-orange was before, but this is it: The photos don’t do it justice. It looked like the entrance to a seafood restaurant. Because I got the paint at my local True Value, I got it mixed in an exterior Porter paint. And because I had a Porter paint nearby during this debacle, I went to them to see if they could adjust it: I found a Porter color that was more what I was thinking. The Porter guy was SO helpful and spent a good 20 minutes adding to it, (for FREE!), and he got it to the “new” red – a color called Brick Dust.

Brick Dust was more like Pink Sunset Dust: It was at this point that I was about to give up and live with a pink front door. These were just first coats, so they would have darkened and deepened with more coats – but I just knew they weren’t right. So I gave it one more try – this time I started from scratch. I checked out the Martha Stewart colors from Home Depot and found The One – Chocolate Cosmos:The brick red I was after from the start! I normally use small sponge rollers to paint doors and furniture: But for some reason the Behr paint I used for the exterior side (I had the Martha Stewart mixed in exterior Behr) was SUPER thick. I don’t know if it was because it was exterior or what, but it was acting all wonky. I ended up doing a final coat in a mini version of a regular 3/8 inch nap roller: That size works great for the panels on the door, and the thicker nap covered much better. I’ll be using that again for the future doors.The most exhilarating post yet.