exterior door threshold insert
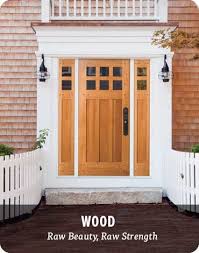
Choosing an exterior door for your home, business or organization is one of the most important factors in keeping your building secure, stylish and energy-efficient. Reeb® carefully selects and stocks a product mix guaranteed to fulfill any design requirement. Check out our in-stock exterior doors catalog or this piece on understanding exposure types for more. Fiberglass doors combine the best characteristics of wood and steel with the latest technology to create a premium entryway that is secure, weather-resistant, energy-efficient and stylish. Authentic wood doors feature unmatched options for customization and the raw beauty and warm feel that can only be achieved with real wood. Steel is an excellent option for a low maintenance, cost effective door that is also energy-efficient, secure and won't crack or bow. It's also the most popular way to fulfill fire-rating needs.Logs IdeasTree Stump IdeasCabin IdeasTree Stump DiyTree Log IdeasWood Stump IdeasTree Trunk IdeasCabin Decorating IdeasIdea TreeForwardWhat a fun & inexpensive way to dress up your backyard, and get some much needed seating too ...

HomeProductsCatalog & CAD LibrarySpec HelpSales AgenciesNewsContact Us Catalog and CAD Library Use the tools below to find a specific page or part, or download a PDF or CAD drawing of a part. You can also find catalog pages by expanding the table of contents sections below. 1. Select a section to begin: Automatic Door Bottoms/ Sill Protection
wooden front door fitters Fasteners & General-Purpose Products
fly screen door spares Fire & Smoke Protection - Intumescent
peephole for front door Control Systems & Applications
affordable windows and doors newton
2. Choose how to view: Single PageTwo-Page Spread (requires flash viewer) 3. Click the go button: By Keyword or Phrase Download the entire catalog to save or print. Search by ANSI/ BHMA # to find Zero Part PDF Catalog Table of Contents Accessories13Adjustable8, 9, 10Bulkhead11Butt & Transition12Carpet Divider4Expansion Joint & Covers10, 11Floor Closer Threshold3Handicap1, 2, 3, 5, 7, 12Interlocking13Rabbeted5, 6Ramp7, 12Rubber4, 10, 12Thermal Break2, 3, 4, 6Traction Tread™9Utility1, 2, 3Water Return13Wheelchair Shower 14
white internal doors cork Automatic Door Bottoms1, 2, 3, 4, 5Automatic Door Bottom, Electrical5Automatic Door Bottom, Lead-lined3Door Sweeps6, 7, 8, 9Door Sweep with Intumescent8End Caps, Locking Key5FLO Option4, 7, 8
garage doors in bridgewater nj
Anti-Bacterial Gasketing - BioWall™(BIO)16Glass Door Weatherstripping17, 18Head & Jamb, Adjustable Seals2, 3Head & Jamb, Contact Seals4, 5, 6, 7, 8, 9Head & Jamb, Interlocking Seals10Head & Jamb, Magnetic Sealing4Head & Jamb, Spring-Loaded3Head & Jamb Protection, Intumescent5Kerf Mount Weatherstripping8Ligature-Resistant Gasketing (ZAG)21Meeting Stiles 11, 12, 13, 14, 15Mullion Application20Self-Adhesive Weatherstripping9Sliding Overhead & Hangar Doors22Strike Plate/ Door Closer Mounting Brackets3, 10Water Shed/ Rain Drip10Wood Doors/ Wood Frames19
garage doors ipswich area Cam Lift Hinge1Continuous Unigear Hinges2, 3, 4Continuous Hinge Options4Mortise Hinge1Door Holder, Heavy-Duty Spring Recoil6Barrel-Type Unipin Continuous Hinges5 Weatherstripping - Double-Hung, Casement1, 2Weathercheck, Sash Pulley, Chain1 Anchors2Double Coated Foam Tapes1Magnetic Strip1Screws, Thru Bolt3, 4, 5, 6
Acoustical Louvers4Pairs of Doors - Sound Trap3Single Doors - Sound Trap2Sound Barrier Sheet8Sound Control Systems - Single & Double Doors9Sound Control Technology - Sound Trap1Structural Acoustics, Floors and Walls6Vision Lites4, 5Wall Insulator System - Sound Trap7Windows and Curtain Wall Partition5 Door Solutions1, 2, 3Firestopping Applications6Glazing Tape5Intumescent Lock Packs/ Hinge Pads5Intumescent Technology7Louver Solutions4Smoke & Draft Control System3Specialties - Auto Door Bottom5Specialties - Fire Block, Fire Bolt5 Directional Signs, Door Kits2Door Hardware Marking4Exit Door Kits2, 4Floor Demarcation Lines4Head & Jamb, Sill Marking4Stair Marking3Stairway Marking System1"Traction Tread" Glow3 ADA Access System1Air Infiltration Systems & Testing2Communicating Doors5Doorlite Systems - Slimport Metal Vision Frames3EMI/ RFI Systems4Equipment, Hotel Room Doors5Gasketing for Exterior Doors6Gasketing for Non-Latching Doors7Gasketing for Residential Doors6Hurricane Protection, Water Infiltration8Radioactive Dust Protection9"Safe-Haven" Room Gasketing8Sliding Hangar Doors, Overhead Doors11Sliding & Pocket Doors10

ADA Access System1Antibacterial Gasketing – BIOWall2Automatic Door Bottom/ Electrical Actuator4Concealed Door Bottom, Easy Access4Doorlites – Slimport Metal Vision Frames5Dust Plug, Self-Adhesive6EMI/ RFI Protection7FLO Option Door Sweeps8, 9Finger Protection2, 10, 11Flood Barrier Shield12Intumescent Fire Block13Intumescent Fire Bolt14Ligature-Resistant Gasketing – ZAG 3Lead-Lined X-Ray Protection5Radioactive Dust Protection15Security Control16 Regulatory Standards1Physical Properties2Air Control Systems3Sound Control Systems4 ^ Top of Page ^ you are seeking has been moved or renamed, or maybe no longer exist. If you are looking for our free courses and other free education resources, simply go to the welcome page of Free-Ed.Net. Use college navigation system to locate your course or study program, and then adjust your Of course we regret the inconvenience this has caused you.THE wide board called the sill, which is visible beneath the narrower threshold in an exterior doorway, receives much wear and frequently develops rot.

Mildly decayed sills can be repaired by using two-part wood hardener and filler. Worn and badly decayed sills must be replaced. Begin replacing a sill by removing the door from its hinges. Also remove the threshold, either by prying it up if it is wood or by removing the screws that fasten it to the sill if it is aluminum. Save the threshold for reattaching, or get a new one. If the door frame is old, it is a good idea to brace it so that it does not move while you are taking out the old sill and installing the new one. Should the frame be disturbed, the door may bind or rub when rehung. To brace the frame, first cut a length of 2-by-4 lumber to fit between the door jambs (the sides of the frame). Then place it a few feet from the bottom of the doorway and drive a wedge between one end of the brace and the jamb to hold it securely. Examine the sill carefully. If it appears to extend beneath the jambs - what you are seeing in most cases is the sill fitting into a groove in the sides of the jambs - pry off the strips of doorstop molding before proceeding further.
Use a wide-bladed putty knife or scraper, followed by a flat pry bar. Start by inserting the putty knife or scraper into a seam near one end of a strip and gradually prying it away from the jamb along its entire length. Then insert the pry bar and wide-bladed tool together into the seam and repeat the process. Hold the bladed tool against the door jamb and use it to protect the wood of the jamb from the fulcrum of the pry bar. To remove a sill that does not extend below the jambs, it is usually possible simply to pry it up with the pry bar. If this can be done, try to remove the sill in one piece so that it can be used as a pattern for making the new one. To remove a sill that extends beneath the jambs or into grooves, either saw it crosswise into three sections and then remove the sections by prying and twisting, or use a chisel to split the sill lengthwise into inch-wide strips. When removing a sill or section by prying, it often helps to raise the piece slightly;

then flatten it again by striking it with a hammer. This leaves the heads of nails in the piece projecting enough so that they can be gripped by the pry bar or hammer claws. Nails that cannot be withdrawn while removing a sill must be cut off flush with the framing below, using a hacksaw. Blade-holders that grip a hacksaw blade at one end and allow sawing in tight places are available at hardware stores. For the new sill, obtain a piece of sill stock from a lumberyard. Sills are usually made of oak or fir, and come shaped to standard dimensions. You will have to saw the sill to length and cut notches at each end that conform to the contours of the door opening. If you can, trace around the old sill by setting it on top of the new stock. If the old sill was sawed into sections, those at the ends can be used as patterns and the space required between them measured and marked onto the new stock by using a yardstick or framing square. If no part of the old sill can be used, you will have to create an outline for the new sill by measuring the length and width of the opening into which the old sill fit.

Make a cardboard template by using the measurements and trim it until it fits easily. Then trace the outline of the template onto the new stock. Cut the new sill carefully, using a handsaw. When finished, the sill should resemble the shape shown herein. Slide the sill into place to test the fit. Tap it gently with a hammer, if necessary, but do not strike hard blows. If the sill does not fit smoothly, remove it and trim it with a plane, sharp chisel, wood rasp or file. When the sill does fit, mark it in two or three places near each jamb for installing nails. To avoid splitting the wood, pre-drill holes for these by removing the sill and drilling through it with an electric drill and a drill bit slightly smaller than the nails you plan to use. These should be 8- or 10-penny (2 1/2 or 3 inches long) galvanized finishing nails. Drill the holes at an angle pointing toward the ends of the sill. Brush or vacuum the area beneath the sill free of debris and grit before installing the sill permanently.
Also, apply a generous bead of caulking compound to the surface as weatherstripping. Slide the sill into place and nail it securely. When nailing, be careful not to mar the jambs by accidently striking them. Remove or relocate the brace installed earlier, if it is in the way. When the nails have been driven to within a half-inch of the surface, use a nail set to drive them beneath the surface approximately an eighth of an inch. Fill the holes with waterproof wood putty, then sand the areas and apply paint or clear finish to the wood before reinstalling the threshold. When replacing doorstop or other molding strips, remove the old nails and attach the strips with new nails to avoid damaging the wood. Withdraw the old nails from the back side of the molding by gripping their pointed ends with pliers and levering them out. When installing the new nails, use a nail set to sink the heads below the surface. Then fill the holes with wood putty, sand the areas smooth and apply paint.