wooden front door fitters

Offering The Largest Selection Of Doors Based in Dudley, CJ Smith Doors are proud to offer the largest display of doors in the area. Whatever your project demands, from external hardwood doors to internal pre-glazed classics, CJ Smith Doors have everything all under one roof, having celebrated 50 Years of continued success! Stockist Of All Fixtures, Fittings & Hardware Here at CJ Smith Doors we have a vast range of door furniture, fixtures and fittings from all the leading manufacturers. Our collection of handles and accessories is of the highest quality and available at extremely affordable prices for both trade and retail customers. Fitting Service Available On All Doors CJ Smith Doors not only offer in-store free and impartial expert advice on every product we sell, but are also provide a fitting service on all our doors, so after you have chosen your door, why not sit back and relax and let the experts not only deliver your door, but fit it too. Stairs, Worktops, Sectional & Sheet Timber
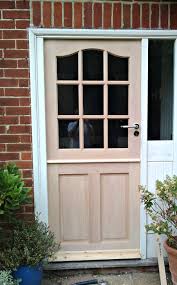
To compliment the core business, CJ Smith Doors also offer a range of associated products including stair parts, worktops, sectional and sheet timber, ironmongery and all associated fixtures, fittings, hardware and finishing products all under one roof, so no need go elsewhere.Slightly different to a normal exterior door, hanging a stable door is more than twice as much work as hanging a single door. The door itself is made up of two halves, a top and bottom leaf that can be opened together or top first. Apart from stables they are also found in country and period style homes and cottages too, and some nice glazed versions are available like the one I'm hanging here. As mentioned there are two leafs to hang, one top - one bottom. There is also two weather moulds, a door handle with a mortice lock, a bolt to hold the doors' to each other and bolts or locks to hold each one closed as well. There is a reasonable amount of work involved so I always allow plenty of time to get these

The door in this instance opens inward and the bottom needs to be rebated over the weather bar.
maytag french door ice maker problems Before starting anything though, I measure the height inside the frame from top to bottom, the doors combined height needs to be around 7-8mm less.
sliding patio doors vancouverThere will be a 3mm gap top and bottom, and another 3mm gap in between. (I know that makes 9 but I like to have a couple of mm spare in case the head or bottom needs to be scribed in). The rebate on the bottom half of the stable door needs to be exactly the same depth as the weather bar protrudes up out of the frame. In this instance it was 12mm so the rebate will be 12mm tall.Before setting out the rebate on the bottom of the door, make sure the door is the right way round and the rebate at the top of the door is facing the right way.

The tallest part of the rebate needs to face the outside, so the upper leaf of the stable door will hold the bottom closed. The bottom should not be able to open unless the top is open! To cut the rebate you can use a circular saw with a straight edge, a router with straight cutter and fence attached or as I did in this case a Dewalt plunge saw with guide rail. Lay the stable door flat and set the fence or straight edge so the saw will cut the same height as the weather bars height above the cill. The depth of the blade/cut can be worked out by measuring from the front edge of the frame back to the front of the weather bar, and adding aBefore cutting, use a stanley knife to score the narrow edges of the door to prevent tearing the grain out when the saw blade comes out the end ofIf using a circular saw, score the whole width of the door with the stanley knife too. Once you've made a few cuts with the saw, clean the rebate up with a chisel and sandpaper before trying the door in the frame.

Use small wedges and a spirit level on top of the door to position it perfectly square and level in the frame before marking anything that needs to be scribed or planed off. Mark the hinge positions on the bottom leaf of the stable door as around 50mm down from the top, and 150-200mm up from the bottom. Chop the hinges in exactly as you would a normal door. There should be a perfectly equal margin all the way round each door, including in between each leaf of around 3mm.When the bottoms hung and I sit the top on to mark it, I use 3mm packers or some cardboard in between the two halves to pack the top door up the right amount. If the gaps aren't tight, especially the join then it's likely a draft will get through. Once both halves of the stable door are hung, It's time for locks, bolts and handles. The bottom is held closed by the top door but it still needs locking as well. In this instance a normal 5 lever mortice lock and handle with escutcheon plates was installed on the upper leaf.

I also fitted a barrel bolt from the top door to the bottom one to lock the two together so they could be opened as one. Another barrel bolt was installed on the lower door to hold it closed independently of the top door. And I fitted a pair of rack bolts like theselike these one top one bottom for extra security. Both leafs of the door need a weather mould. Water will run down a surface until it reaches the lowest point, at which it drips. moulds have a groove machined into the bottom (called a drip) that gives a moulding it's 'lowest point'. When the water reaches the groove it will drip off instead of running further - and eventually ending up inside. To fit the lower weather mould, I cut it 20mm wider than the gap between the frame. Then, close the door and hold the offcut in position (flush with the bottom of the door) and mark the shape of it on the frame. To remove this I use small chisels as it's normally too close to the cill to use a router. The picture on the right shows the drip mould on the top door.