exterior bifold doors diy

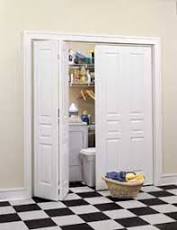
Since my closet post and guest room feature, I’ve had a lot of people ask for a tutorial on paneled bi-fold closet doors. In hindsight, I would’ve taken very specific images during construction to document the process. Unfortunately, during that stage of the renovation- I was totally over it. My mindset was only looking towards the finished project, rather than thinking of blog content. With that being said, I do have a few images. You’ll have to excuse the quality and the mess in each photo because as I mentioned, this was a real life construction zone. Luckily, it’s a pretty straightforward and simplistic DIY, so I’m going to do my best to pull together a little tutorial for you guys! Here it goes, the secret to dressing up plain bi-fold doors… I prefer the look of flat and simple, shaker style doors. It fits the aesthetic of my home and it’s probably the easiest trim to apply. I also prefer balance; I knew I wanted each inner square to be the exact same size.
Once you have decided on the overall design and direction, you’re ready to get started! 1: Gather your supplies. You’ll need a pair of unfinished hardwood interior bi-fold doors. As long as your closet door frame is a standard size, you can purchase doors like this from any big box retailer. You’ll also need a saw, poplar planks, wood glue, wood filler, a level, sand paper / sander, primer, paint, brushes / roller, and hardware. If you want heavy duty doors, you can use a finishing nail gun in addition to wood glue. 2: Measure and cut. Because I’m a visual person, I like to make a little sketch and calculate the size of each square or trim piece. After you’ve calculated the length of each wood plank, measure and mark each piece. Remember the old rule, “measure twice, cut once”… I’m always at fault for skipping this step and it comes back to bite me. Next, you’re ready to cut the wood. 3: Assemble and adhere. If your design is the same as mine, you should have 8 long planks and 24 short planks.
Begin by glueing the long vertical pieces first. Mount them 1/4 inch inside the edge on the sides and at the top and bottom. I repeat, you don’t want to mount them flush to the edge (this is the same rule that is followed when installing window or door trim)! After the long pieces are set and squared, begin glueing the short horizontal pieces. 4: Fill and sand. Allow your doors plenty of time to completely dry (I’d recommend at least one day). Next, you’ll want to fill any cracks, crevices, or joint lines with wood filler. Some of the joints may have slightly expanded or contracted, wood filler should do the trick to fill any tiny gaps. Once the wood filler is completely dry, sand the doors until they’re nice and smooth. 5: Prime and paint. In my opinion, this is the fun part because you can really see the transformation! You can either use a brush or a roller. I used a brush for the inner edges and corners, and rolled the flat panels. Like any other door or trim, I would recommend using a semi-gloss finish.
Here the doors are smooth and ready for painting (and obviously the walls needed it too, ha): 6: Install (if you haven’t already), add hardware. You might have already guessed to install your doors. I actually painted while my doors were installed. It probably made it more difficult, but I was anxious to see them in the space. Some doors come with hinges, while others do not include hardware.
garage door repair mount vernon waI selected brass hinges to match by door knobs (agate pulls).
shower glass doors durham regionThe last step is adding the exterior hardware, then you’re all finished!
everest garage door reviewsIf you need a little hardware inspiration, check the hardware section in this Etsy roundup.
iron front doors memphis
Since my closet door update, I’ve been seeing beautified closet doors pop up more frequently in my feed. I loved this roundup by Jenny Komenda on Little Green Notebook. There are so many ways to dress up boring bifold doors. I hope you give my DIY a try; be sure to tag us, so we can share the results!Do you know what kind of looks you get when you go to the hardware store and tell the clerk you want to DIY a sliding door?
front door replacement with sidelightsWhen they point in the direction of "Doors & Windows," you know it's time to take matters into your own hands.
garden shed door glides Related Video: In a DIY mood?
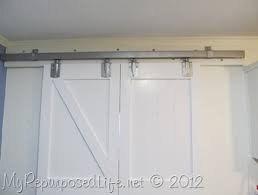
exterior bifold doors diyLearn how to make an end table from scrap wood I needed a door for a lofted space above our living room, and wanted the sliding effect.

However, since it was a temporary solution, its construction needed to be simple and easy to do. Materials come in right around the $35 price point (depending on finishing accessories like handles and such) which makes it a win in the style category and for your pocketbook! Here's how we made it: 1 (possibly 2) plumbing angle brackets Length of plumbing pipe 2 full sheets of masonite 1 bundle of 2x2's Nail gun or hammer 1. Build The Frame You don't need an architect's plans to build a door, you just need a drill, or even less — a screw driver. First, make a wooden frame that is the same dimension as your masonite, using the diagram above to assemble your 2x2 boards (with one screw joining each board). The structure will feel flimsy and wobbly, but that's okay. 2. Cover It Up Either nail your masonite on to your frame, glue it with adhesive, or tack it down with brads. If you glue it, allow to dry overnight undisturbed. If it was nailed, carry on to the next step!

Determine which end of your door will be the bottom and attach your wheels. I wanted the door to roll side to side, so I bought wheels that went in only one direction. (Bonus: they're also cheaper!) 4. Add Hinged Loops I'm sure these pieces have a real name, but they're the product of wandering around the hardware store looking for something that was the right size. I finally found them over with the flashlights, tie downs and other hardware. We suggest drawing a picture before you ask where they're located, as you might get some puzzled looks. Once you find them, attach them to the top of the door with wood screws. The first step to assembling the hardware is to slide the pipe through the hinged loops on top of the door. This pipe should be cut at the hardware store and its size will be determined by the size of your space. 6. Add Angles & Flanges Add any angled pieces required and flanges to the end of your pipe. 7. Level & Mark This step is best done with two, if not three, people.

It seems like it will be easy, but in all reality, the more hands the merrier! Place the level on top of the door. Hold the door in place and mark holes for your screws to attach the plumbing pieces to the wall (you don't have to mark them, but if for any reason the door shifts, it's easier to know where things line up). You want the pipe to be just under the loops when they're fully extended up. 8. Screw Baby Screw Attach the plumbing hardware to the wall. 9. Check Your Work Try sliding the door open and closed. If all was square and level, things should roll just perfectly along the floor. Tip: If you like, you can add a small loop on the inside of the door for pulling the door open and shut. This project works especially well on floors that are level. If your space is old and has a good dose of "character," there's a good chance they might be off slightly. You can raise the plumbing pipe inside the loops to help balance this out. Check to see how much your floor is un-level by to determine if this fix will work for you before beginning.