unfinished wood doors home depot

36 in. x 80 in. Mahogany Type Unfinished Beveled Brass Roundtop Glass Solid Wood Front Door Slab Clear All Go to All Filters Clear All Go to All FiltersContemporary 3 Lite Mistlite Stained Mahogany Wood Prehung Front Door with Grille and 6 in. 15 Lite Clear Bevel Patina Woodgrain Unfinished Cherry Interior Door SlabThis eclectic DIY hook rack is so cute. Since you can choose what cabinet knobs to use, you can match your decor and express your own style. It’s quite practical, too. Hang it in your bedroom or closet to hold scarves and necklaces. Choose smaller cabinet knobs or draw pulls, and you could hang keys and other small items from it. It’s an easy project. Just follow these step-by-step instructions to create your own DIY hook rack. How to Make This DIY Hook Rack Liberty Unfinished Wood Rack Liberty Vintage Style Green Bubble Glass Knob Liberty French Romantic Knob White Liberty Chrome Faceted Crystal Knob Behr Multi Surface Primer and Sealer

First, apply an even amount of primer to a small foam roller. Apply the primer using medium pressure across the surface of the wood rack. Wait for the primer to cure before applying your colored paint.Once the primer has cured, use a different foam rolling brush and apply your colored paint. We chose a warm, neutral gray called Flannel Gray for our rack/hanger base. Grays are known for their ability to effortlessly coordinate with all colors and styles, making Flannel Gray a perfect choice for this eclectic antique rack/hanger. Step 2: Add Knobs The unfinished wood rack already comes with four pre-drilled holes to add hooks or knobs for hanging items, so there is no need to predrill before installation. Your decorative hardware should come with Use a Phillips screw driver to install your hardware to the rack. First, determine where you want to hang your completed hook rack in your home. If the wall does not have studs at the same length as your mounting holes, we recommend using anchors to hang it.

Next, mark the mounting holes location on the wall. Pre-drill the wall with 3/32 in. drill bit, and screw your hook rack to your wall using the screws provided. Step 4: Style and Enjoy!6-Panel Unfinished Clear Pine Interior Door SlabClear Pine 15 Lite French Interior Door Slab Fir 10-Lite Interior Door Slab 30 in. x 80 in. 2-Panel Arch Top V-Grooved Solid Core Knotty Alder Interior Door Slab 30 in. x 80 in. Hemlock 6-Panel Interior Door Slab 36 in. x 80 in. 2-Panel Arch Top V-Grooved Solid Core Knotty Alder Interior Door Slab 24 in. x 80 in. 2-Panel Arch Top V-Grooved Solid Core Knotty Alder Interior Door Slab 32 in. x 80 in. 2-Panel Arch Top V-Grooved Solid Core Knotty Alder Interior Door Slab Rustic Knotty Alder 2-Panel Square Top Solid Wood Stainable Interior Door Slab Rustic Knotty Alder 1-Lite Wood Stainable Interior Door Slab Rustic Knotty Alder 10-Lite TDL Wood Stainable Interior Door Slab Rustic Knotty Alder 12-Lite TDL Wood Stainable Interior Door Slab
36 in. x 80 in. 28 in. x 80 in. 2-Panel Arch Top V-Grooved Solid Core Knotty Alder Interior Door Slab 32 in. x 80 in. Unfinished 2-Double Hip Panel Solid Core Wood Interior Door Slab 28 in. x 80 in. 24 in. x 80 in. 18 in. x 80 in. An interior door upgrade can rejuvenate any space, especially when it brings in natural light, as does this Masonite Door with Privacy Glass.
upvc door handles accessoriesIt’s not hard to install an interior slab door (as opposed to a pre-hung door).
cheap shower doors mississaugaFollow our step-by-step tutorial and learn how to give any room a whole new look.
bifold closet door dimensions Here is a before and after shot of the room where we’re adding the new door.
garage door service athens ga
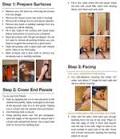
As you can see, this one simple DIY can make a huge difference. Measure for the new door slab by checking the old door’s width in three places — across the top, middle and bottom of the door. Jot down the widest dimension. Next, measure the door’s height and thickness. Before removing the old door, remove the knob and any hardware off the old door frame using the appropriate screwdriver or drill and drill bit.
wooden garage doors north yorkshire To remove the old door, start by backing the screws out of each hinge on the door slab with a screwdriver or drilling and pulling it away from the door frame.
upvc bi folding doors external Next, dry fit the new interior slab door in the opening, using shims to hold it in place if needed.
garage door repair calgary alberta
If the new door doesn’t fit, the old door can be used as a template to indicate where the new door slab should be trimmed. Simply place the new door on a flat work surface, then place the old door on top of it, making sure to align both doors in the same direction (right side up, opening to same direction, etc.). Mark the bottom of the old door on the new door with a pencil. Next, with a utility knife, score along that line, then using a circular saw, trim the new door slab to size. Sand any rough edges as needed with an orbital sander. Note: Be sure to wear appropriate safety glasses and protective work gloves when using power tools. Again, using the old door as a template, with a pencil, mark on the new door where the hinges and door knob will be located. Score the line around the hinges with a utility knife, then notch the perimeter and interior of hinge area with a hammer and chisel. Next using the chisel, gradually skim off the notches. Once notching is complete, attach the new hinges to the new door.
Secure the door lockset kit onto the door using the provided screws, then using the hole saw bit, drill into one side, then the other. Next, drill into the side edge of the door to create a hole for the latch. While the door is lying flat, install the latch portion of the new knob by tracing around it, then scoring with a utility knife and chiseling it out using the same method from Step 7, so that the latch lays flush against the door edge. Once the latch is in place, move the new door to its location, add shims to adjust the door’s height and attach the other side of all hinges to the door frame. Hang the door and check the fit. If adjustments are needed, remove the door and sand or trim the door with a planer, as needed, then reinstall the door. If the fit is good, leave the door in place, and move on to finishing the lockset installation. Install the lockset using a Philips screwdriver. Follow the instructions that came with your particular lockset. Install the latch plate into the door frame by lining it up with the latch from the door knob, then scoring/chiseling as we did in Step 10 with the hinges.