sliding screen door gasket

Truck & Tool Rental The Home Depot Logo DIY Projects & Ideas Flooring & Area Rugs Lighting & Ceiling Fans Model # B 705 Bug Seal, 3/4 in. to 1-3/8 in. Wide, 7 ft. Black Vinyl This bug seal is constructed from black vinyl. It features a flexible design that can adjust from 3/4 to 1-3/8 in. This seal helps prevent insects from crawling under your screen doors. Adjusts from 3/4 to 1-3/8 in. I just submitted a question concerning obtaining a longer length of bug seal the Model # was incorrect it should have been 202604608 A Home Depot associate can show you our model number B-658, but there is a slight difference in dimensions from the B-705 model number. For additional questions regarding this item, or any other product manufactured by Prime-Line Products, please call their toll free number at (877) 649-9740, or contact them by email at info@primeline.net How do you adjust how much to trim Hello Len, and thank you for your inquiry regarding this item from Prime-Line Products.
You can measure the distance from the edge of the sliding screen door, to the surface of the araea to seal. Or, you can install the seal, then mark where you want to trim off, making sure the width of the piece to remain will seal the gap intended to protect. Can this be used on the bottom of the door or is it meant for the side? This seal was meant specifically for your vertical patio screen door edge.
door locks for arthritisAs far as I know, there is nothing made for what you want.
made to measure bi folding doors internalYou'd have to rig something self-adhesive.
tilt garage door sealLook at the weather stripping that is self-adhesive and comes in a roll.
garage door repair tampa bay
On my door there are 2 adjustment screws along the bottom, and 2 more along the top meant to raise or lower the door and center it in the opening. I'm no expert, so I had to play with these screws until I got the gap lessened and the door still slid, but it can't ever be perfect. Smaller insects can still come in. How do you put it on? You need to examine your door. Does it have a groove? If so, measure that opening carefully and precisely. The seals come with precise dimensions on the package for that reason: they fit certain doors only. After you have cut it to the height you want, just push it into the groove from the top of the screen on down.. Wide, 7 ft. Black Vinyl Reviews - page 2E/O 1 in. x 7 ft. Brown Replacement Foam Kerf Door SealPlatinum White Collection Door Weatherstrip Replacement E/O 2-3/8 in. x 36 in. Brown Aluminum/Vinyl Ex-Wide Door Sweep White Security Door Seal Kit E/O 17 ft. Magnetic Door Seal Replacement KitPlatinum Collection Door Weather-strip Replacement in Beige

1-1/2 in. x 17 ft. White Primed Wood and White Thermo Plastic Door SetWhite Cinch Door Seal Top and Sides (5-Piece) Black Security Door Seal Kit 2 in. x 1 7/10 in. Brown Door Corner SealsWhite Door Weatherstrip Corner Seal 1-1/2 in. x 17 ft. Brown Primed Wood and Brown Thermo Plastic Door Set 3/4 in. x 5/8 in. x 84 in. Brown Elite Lifetime Door Weatherseal ReplacementWhite Elite Lifetime Door Weatherseal ReplacementBrown Cinch Door Seal Top and Sides (5-Piece) 72 in. x 96 in. Flat Profile Door Jamb Bronze Weatherstrip KitRestroom Stall Door Privacy Cover (2-Pack) Copper Security Door Seal Kit Weth-R-Strip 1 in. x 84 in. Vinyl and Pine Moulding Weather Strip Navajo White Security Door Seal Kit 2 in. x 7 ft. Door Stop and Weatherstrip Magnet-Stop Magnet Door StopFlat Profile Door Jamb White Weatherstrip Kit Set your store to see localavailability Find Andersen® window & door replacement parts through our online Parts Store or by using our Parts Catalog to identify part numbers, descriptions, and dimensions to order your part quickly and accurately.
To speak with an Andersen representative regarding product service, contact us at 888-888-7020. Our Parts Catalog can be used when you need to identify an Andersen replacement part for an installed window or door. Find part information on 80 years of Andersen products. Get part numbers, descriptions and dimensions that will help you identify and order parts quickly and accurately. Get details including size charts or grids, product detail, illustrations, part numbers, descriptions and dimensions that will help you identify and order parts quickly and accurately. Created for building professionals and homeowners, these documents can be used when you’re attempting to identify an Andersen replacement part for an installed window or door. Contact the retailer, builder or distributor who supplied your product, or contact Andersen directly at 888-888-7020 to place an order for your parts.Product identification, installation guides, care & maintenance, and moreAndersen has the answersClick here to learn about VeriLock Security Sensors and Wireless Open/Closed Sensors
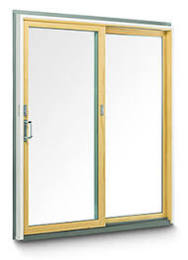
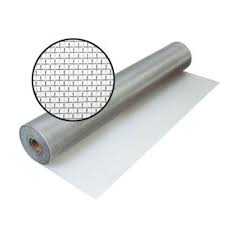
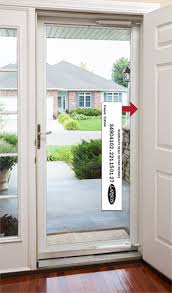
A patio door is a great way to bring the spaciousness of the outdoors into your home. And with its sliding screen, you can enjoy fresh air without inviting in a variety of airborne pests. As for routine maintenance, there's little more to do than keep the track and rollers clean. That is, until someone accidentally tears the screen.Most modern screen doors consist of a lightweight aluminum frame across which fiberglass screening material is stretched. While fiberglass is an economical choice, it doesn't take much to punch a hole in it. The good news is that a damaged screen is easy to replace and you'll find all the materials you need at your local hardware store.Before your shopping trip, slide the door back and forth and check for broken parts. If the door doesn't slide easily, vacuum all dirt from the track and try again. If it's still sticky, add new rollers to your shopping list. To remove the door from the frame, simply lift it up and pull the bottom edge away from the track.When you replace a damaged screen, there are two things you need to become familiar with, fast.

After the screen itself, the most important material is the spline--the narrow rubber tubing that locks the screen in a groove around the frame. Spline comes in various diameters--with some sizes differing in diameter by only 1/64 in.--and matching your new spline to the old is important. Then, you'll need a spline-installation tool. This pizza-cutter-like device has a roller at each end. The convex end forms the screen in the groove, and the concave end presses the spline in place.What to BuyWhile almost all home centers and most hardware stores stock rescreening supplies and universal door hardware, doors from some larger manufacturers may require specific replacement parts. Anderson, for example, sells replacement hardware for its doors at The Home Depot. However, if your door is from a smaller, regional company, generic parts will most likely work. If you're replacing your door's rollers, bring an original along so that you can find the right match.Buy enough screen to overlap the doorframe by about 2 in. on each edge.

You'll also need a new spline (which holds the screen in its groove) if the existing one is brittle or breaks, and a spline-installation toolRemoving the ScreenA sliding screen is supported on rollers that ride in a track. Lift it until the rollers clear the track. Then, pull the bottom out and lower the door until it clears the top edge of the frame.Step 1: Remove the Handle Remove the door handle to provide unobstructed access to the screen. If the handle is damaged, this is a good time to replace it.Step 2: Use an Awl It's common to find a separate length of spline on each side of the frame. Use an awl or pick to catch the end of a piece and pry it up. Try not to damage the spline--if it's not broken or brittle it can be reused.Step 3: Remove the Spline Grab the screen spline with your hand and gently pull upward to remove it. Repeat the process for the other spline segments.Step 4: Remove the Rollers To remove the rollers, carefully pry them from the edge of the door with a screwdriver.

On some doors, you may have to depress a spring clip to release each assembly.Step 5: Installing New Spline If you're installing new spline, use scissors or a knife to cut it to lengths that fit in the frame grooves. Make sure that the diameter of the new spline is the same as that of the old material.Step 6: Align Replacement Screen Lay the replacement screen over the doorframe. Align one edge of the screen with the outside edge of the door to ensure that the screen is square to the frame.Step 7: Convex Roller Beginning at one corner, use the convex roller on the spline-installation tool to press the screen into the groove on a long edge of the doorframe.Step 8: Concave Roller Use the concave roller on the tool to press the spline into the groove. Apply gentle pressure and angle the tool slightly toward the outside of the frame to avoid tearing the screen.Step 9: Pull it Tight Step 10: Trim the Excess After installing all of the spline, use a sharp utility knife to trim the excess screen.