sliding closet doors hit each other

5 Panel Barn DoorDoors BarnPainted Barn DoorsDoors PanelBarn Door HardwareDoors RusticTrim DoorsDoors WindowsSlide Barn DoorForwardOur 3-Panel barn door is a more contemporary twist on the popular 5-Panel barn door. Uniformity and structure that works well with with almost any setting.Bypass Closet DoorsBarn Door Closet DoorsBypass Barn Door HardwareSliding Barn Door For BedroomBypass Barn DoorsBedroom Closet DoorsMaster BedroomDual Sliding Barn DoorsDouble Closet Barn DoorForwardPerfect for what I have in mind. Need two doors that bypass one another but that operate on an overhead track (rail).Mission Arts Crafts StyleCraftsman Mission Arts CraftsCraftsman Arts Crafts BungalowCraftsman ArtsandcraftsstyleBungalows Craftsman ArtsCraftsman HousesCraftsman Mission StyleBungalow YoCeltic CraftsmanForwardKurt Schwenk and Michael Boruszewski restored their Craftsman house in Pasadena, California. In the living room, above, they employed Mission-style furniture and created a wood chimney breast with a copper-tile fireplace surround imbuing the space with “a warm, intimate feeling,” notes Boruszewski.
5 Stylish Space-Saving Door Alternatives You know how in some small spaces doors are like, always in the way? If you own your home or have an open-minded landlord, consider one of these four easy ways to replace a standard swinging door to reclaim a little extra space for your small home.
upvc door panel manufacturers uk 1. Hang a curtain
front door suppliers in birmingham Take that door down completely and replace it with a curtain on a tension rod or some other curtain hanging hardware.
solid oak doors high wycombeThis will allow you more furniture arranging options around the opening, without a swinging door getting in the way.
garage door won't open light flashing
It's particularly great for closets and other storage areas, but do keep in mind that curtains don't have the same sound-blocking abilities or privacy that doors do, so think twice before replacing say, your bedroom's door if you live with roommates. This one spotted on Design*Sponge.
timber sliding door gear (Image credit: Flax & Twine)
used hangar doors for sale 2. DIY a beaded, 70s door hanger
upvc door handles no lock Similar to a curtain, this also involves removing the door completely. (And of course, if you rent, these door-removing ideas only really work if you have a place to temporarily move or store your door if your landlord's going to want you to put it back when you move out.) But unlike a heavy curtain, these are a little looser, let light through, add pattern and movement and in general just provide a touch of visual dividing.
Learn how to make one today at Flax & Twine. 3. Install a DIY pocket door Those with the skills and the tools might consider replacing their standard swinging door with a stylish and sleek pocket door. Eliminating the swing means gaining more flexibility with where and how you arrange your furniture in a small space, but the pocket door still provides some pretty good noise-blocking and privacy options. Learn how to make your own here: C.R.A.F.T. (Image credit: Hannah & Brandon's "Ever Evolving" Classically Modern Reno) Who says you have to put anything back after you take a door down? Lots of older, quirky houses tend to have doors in odd places, like in a hallway. And if you change the function of a certain room — say change a bedroom into a den — you just might not need a door or any visual covering at all. This example spotted in Hannah & Brandon's "Ever Evolving" Classically Modern Reno. (Image credit: DIY Home Decor: How To Make a Sliding Door for Under $40)
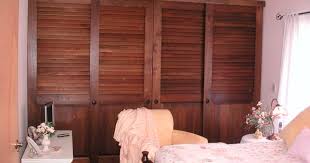
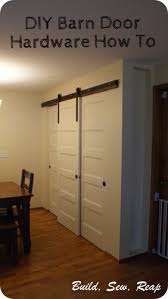
5. DIY a sliding barn door And of course, there's the famed $40 sliding farm door project! This one can replace a standard swinging door like the other examples (though unlike a pocket door, you'll have to make some allowances for the slide of this door around your furniture arrangements). But also this is a great divider option for small spaces, too. Have you replaced your doors in your home with something else to save space or for some other reason? Why did you replace them, and what did you replace them with? Share your secrets in the comments below!As you'll recall, I recently added a pantry to our dining area (the closest area to the kitchen) and I wanted it to look better than your average boring pantry or closet. The opening is 81 inches wide so instead of doing 2 huge closet doors, I opted for three smaller standard doors that I picked up from a local building materials recycling company. I also wanted all three doors to roll to one side or the other so I could get to the maximum sized opening possible when I need to access the food inside.
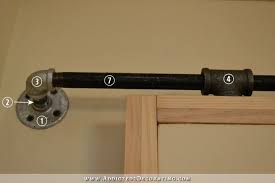
The easy part of the project was attaching the two back doors which are each 28 inches wide. I used a standard closet track system and followed the instructions in the box. I did buy a nice one knowing it would be used many times daily but it was available at my local Home Depot so this should be easy for you to acquire. Let's start with just the track setup. My track is 96 inches long, I wanted it to run wider than the actual opening of the pantry. 1 - 8 foot long 1x4 stain-grade lumber 6 - 4 inch long screws that match the stain on your wood 2 pieces of 4 feet by 1 1/2 inch by 1/4 inch steel (Lowe's or Home Depot). NOTE, this must be 1/4 inch if you're going to use the same garage door pulley I'm recommending. Of course, if you can get an 8 foot long piece that's 1 1/2 inch by 1/4 inch thick, go for that instead. 6 hex lag screw - 4 inch long, 1/4 inch diameter 30 standard washers - fits over 1/4 inch bolt/screw 6 fender washers - fits over 1/4 inch bolt/screw but larger outside diameter

2 strong nails, at least 2 inches long Black spray paint (if you want the look I used) First, I stained an 8 foot long piece of 1x4 hemlock to match other wood in our house. I hung that up using matching screws secured into the studs. I positioned those screws so that they would be hidden by the steel track later but was mindful to avoid where the bolts would need to go. The front edge hangs 1 1/4 inches down from the finished opening to the pantry. This was low enough to hide the metal track but high enough so I could still remove the back doors for repairs if necessary. Next came the actual steel track. It consists of two pieces of steel that I purchased at Lowe's that I spray painted flat black. Each piece is 48 inches long, 1 1/2 wide and 1/4 inch deep. I used my regular cordless drill and a good bit to drill three holes in each piece; 4 inches from either end and in the center. Using lots of clamps, I positioned the steel bars one at a time, end-to-end and marked where I would need to pre-drill through the wood.

I positioned the bar 1/2 inch down from the top. I liked the way this looked and it allowed ample clearance for the bolt that will go through the center of the wheel. I took the steel back down and drilled 1/4 inch holes through the wood and into the studs (where I hit them). Since I screwed the wood into the studs in an earlier step, it isn't as necessary that the steel be attached to the studs, as long as it is securely attached to the stained wood piece. Next, I stacked my materials as follows for each screw: One four inch long, 1/4 inch hex lag screw I found that I needed to get each one started just a little bit before I could tighten them all down. Remember also that you will have a little bit of wiggle room as you're tightening so take care to ensure your two tracks are perfectly aligned and butted up tightly against one another. I tapped mine with a hammer before fully tightening down all the screws and my doors glide easily over the intersection. The last step is to create door stops.

I wanted something really subtle so I used a nail that I tapped in until I felt like it was really secure and then I used a hack saw to cut the nail off and I painted it black to blend. If anyone gets up a bunch of speed with the door, it will fly off the end most likely but I felt like it was secure enough in our household. If you don't feel like this would work in your home, perhaps try using an L bracket to stop the wheel. Now let's move on to the wheels and the door 2 - 3 inch garage door pulley kits - This idea came from ShabbyLisaW 6 standard washers to fit over the bolt included in the pulley kit 2 - 18 inch long by 2 inch wide steel flat bars (or 1 - 36 inch long one and a good hack saw) 4 - 1 inch long by 1/4 inch hex lag screws 4 standard washers to fit over the 1/4 inch hex lag screws Flat black spray paint (optional) Brown spray paint (optional) Glue that can adhere metal to wood I purchased one 36 inch long by 2 inch wide steel flat bar because I liked where the existing holes were positioned.

If you can't find that, you can drill your own holes. The top hole should be an inch from the top of the bar to achieve the same look I have. I spray painted all the bolts, washers, wheels and flat bars with a flat black spray paint then just lightly dusted over that with brown to soften the look a bit. Once the paint is dry, assemble the setup as follows: Bolt from pulley kit Nut included in pulley kit Next, I used clamps to position the bars on the door while in place. I checked to ensure it rolled smoothly from end-to-end, appropriate gap under the door (matched the other doors) and that it looked good from afar. Once I liked where it was, I marked the placement very carefully, took the door off the track, and removed the clamps. Then I glued the bars to the door as marked and clamped them back down. Finally, I pre-drilled and screwed the 1 inch lag screws with washers into the door. The lower two didn't make a great connection but they went through glue so while they aren't highly functional, they are stuck in there for good.