sliding barn door entertainment center

This Old House TVSeason 34Down to the Wire Kevin arrives to find Roger and sod grower Pat Hogan installing a new variety of turf type tall fescue that needs less water and fertilizer than other varieties. Kevin meets plumbing contractor Kevin Bilo and plumbing inspector Duke LaConte to see what he looks for at the final plumbing inspection. Kevin sees how interior designer Robin Gannon came up with the design for the great room entertainment center, and then meets Matt Allen to see how he's turning her design into reality. Kevin meets master electrician Allen Gallant and wiring inspector Alix Berube to see what he looks for at the final electrical inspection. Later, Kevin meets back up with Matt Allen to see the progress on the piece and the sliding barn door hardware he is using to hang the salvaged interior doors that will conceal the TV. In the basement, Richard shows Kevin the finished mechanical room and closes the loop on the final heating and cooling decisions Pine Veneer Pine Solids Metal wheels Hardware

All pieces are constructed of Pine veneer and Pine solids.All top drawers bottom of cases are felt lined.All drawers are tinted with French dovetail in the front and English in the back.Entertainment features Console, Hutch, Left - Right Pier.All drawers feature ball-bearing guides.Console features 2 adj. wood shelves in center, 2 drawers, wire management, levelers.Left and Right Pier feature 1 LED light, 3 way dimmer, 2 adj. wood framed glass shelves, 1 adj. wood shelf behind 1 wood door, 1 drawer, 2 sliding doors with long rail, adj. levelers, wire mangement.on doors and hardware systems within cont'l U.S. Free Shipping on doors and hardware systems within cont'l U.S. Barn Door Kit And Barn Door Hardware Combo All in One Now Comes With EVERYTHING needed for Installation! A combination of both the Barn Door and the Barn Door Hardware, comes with everything you need to get started. The Door Kit™ is made with strong and reliable Solid Alder. Note Barn Doors come shipped as a Kit, some Assembly is Required.

You'll need at least 2-1/8" clearance below. Measure the existing slab, that you're wanting to replace, from the top of the door to the top of each hinge. You will format your entry in this format: Hinge 1- 10" from top of door. The spice rack is great for holding an assortment of items. Four shelfs total, our biggest bookshelf. Two shelfs, with a beautiful design. The perfect coat hanger for any office or home entry.We're sorry, we couldn't find the page you're looking for. How can we help?I have been so excited to share this project with you guys!! Some of you may remember a few weeks ago on Instagram I shared a little sneak peek of it & I said something like, wow this DIY project didn’t come easy & with out a fight. By fight I mean like bickering between Mr. LMB & I. It’s rare that we argue during a DIY because we both enjoy it, but this project just wasn’t going our way. Like ruining drywall, making mistakes, measuring wrong, gahhhh. Well, the project was finally done a few weeks ago & THEN our ceiling starting leaking in our lower level living room.

Are you kidding me? Thankfully we have amazing family that knows all about plumbing & our ceiling is now for the most part repaired & we have no more leaks so lets celebrate that! In conclusion, we learned the hard way about this project & how to do it the right way.. so learn from our mistakes & I hope you guys love what we came up with. Here is our DIY industrial pipe sliding barn door TV cover… & if you slide the doors open… Our TV is hidden behind those lovely barn doors!We can now hide our lovely little TV in our lower level & that to me is a win! I have to confess something at this point of the blog post. Ok, so this little nook in our living room has been neglected since we have moved in. We had our old TV stand from our last house in the space, but it didn’t fit correctly so we are actually selling that piece & moved it for these photos. I moved these chairs into the space just temporarily from our other living room upstairs & I actually don’t hate it. BUT we are going to build a custom Built in entertainment center very soon in this little cove so stay tuned for that!
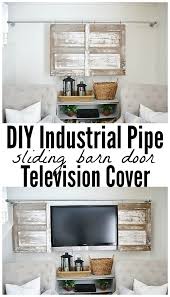
The temporary setup isn’t too bad, but I will be super happy when this little space is all done!This project really should have been really simple. & I’m going to blame our drywall & the fact that we kind of went into the project blindly. I have never seen anything like this before so I made it up as I went along & well, sometimes my brain doesn’t work out all the technical details. 2 – galvanized base flanges [3/4 size] 2- 90 degree elbows [3/4 size] 2- 6″ pipes [3/4 size] 1- 8 ft pipe [3/4 size] How we made this beast: We actually took an antique door & cut it into two piece that would slide together on the pipe system. We did not have a large wall to work with so the pieces had to be just big enough to fit over the TV. I would have loved it more if the pieces could have been bigger, so if you have a large wall, I say the bigger the better for more impact! Since we were working with this cove situation, it just had to be that small. So, we measured the Tv & figured out how big the door pieces had to be & cut the antique door accordingly.

After the door pieces were cut we screwed eye hooks [large enough to slide easily on the large pipe you choose.] into the tops of the doors on both sides. First of all we recommend only installing the piping into studs because we made the mistake of using anchor screws on one side because we didn’t have a stud on one side. The screws came right out of the wall. Anchors are not going to cut it in this situation. Installing wood blocks on the wall on both sides with screws to install the pipes into [as pictured]. First screw the flange into the stud or wood block. Second install the pipe extender into the flange [pick the side of this by the thickness of you TV. Meaning, how far out of the wall does the sliding door system have to be to clear the TV.] Then put the 90 degree connecter onto the extender & screw on the long pipe [Pick the size of your long pipe by how big your doors are & how big the space is that you are working with.] At this point both sides [flanges, extender, & angle pipes] should be on the wall.