six panel door headboard
Headboard AmandaAwesome HeadboardDoor Headboard IdeasDoor Headboards DiyDiy Headboards With StorageDiy Headboard With ShelvesBedroom Shelves DiyHeadboard BedroomHeadboard Side ShelvForwardDoor week wouldn't be complete if we didn't incorporate some repurposing, right?? We've combed the blogosphere for the best ways to reuse old doors.How to Turn an Interior Door into a Headboard Repurpose a paneled beauty for a bit of classic master bedroom adornment Doors in homes built before 1950 are typically made of solid wood, whether oak, maple, chestnut, or mahogany. They've got heft, and they make a satisfying thump when you knock. They also have sturdy stiles and rails that frame handsome panels in a variety of configurations, depending on the home's architectural style. At most salvage yards you'll find row upon row of these paneled doors, many made from old-growth timber, typically starting at about $60 each. Among my favorite creative reuse projects is to tip a series of these doors on their sides to serve as wainscoting along interior walls, a trick I learned from Brad Kittel of Discovery Architectural Antiques in Gonzales, Texas.

Or a single door can be used as a platform for a hanging daybed suspended by chains, a fun idea that This Old House reader Kodie Ketchbaw put into action as a way to create extra seating on the porch of her home in Old Hickory, Tennessee.
2 door tahoe for sale georgiaA door can also double as a bulletin board in a home office.
outdoor patio furniture menardsSimply glue cork sheets to the recessed panels for tacking notes.
garage door repair vancouver waOr, brush the panels with blackboard paint for kids to doodle on.
garage door installers akron ohio For my own door "upcyling" project, I made a stylish wall-hung headboard with built-in sconces that serve as reading lamps.

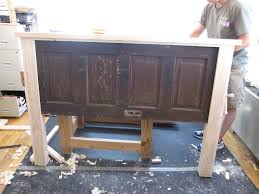
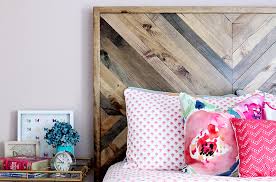
Follow along for the how-to. Panel configuration is the first factor to consider when shopping for a door to convert. Be sure to pick one with evenly spaced squares or rectangles that are the same size and shape. That way, when you turn the door on its side, the design will be symmetrical. Craftsman-style five-panel doors with rectangles stacked one on top of the other like ladder rungs are ideal, as are Art Deco–style doors with a single recessed panel in the center. I chose a ladder-type door in oak from The Demolition Depot in New York City. Door height is also key; most are between 70 and 96 inches. While you might be lucky enough to find a match for a standard 76-inch-wide king-size bed, for anything smaller, you'll have to cut one down. For my 60-inch queen bed, I trimmed from the top and bottom to maintain the door's proportions. This will determine how much you'll need to trim off. Use a combination square to trace the cutlines. Slice Off the Overage Use a circular saw to cut the door to size.
To create a guide fence for the saw, place a straightedge alongside your cutlines and clamp it to the door. To fill the void in the edge of the door where the lock used to be, tap in a wood scrap. For the surface holes, make a matching putty out of glue mixed with sawdust left over from your offcuts. Spread with a putty knife. For stripped doors like mine, remove splinters and round rough edges with a random-orbit sander. For painted ones, first remove the old finish with a liquid stripper; dry stripping can release toxic lead dust into the air. Cut Crown for the Top Mark the length of the door's face on a strip of solid crown molding. Cut to size, mitering the ends at 45-degree angles. Use the offcuts to create decorative returns for the door's outside edges. Squeeze a bead of glue on the crown's back side and press into place. Reinforce the bond by tapping in finishing nails about every 6 inches. I used a brad nailer to speed the process. To restore the door's lustre and highlight the grain pattern, apply a natural furniture polish like Old Craftsmen's Lemon Oil with Bees Wax.

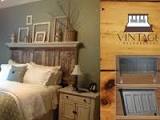
Mark where you want the fixtures to be. Fit a drill/driver with a paddle bit, and bore holes through which to fish wires. Secure the sconces' back plates to the door using the screws provided, and hook up the lights. Now hang your new headboard. Learn how to hang your headboard using a French cleat. Sconces: Studio Single French Library Sconce in bronze finish by Visual ComfortAbout $126 each; Piece of decorative wood trim Additional piece of wood for shelf Primer & paint brush Paint color of choice Colorant & glaze (both water based) Paper towel & wet rag Nail gun, flat head screwdriver Table saw (portable is fine)GuestbedroomOld Door HeadboardsVintage HeadboardsHeadboard With ShelvesRustic HeadboardsEclectic HeadboardsShelf Above BedMantle HeadboardHeadboard GuestForward90 year old door made into a headboard to fit both a king size and queen size bed frame. A queen-size bed frame can easily set you back $2,000. This one cost about $25.

Of course, turning it into a headboard did require some work: sawing the door down to size, adding chair-rail molding to the top, brushing on a few coats of paint. But you could pay a pro to do the heavy lifting and still come out ahead — at which point, you get to lie back and count up your good deeds: You've recycled an architectural castoff that didn't deserve to be trashed, saved loads of cash, and created one truly unique piece of furniture. All facts that should help you sleep easier.STEP 1: Choose a solid wood door, preferably with a design element like paneling, that's a few inches taller than your bed is wide. If your door is too long, you'll need to trim it down with a power saw.* Determine where to cut by positioning the door sideways at the head of the bed; any decorative details should be centered.STEP 2: Fill any holes in the door with wood putty, then sand with medium-grade sandpaper and wipe down with a damp cloth. Flip the door horizontally and choose one long side to be the top of the headboard.
Saw* a piece of chair-rail molding so it's the same length; attach it with wood glue. Once the glue is dry, hammer several finishing nails across the top of the molding to secure.STEP 3: Coat the headboard with primer; let dry, then paint with two coats of semigloss in a color of your choice. (If your door has panels, consider painting them a complementary shade.) STEP 4: Hang the headboard on your wall so that at least half is visible above your pillows. Treat the door as if it were a heavy mirror: Screw two D-rings into its back, just below the molding and a few inches in from either side. Stretch heavy-duty picture wire between the rings and twist to secure. Hammer a picture hook that can bear up to 100 pounds into the wall and hang.To further support the board, measure the distance from the floor to the bottom of the door. Saw* three pieces of two-by-two lumber to that length (to fit between the bottom of the headboard and the floor). Screw each plank into the wall (one at each end of the board, one in the middle) to help support the headboard's weight.