screen door hinges home depot

Established in 2005, Hinge Outlet, Inc. is committed to bringing you the highest quality hinges at the best possible prices. We are your premiere store for quality residential and commercial hinges at everyday low prices. Not only do we carry some of the leading Hinge Manufacturers on the market today, we also manufacturer our own line of hinges. We strive to offer one of the largest selections of door hinges on the Internet. In addition to selling adjustable spring hinges, double acting spring hinges, ball bearing hinges, residential and commercial, we feature many door accessories like wood screws, hinge door stops, ball catches, flush bolts and more. Please be sure you add yourself to our email list since we are always adding new items to our product line. We are open to building long-term partnerships with you or your company for your short and long term door hinge needs. For long-term partnerships or large door hinge purchases, please contact us. We welcome the opportunity to work with you.

This is how I fixed my bathroom door. One day, Monkey Boy decided to swing with his full weight, hanging from the door handle of the bathroom door.
sliding bathroom doors perthNot surprisingly, the screws holding the hinge to the 30-year old bathroom door decided that they'd had enough, and gave up. The screws pulled out of the door and the holes were permanently stripped. Like most ordinary folks, we enjoy privacy during bathroom time, so I needed to fix it. I had tried the toothpick and glue method shown here in the past on another door in the house when something similar happened involving a gaggle of giggling teenagers. It did not work well for me, so I decided to try a more robust method. I'll be drilling out the stripped holes and gluing in dowels to fill the holes. Step 1: What you'll need:Show All Items« PreviousNext »View All Steps Download Time to get Hands On!
The Home Depot offers free workshops for do-it-yourselfers of all ages and experience levels. Review the schedule of upcoming workshops and choose a specific workshop to attend. You'll see a variety of workshops scheduled - please be sure to select the correct workshop you'd like to participate in. There are currently no workshops available in this category.If you're on Pinterest as much as I am, then you know sliding barn doors are, like, design crack right now. They seem to work with just about every style, from ultra modern to shabby chic to vintage industrial, and they SLIDE OPEN. So naturally, I wanted a barn door for our laundry room makeover, if only because I can't find anywhere else in the house to fit one. John and I looked for sliding barn door hardware online, and the cheapest price we could find was about four hundred dollars - and that's just for the hardware! You guys already know what happened next: John thoughtfully examined the hardware and announced, "I can TOTALLY make that."

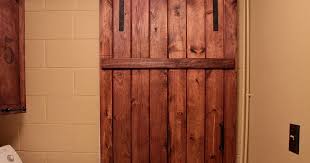
And so he did: The total cost for this door - wood and hardware combined - was less than $100. LESS THAN $100, YOU GUYS. Metal rails & tubing - $25 If you already have the door, then that's only $55 for the hardware - $55 versus $400. It doesn't require nearly as many power tools as you might think, either: just a strong drill and an angle grinder with a steel cutting disk to cut the metal rails. (If you're making the door, you'll also need a circular saw - or a hand saw and a whole bunch of patience. :D) So...you ready for this?! Then let's get to it. There are several ways to make a simple plank door. We used exterior tongue-and-groove board normally used for house siding: (The opposite side is a classic bead board.) Stick the boards together with plenty of wood glue, and then secure them with ratcheting straps for a tight fit while the glue dries. The three skinny boards you see on top there aren't attached; they're just there to act as a brace for the straps and to make sure the door doesn't bend:

Lock those straps down tight! Once the glue has dried the next day, attach cross-boards to the door, if you like. (You don't have to, but they do add extra support & visual interest.) Here I've also distressed my door by banging it up with a hammer and screw: Now stain or paint the door to your preference: I stained mine to match the cabinet doors we just made. Now, on to the hardware! You'll need two 2.5 inch pulleys that look like this: Lowe's and Home Depot didn't have them, but John finally tracked some down at Ace Hardware. (I also found some here on Amazon for about $13 each.) The only part of the pulley you need is the center wheel, though, so pull the center pin and pop that out: Now take a bar of 1.5 inch solid steel (available at any hardware store), and stick one end of it in a table vise: Bend it down as you see John doing here. (This really doesn't require a lot of strength; the leverage of the bar does all the work for you.)
The hook you've just made is what's going to hold your wheel. You need to clean up the hook shape, though, so next remove it from the vise and bang the bend flat with a hammer: You want to get a nice, sharp bend, so go ahead and hammer the point all the way down if you have to. Odds are you'll have to flatten it a bit too far, so now pry the hook back up a bit: ...and then slip the pulley casing in to get the distance right: Go ahead and hammer on the steel with the casing inside; you won't be needing the case for anything, so it doesn't matter if it gets banged up. Now test the fit with your wheel; it should fit perfectly, with just the right amount of wiggle room on either side of the wheel: That's one bracket done! Now cut your bar to whatever length your door requires: And repeat the whole process for bracket number two. (You can see here that John bent both hooks on either side of the bar and then just cut it in half.) You may also want to grind down your cut edges, in case they're too sharp.

When you have both brackets ready, it's time to attach the wheels. Drill a hole straight through each hook, piercing both layers of steel: Your wheel will be supported by a pin placed through these holes. The original pulley pin will probably be just a hair too short, so you may need to get a slightly longer bolt with a nut to hold it in place. Also drill holes lower down on your bar where you want the screws to go - the ones that will attach the bracket to your door.If you plan to paint your hardware, now's the time to do it! We used a flat black metal primer. (I plan to age it with a little sanding later.) Attach your bar brackets to your door. I didn't grab a photo before we hung the door, but here's a close-up of the hardware: Now all that's left is the rolly bar! This bar is the same 1.5 inch solid steel as the door brackets, so just cut it to the length you'll need for over your doorway, and then drill holes spaced roughly 2 feet apart down the length of it.

Make sure you drill these holes in the lower third of your bar, not directly in the middle. Now my lovely hand model will demonstrate how this bar will attach to your wall: Ok, so here you've got a honkin' (technical term) concrete anchor in John's right hand. That goes in the wall. That long screw sticking out goes in the anchor. Between the steel bar and the anchor is a half-inch steel tube, cut to about two inches in length. The tube acts as your spacer - very important. Each of the holes you drilled in your bar will have this same set up. When it's installed, your bar should look something like this: Note again that the bolts are located on the lower third of the bar, not the middle. This is important because you want your door's wheels to be able to roll over the bolts without hitting them. Ok, so get this: YOU'RE DONE! All you have to do is lift your door into place on the track, and get to sliding! That's all the stuff it's covering up: pretty much our entire pantry.

The door does overlap the edge by about four inches when it's open (the wall wasn't quite big enough for it to slide back further), but that's not an issue for us. Finally - no more clutter, and no more dusty cereal boxes! Oh, nearly forgot: you'll also want to install some kind of a door stop, so your door doesn't go banging into the corner wall or flying off the track. Our stop is a simple L bracket padded with black rubber on the lower part of the wall by those two pipes. You can also install a stop on the rolly bar itself, though. Totally up to you. I've outlined the basics here, but if you want a much more detailed barn door tutorial (complete with diagrams and precise measurements), head over to this post by Jill of Baby Rabies. There may be some slight differences, but overall it's the same techniques we used. (And I found it - where else? - on Pinterest. Well, hope you guys liked seeing the next stage of our laundry room makeover! We're still not done, of course; next I'll show you our plumber's pipe shelving and the super fun and steampunky way we've devised to hide our water heater.