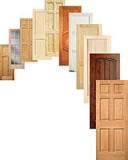
prehung interior doors for sale
Travis Larson, an editor for The Family Handyman, shows you how to remove a door and hang a new one or rehang the old one. Travis Larson, an editor for The Family Handyman, shows you how to remove a door and hang a new one or rehang the old one. Hanging a door correctly is one of the most satisfying jobs in the home improvement world, but it's often the most challenging. Unless it's installed correctly, your door can have uneven gaps along the jamb, or it can bind or not even latch. In this article, we'll show you foolproof tips and techniques that'll give you great results every time. All you need are simple carpentry tools and some basic home improvement skills and tools to easily master the techniques. Allow about an hour and a half for your first door, and once you get the hang of it, your next door will go in twice as fast. When you buy your door, pick up a package of wood shims and 4d, 6d and 8d finish nails. Also get a straight 7-ft. 2x4 and cut another 2x4 the width of your opening (Photo 1) that are both straight as you sight down the edge.

Since installing trim is part of the door installation, purchase some matching door trim and be sure you've got a miter saw to cut it.
garage door opener loudYou'll also need to pick up a lockset for the door even though we won't cover the installation in this article.
sliding shower doors 1600 Pro Tips for Hanging Doors
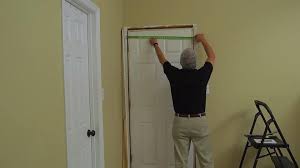
garage door sales lima ohio An accurate level is crucial for a good installation. Check it by laying it on a flat surface. Memorize the bubble's position. Then flip the level end for end and check the bubble. If the bubble doesn't settle in the exact spot, find an accurate level. Check the length of your prehung door jambs. They may be longer than you need. You may have to trim both sides to minimize the space under the door.

In most cases, the door should clear the floor by 1/2 in. If you're setting your door into adjoining rooms that'll be carpeted later, you can hold both jamb sides 3/8 in. above the floor and avoid having to trim your doors. Use blocks to level jamb bottoms. If you’re installing a door on an unfinished floor and need space under the jambs for carpet, just rest the jambs on temporary blocks while you’re hanging the door. Adjust the size of the blocks so the bottoms of the jambs are on a level plane. Leaves a space of anywhere from 3/8 in. to 5/8 in. under the jambs, depending on the thickness of the carpet and pad.Make sure the plug that holds the door slab in place is the type that can be removed after the door is installed. If it’s not, sometimes you can cut off the plastic strap and insert the plug back in through the doorknob hole. It’s difficult to move the door when the slab is flopping all over the place, but it’s worse to install a door that won’t open. It’s not always necessary to use shims on the top doorjamb—the casing will hold it in place.

And on new homes and additions, walls can compress as they settle and push down on the top shims, causing the jamb to bow down. Only shim the top jamb if you’re working with a 3-ft.-wide door, and the top jamb arrives bowed from the factory.Skip to main content You are hereHome / Products / Finishing Options / Pre-Hanging Like our doors, TruStile’s pre-hung units are built using premium construction techniques, high quality craftsmanship, and complete flexibility. We build our pre-hung units to order and can supply jambs in any width, for any size door. Our automated, precise machinery ensures every pre-hung unit is high quality and machined exactly to your specifications. For non-rated openings requiring wood jambs, TruStile offers a turnkey knock-down (KD) jamb in paint-grade poplar or any stain-grade wood species. Our KD jambs come pre-machined to match each door in your order and are packaged and labeled to make job site organization and installation quick and easy.

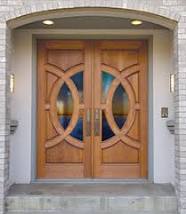
Edit ArticleHow to Replace a Pre Hung Door A door replacement is a fairly large project. If your door can simply be refinished or otherwise mended, try that first. This door was very badly scratched by the previous owners' dog and it had warped to the point where no weatherstripping could keep the kitchen cozy. Read and understand all the instructions before beginning. Size up the job. Recruit an assistant or two.not Choose a mild, dry day, if this is an exterior door. Measure the door carefully and select the right door. Paint the door before installing it, if you wish. Clear a work area. Prepare the lockset, doorknob, and/or deadbolt. Remove the trim from both sides of the old door, exposing the door frame. Separate the old door from its frame. Remove the old door from its hinges, then carefully lift it off. Exterior doors are heavy! Then, make sure the longest screws are out of the hinges on the jamb side. There are a few screws that just hold the hinges to the jamb, and there are others that go all the way through to the frame.
Separate the old door jamb from the frame. When it is loose, tip the jamb out of the frame and remove it. Clean up the opening. Some exterior pre-hung doors come with brick molding already attached. Look at the door jamb and determine if the hinge screws are sticking through, many times they will be. Look at doorknob cut-out and be sure that any device used to hold door aligned can be removed after installation. Check very carefully for any nails going through the jamb into the door, and pull them out. Pull any staples, shipping materials, etc. Test fit the new door. Check the frame for level and plumb and correct any major problems now. Position door so that it can be tipped up into opening, if possible. Look at the bottom of the new door and get an idea of the areas that will contact the door sill. Tip door into opening, and adjust in or out till door jamb is flush with wall surfaces. Begin shimming between the jamb and the door frame.

Stack wedge-shaped shims pointing in opposite directions and drive them in until they take up the required space. Start at the bottom on the hinge side, then at the opposite bottom corner. Proceed to the top of the hinge side, and the top of the opposite side. Then shim directly behind the top, middle and bottom hinges. You will be driving screws through the jamb, shims, and frame, so for the shim locations behind the hinges, put the shims directly behind the empty hole. Finally, shim opposite the top and bottom hinges and just above and below the deadbolt. The objective of all this shimming is to center the jamb in the door frame and to square, plumb, and level the door. Use a piece of material of an appropriate thickness, probably about 1/8", to feel all the way around the door, to ensure that the spacing between the door and the jamb is consistent and even. This is somewhat a process of trial and error. Use the door itself to gauge where the frame must be to be square. Be patient and make adjustments as necessary, pushing the shims further in or pulling them out.
It is worth being picky at this stage, since these adjustments will affect the fit and operation of your new door for years to come. Also adjust the door location front to back. If the door is weatherstripped, look for even compression of the weatherstripping from top to bottom. If not, look for an even gap when the door is closed. The door jamb should also be flush with the wall, as much as possible. Remember, the trim needs to go back on at the end. If the door has pre-cut openings for the knob and deadbolt, make sure that they align properly as you shim the jamb. Putting a screw through the jamb and shims will pull the jamb slightly towards the frame. Shims can be used to correct the parallelogram of the jamb and to flex the wood in or out a little bit near the shim. When the door is shimmed all around, you can test opening and closing it, but be sure to support its weight so that it does not pull out all your careful adjustments. Install the long screws into each hinge, through the shims, into the frame.

Proceed around to the other shim locations and screw or nail through those into the frame, again checking and adjusting as you go. When the door jamb is level, plumb and square, install the deadbolt, doorknob, and strike plates. Cut off the shims so that they are flush with the jamb and rough opening. Insulate the space between the door jamb and frame. Replace the trim, adjusting it if necessary. Caulk around the trim or molding, inside and out. Paint or finish the door, if you didn't already, and paint the trim to match its surroundings. Install weatherstripping, kick plates, and any other accessories. Method for hanging with molding attached. Measure from floor up, on hinge side of jamb and mark locations of hinges. Subtract width of door assembly from width of rough opening and divide by 2. Stack shims up in alternating directions until you get a stack that is equal in thickness to the vertical margin. Place shim-pack directly over the mark on the framing for the lowest hinge and nail in place.
Place a 6 foot (1.8 m) level against bottom shims and place the shim-pack across top hinge line. Place level against bottom shims and top shims, and slip the shim pack between level and framing, at the middle hinge, and adjust as above until it is snug against level. Cut excess shim material off slightly narrower than wall thickness. Run a bead of caulk on the back of the brick mold near the edge. Tip the new door up onto the caulk. Place door in opening and push hinge side tight to shims, and brick molding tight to outside wall. Nail a 16 penny galvanized finish nail through the brick molding into the wall framing, at the top hinge location. Now you can carefully open the door and nail another 16 penny finish nail through jamb into framing at the top hinge location. Check margin between top of door and the head jamb, at the corners. Nail through brick molding at next hinge location working from top to bottom. Remove the middle screws from the hinges where they attach to the jamb, and replace with screws of sufficient length to go through shims and into framing at least 1-1/2 inch.

At this point the door is basically hung. Place a 16 penny finish nail through brick mold at top on the latch side of door. Break off the thin end of a shim until the end is the same width as the margin between the door and jamb. Make another shim pack Place spacer between door and jamb at the strike (doorknob). Insert shim pack between jamb and framing at the strike. Adjust shims until they are snug. While pushing the jamb tight to the shim pack, open the door. Nail through jamb into framing at this location as described above. Nail through brick mold at the same location. Repeat this procedure at locations opposite the hinges, as well as in two locations at top of door, and above and below the dead bolt, be careful not to allow shims to cover or block the dead bolt hole. Cut off excess shim stock off and wipe any excess caulk off. Screw sill to floor. Adjust sill to fit door, if necessary. Insulate between jamb and framing.