pocket door hardware at lowes

FREE SHIPPING ON QUALIFYING ORDERS $49 OR MORE Prices, promotions, styles, and availability may vary. Our local stores do not honor online pricing. Prices and availability of products and services are subject to change without notice. Errors will be corrected where discovered, and Lowe's reserves the right to revoke any stated offer and to correct any errors, inaccuracies or omissions including after an order has been submitted.1500 Series Pocket Door Frame for Doors up to 30 in. x 80 in. 1500 Series Pocket Door Frame for Doors up to 28 in. x 80 in. 1500 Series Pocket Door Frame for Doors up to 24 in. x 80 in. 1500 Series Pocket Door Frame for Doors up to 32 in. x 80 in. 2000 Series Pocket Door Frame for Doors up to 36 in. x 80 in. 2000 Series Pocket Door Frame for Doors up to 30 in. x 84 in.Pocket Door Frame Set Satin Nickel Pocket Door Privacy LatchSatin Nickel Closet Pulls (2-Pack)Satin Nickel Pocket Door Privacy Latch Satin-Nickel Pocket Door Pull Handle

Classic Bronze Pocket Door Passage Pull 1500 Series Pocket Door Frame for Doors up to 36 in. x 80 in. 2000 Series Pocket Door Frame for Doors up to 30 in. x 80 in.Knock Down Wood Pocket Door Frame Sliding Wardrobe Door Nylon Bottom Guide (2-Pack) 1500 Series Pocket Door Frame for Doors up to 36 in. x 96 in. Nylon Floor-Mounted Adjustable Bypass Bottom Guide for Wardrobe Doors 1500 Series Pocket Door Frame for Doors up to 28 in. x 84 in. Top Pivot and Guide SetNewbury 2-Panel Gliding Patio Door Hardware Set in Oil Rubbed Bronze Anvers 2-Panel Gliding Patio Door Hardware Set in Satin Nickel Double Bolt Sliding Glass Door White Lock Patio Aluminum Sliding Door Security Bar Encino 2-Panel Gliding Patio Door Hardware Set in Distressed Bronze Patio White Sliding Door Security Bar Tribeca 2-Panel Gliding Patio Door Hardware Set in Stone #444 Chrome-Plated Patio Door Lock Basement Door Keyed Lock Kit Satin Nickel Left Handed Sliding Door Lock

White Keyed Alike Patio Door Lock with Rotating Bolt Chrome Keyed Patio Door Lock with Rotating Bolt Patio Zinc Twist-in Sliding Door Lock Patio Chrome Sliding Door Pin
sliding wardrobe doors new york Adams Rite Round Face Sliding Door Mortise Lock
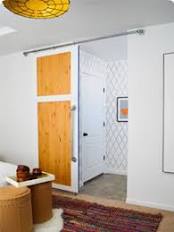
cadillac 6 door limousine for sale Chrome Showcase Door LockReplace AwkwardAwkward EntriesAwkward EntrySliding ModernDoors DetailedDoor ReplaceGain SpaceBarndoorsUpstairs BathroomForwardSliding barn door. Replace awkward entries and gain space in closets with sliding modern barn doors. Detailed instruction on how to install, what to buy and plans to build the door inexpensively. Please register to participate in our discussions with 2 million other members - it's free and quick! Some forums can only be seen by registered members.
After you create your account, you'll be able to customize options and access all our 15,000 new posts/day with fewer ads. 624 posts, read 3,590,121 times 1,501 posts, read 9,666,525 times Do they sell a pre-built unit? I haven't seen one. Anyway, we put one in with the hardware kit you buy from Lowes or Home Depot. The biggest thing to realize if you will have to take down the drywall on one side of closet to open it up for the framing. The framing would just be to take out a few studs and add a header. So if you can do framing, drywall, and a little finishing work, it shouldn't be that hard Using the kit gives you the flexibility to use whatever door you would like (we used solid doors to match the other doors in the house). 21,534 posts, read 40,722,554 times 8,309 posts, read 29,621,593 times 9,124 posts, read 29,466,144 times Please register to post and access all features of our very popular forum. It is free and quick. Over $68,000 in prizes has already been given out to active posters on our forum.
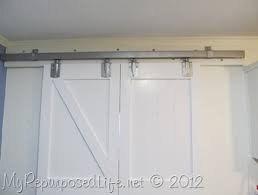
Additional giveaways are planned.** Check out for an updated (and more detailed) lightweight version of this tutorial! Including how to make your own door! How to make a Sliding Barn door was hands down the most requested tutorial from The Epic Room Makeover 2012, which I was SUPER excited about, cause it is one of my favorite projects too…. DIY Sliding Doors are fantastic. They can also be very not thrifty depending on the hardware that you use to hang them. They don’t need to be expensive. Kelsey’s was done for under $75 my friends. How do you feel about that? There are a few measurements you need to get right off the bat. You need the length of the pipe for the door to slide on (make sure you give it enough room to open!) and you need the width of your door opening. Now that you have your measurements, you need a door. Measure the space you need to fill and add at least a 2” overhang to each side. We ended up at Restore and played Let’s Make A Deal with Randy, the Restore employee.

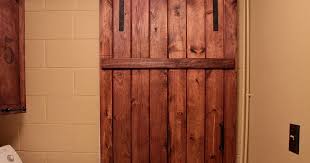
I wish I could say he loved us like everyone else we had video taped that weekend, but notsomuch. Cause we are PRETTY dang loveable. This is the door I fell in love with. It was solid wood and it may or may not have been covered in bird poop and feathers. We got it for $40. Here is the problem. Though we THOUROUGHLY measured the door opening when we found this great door we were so excited that we accidentally forgot to measure the door. But we totally fixed it, so its fine. (I know I had you worried for a second.) The first item of business was to cut the length of the door down 6”. (The door was 8’ and so was the opening, we needed to make room for the casters and eyehooks.) You can determine the amount you may or may not need to cut the door down by adding the height of the casters, eyehooks, and where on the wall it will be mounted. Did you know that if you have something huge like this door to cut that you can take it over to Lowes and they will cut it for you?

Even if you didn’t buy it from them! Originally I was all for jigging it out, but to get a perfect line in about 2 minutes is a MUCH better option. Once the door arrived back at Kelsey’s we needed to expand the width (remember the whole not measuring at the store thing? We used 2×2 premium pine slats to do this. (Premium means that they are not as warped. They are a little bit more expensive than the cheap pine but totally necessary in this type of project.) Start by drilling your pilot holes through the 2x2s and into the door. If you don’t there is a great chance that the solid door will stop your screw in its tracks, and/or strip it. You will need screws that are long enough to get a good grip in your door. We used 2 1/2” wood screws. When its time to attach your casters and eyehooks the biggest thing that you need to remember is that they need to be PERFECTLY centered/even especially the eyehooks. I would recommend getting stationary casters that don’t swivel, we did not get them and its fine but when I do this project in Ivie’s room I will for sure be doing that.
You will pre-drill your pilot holes and screw them on! We used metal casters from Lowes. If I remember right they were around $4 each. We used the largest eyehook that Lowes had for the guides on the top of the door. If I were to do it over again, I would use larger hooks (you can probably find them at a specialty store) or a thinner piece of pipe. Though it will slide there is room for play, so if you eye hooks arent perfectly centered on each other then it will rub. This is where we took a sleeping break. And now its morning! Oh the power of the internet. Use wood filler to fill your gaps. I would not use regular wall spackle especially if your door has a clear coat on it. It wont adhere the way that it needs to and will probably crack. When its completely dry its time to sand. Make sure that you are wearing a mask when you are sanding wood putty, because it is a lot harder than spackle you will be sanding a lot longer. Therefore breathing it in longer.
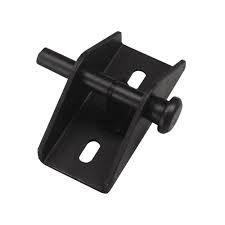
And no one wants a black lung from wood putty. Just to be safe, next time you are at Lowes grab a pack of 3M masks for $5. They are SO important to have on hand. Once your surface is smooth and gap free (hooray!!) its time to paint! Don’t forget to put your ScotchBlue down to get perfect edges and protect the parts you don’t want painted! To get our bright blue edge I bought a sample pot from Lowes in a great cobalt color and used this technique. Now lets get into the pipe aspect of the door. There are 2 types of conduit pipe that they sell at Lowes. They have electrical conduit and pluming conduit. You want the electrical. Go into the store with the measurements that you need for the handle and for the length of the sliding rod. They will cut and thread the pipe for you for free, then all you have to do is screw it together! To make your handle and your sliding rod you will need (4) floor flanges, (2) Connecting Nipples, (2) 1” Connecting Nipples, (4) 90 degree elbows, and the pieces of electrical conduit pipe in your preferred length.

The pipe we used was 3/4”. To make the rod that the door slides on you use the exact same set up and the handle pictured above. The only difference is that you use a 1” connector nipple between the flange and the elbow (it will give you a little more length from the wall.) When you are mounting your flanges to the wall, do everything you can to get it into a stud. It will make it MUCH more secure. This door is heavy and you need to be safe. Put the door on the pipe and determine where it needs to attach to the wall. (You obviously determined this before you had the door cut down but do a dry run before you start screwing things to the wall.) Attach your first flange to your studs with the pipe on it. The put your door on. Screw your other elbow flange combo on and mount it to the studs on the other end. You need to remember that the door is not hanging from the rod/eyehooks. They are simply a guide. All of the weight of the door should be on the casters at the bottom.