mirrored sliding doors closet home depot

Smooth Flush Solid Core Primed MDF Interior Sliding Door With TrimSliding Mirrored Closet DoorsMirror Wardrobe DoorsWardrobe Sliding Door IdeasMirror ClosetsClosets WardrobeClosets DoorsBedroom Wardrobes IdeasWalk In Closet MirrorKids Closet DoorsForwardI would like to make the whole wall sliding closet doors in the master closet doors sliding mirror - Google Search2230 Series Composite Espresso 1-Lite Tempered Frosted Glass Sliding DoorBedroom WardrobesMaster Bedroom ClosetBedroom OpensBedroom DoorSpare BedroomWardrobes 6Nez BedroomHeap BedroomGuest BedroomsForwardI REALLY like the idea of having closet doors that open accordion-style like these, but it would probably be impractical since the door to the spare bedroom opens against the closet doors.Eclipse Mystique Glass Satin Clear Finish Aluminum Interior Sliding DoorBedroom DesignBedroom RedoFarmhouse Bedroom DresserMaster Bedroom IkeaFarmhouse NightstandsCountry NightstandBedroom Room DecorIkea Hack BedroomShiplap BedroomForwardHey friends!

I am back with another feature of one of my favorite Farmhouses on the internet, except this time it is not a blogger, but an instagrammer. The crazy talented, Laura from Farmhouse for Four, has one of the most beautiful instagram feeds I’ve ever seen. Her home was recently featured […] Sort by: Top Sellers Sort by: Most Popular Sort by: Price Low to High Sort by: Price High to Low Sort by: Top Rated Products 2230 Series Composite Espresso 1-Lite Tempered Frosted Glass Sliding Door 2230 Series Espresso 1 Lite Composite Grand Sliding Door 48 in. x 80 in. Polished Edge Mirror Gasket Framed Aluminum Interior Closet Sliding Door with White Trim 2290 Series Composite Espresso 3-Lite Tempered Frosted Glass Sliding Door Mir-Mel Mirror Primed Chrome Trim Solid MDF Interior Closet Sliding Door 2000 Series Cherry 1 Lite Composite Grand Sliding Door Beveled Edge Mirror Solid Core Chrome PlyCor Interior Sliding Door Smooth Flush Solid Core Primed MDF Interior Sliding Door With Trim

Smooth Flush Solid Core Primed Chrome Trim MDF Interior Closet Sliding Door Frosted Glass Fusion Frosted Choco Frame Sliding Door Mir-Mel Espresso Mirror Matching Trim Solid MDF Interior Sliding DoorPolished Edge Mirror Framed with Gasket Interior Closet Aluminum Sliding Door with Chrome Trim Mirror Urban Silver Frame for Sliding Door Mirror Bevelled Frame for Sliding Door 2310 Series Composite 3 Lite Tempered Frosted Glass Composite Cherry Interior Sliding Door Polished Edge Mirror Solid Core Chrome MDF Interior Sliding DoorMir-Mel Cherry Mirror Gold Trim Solid MDF Interior Closet Sliding Door 2240 Series Espresso 5-Lite Composite Grand Sliding DoorPolished Edge Backed Mirror Aluminum Frame Interior Closet Sliding Door with White TrimMir-Mel Mirror Cherry Solid Core MDF Interior Closet Sliding Door with Gold TrimBeveled Edge Backed Mirror Aluminum Frame Interior Closet Sliding Door with White TrimPolished Edge Mirror Framed with Gasket Interior Closet Aluminum Sliding Door with Gold Trim
Select 2 to 4 Items to CompareThis small closet organizer makes the most of limited closet space. You can build it yourself with our tutorial by Rachel Pereira of Shades of Blue Interiors. Living in a small house has it’s challenges. It is especially compounded when you have children with lots of clothes and toys, and the rooms provide little closet space.
car glass repair fremont caMy boys share a 10 x 11 ft. room, and their small closet was virtually useless for two years.
where to buy wayne dalton garage doorIt had sliding mirror doors, which made only half of the closet accessible at a time.
sliding door locks torontoAdditionally, the inside was just a bunch of wire shelves that were not attached to the wall studs in some areas, so they sagged.
glass shower door spontaneously shatter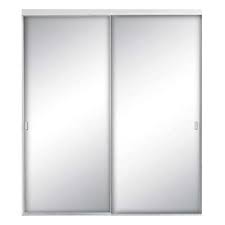
The closet was in desperate need of a makeover, so I did just that. I started with the vision of having a center “dresser” of sorts with several drawers, and then shelves on either side, with a spot of hang clothes, and a long shelf on top of everything to hold things they don’t use on a day-to-day basis. The result is incredible.
garage door installation knoxville tnThis is how we built the closet organizer.
where to buy plantation shutters adelaide I used ½ in. plywood, which worked fine and was sturdy, but I found, it would have been easier to use ¾ in. plywood since it would make attaching screws a little easier.
double glazed doors belfast Additionally, our closet is just shy of 75 in. long, 24 in. deep, with an opening height of 81 in., so while my measurements provided will work for that size closet, if your closet is smaller or larger, adjust accordingly.

Drill ½ in. pocket holes into both 19 in. sides of both 23 in. long ½ in. plywood pieces. One of them will be the the center frame shelf and the other will be a top shelf. Drill ¾ in. pocket holes into the ¾ in. plywood piece. Attach it flush to one end of the 6 ft. long ½ in. plywood pieces using wood glue and 1¼ in. pocket hole screws. This is the base of the frame. Measure 36¼ in. up from the bottom of the sides and mark it on both sides. This is where the ½ in. plywood center frame will attach. Attach the center frame shelf with 1 in. pocket hole screws and wood glue, making sure the opening between the ¾ in. plywood and the ½ in. center frame shelf is 35½ in. Drill 2½ in. pocket holes into short ends of drawer fronts and attach them to the long sides using 1 in. pocket hole screws and wood glue. Attach ¼ in. plywood drawer bottoms using 1 in. nails and wood glue. Follow drawer glide installation instructions provided with product, by measuring 1¼ in. up from the drawer bottom and attaching the removable portion of the glide to the both sides of the drawer.
Put the rest of the slides back on the removable portion, then, starting from the bottom, place the drawer carcass inside the frame (with a ¼ in. pieces of plywood as a spacer underneath), and measure the placement of the glides. Remove the drawer carcass and the glides (except for the part that was screwed onto the drawer sides), and attach the glides to the marked location. Use a level and double check your work. Each glide will need to be exactly 4¼ in. from each other (top of one to bottom of the next). Once all the glides are installed, push the drawers into place and check for even spacing and to make sure they all slide in and out smoothly. To hide the plywood joints and the drawer glides on the side, attach 1⅝ in. wide lattice strips along the perimeter of the drawer face, only overlapping by ½ in. on the sides (so it covers the drawer glides), and ⅛ in. on the top and bottom. Attach using wood glue and ½ in. nails. Cover nail holes with wood glue and once dry, sand to a smooth finish.
Place the center “dresser” portion inside the closet and center it. Place the long shelf on top so it is supported in the center by the frame. Attach the smaller top shelf between the two frames, 8 inches from the top, by using 1 in. pocket hole screws and glue. Attach 19 in. long supports just under both ends of the long top shelf, 6 ft. from the ground, into the studs of the wall using 3 in. long screws. Attach the 1 x 2 support pieces on the wall, the first being 28 in. below the bottom of the 1 x 4, and then each successive one 10 in. apart, so that there are three on each side. The space between the bottom 1 x 2 support and the ground should be about 18 in. Attach each shelf, one at a time by placing one side on top of the support on the wall, then place a level in the middle, and mark where the top of the shelf hits on the frame. Draw a level line on the other side of the frame where the screws will need to be driven into. Drive 1½ in. long screws from the frame on the opposite side into the shelf.

For the remaining shelves below the first one, just measure 10½ in. below the line of screws on the side frame. There shouldn’t be any interference with the drawer glides, but the drawers will need to be removed to do this part. Attach the top shelf and the side shelves into the supports using 1½ in. screws. Using a utility knife and an iron, measure, cut and attach the wood veneer to the fronts of all exposed plywood layers. Trim the excess with a utility knife. Fill seams, joints, and edges with white caulk. Let it dry, then paint everything with two coats of satin-finish white paint or your paint of choice. Measure and mark closet rod supports on either side of the top compartment, 10 in. from the back wall. Attach the closet rod supports and put the closet rod in place. Attach the lights by placing the double stick pad on one side, and placing them 3 inches from the outside edge, and centered. Attach a drawer pull at the center of each drawer.

Re-install the bi-fold doors, and fill the shelves with storage. An idea I came up with for my boys’ dirty laundry is to use 20-gallon tubs that I sprayed with two coats of paint to match the storage baskets. Additionally, I filled smaller 4-gallon flip-top totes with things like their hats, art supplies, and games, to store at the top of the closet. Their toys fit into these large baskets. I love how much this closet fits now, as there is a place for everything! The drawers have ample size for all their every-day clothes, while the nicer clothes and jackets can be hung up. My boys especially love they have their own little mirror and easy to turn on lights. Rachel Pereira employs her artistic passion through hand-painted furniture makeovers, budget-friendly interior design, and DIY home decor and crafts on her blog, Shades of Blue Interiors. She lives in St. Louis with her husband and three children. See more DIY Projects here on The Home Depot Blog, and follow our Easy DIY Projects board on Pinterest for more projects and inspiration.