linear garage door opener code
It looks like nothing was found at this location. Maybe try a search?Secure your garage by changing the door code from time to time. If you think someone knows the code to open your garage door or your remote has been stolen, it is time to change the code on your garage door opener. Newer garage door openers have a keypad in addition to the remote, which makes it slightly easier to change the code. If you have an older garage door that is only operated by a remote, you must physically move the switches inside the remote and door opener to change the code. Place a ladder beneath the garage door’s motor unit to reach the unit. Press the learn button located on the side of the motor and hold it down. Release the button when the light beside it goes out to remove the old code from its memory. Push the learn button on the motor again, so its light comes on again. Enter the desired code on your keypad on the garage wall. The motor unit’s light blinks to indicate that the new code has been accepted.

Press the learn button on the motor once more, so the light on the motor lights up again. Press a button on your remote. The motor unit’s light blinks to indicate the remote has been programmed with the new code. Repeat this step to program all other remotes. Take the cover off of the garage door’s remote control to expose the switches inside the remote. Repeat to change the code in all additional remotes. Move the switches inside the remote to change the code. Replace the cover on the remote control. Place a ladder beneath the garage door’s motor unit. Move the switches on the motor to change the code to match the code in the remote control. /Getty Images Suggest a CorrectionHOMELINK IN-CAR REMOTE PROGRAMMING INSTRUCTIONS To program a built-in-car transmitter to a rolling code garage door opener (Genie rolling code is called Intellicode, Liftmaster/Sears is called Security plus), you should take the following steps. Clear out anything previously programmed into the in-car system from the factory by holding down on the 2-outside buttons simultaneously, until the in-car LED starts flashing rapidly.
This may take up to a minute (in most cases, the key should be on auxilary, and/or the car door must be shut). Decide which button you want to make to be your in-car garage door transmitter. Hold your transmitter up near the selected button, pressing both the garage door remote and the selected in-car transmitter button simultaneously. Hold down on the buttons until the in-car, LED light flashes rapidly.
garage door bottom bracket amazonThis sets the in-car remote transmitter to be your garage door openers make transmitter, but you are not done.
exterior french doors austin texasYou now need to make this in-car transmitter your personal transmitter.
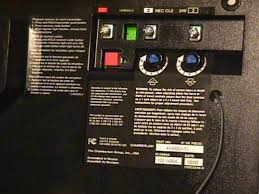
garage door repairs bolton area Go to the Learn Button on your garage door opener.
The button is usually next to the area where the floppy antenna is connected to the motor head. With Genie it is most often behind the light lens, and an indicator light flashes red when pressed. With Sears or Liftmaster (Chamberlain) it is near, or part of, the terminal screw board, and is a red, green or purple square button with a green, amber or purple indicator light. Press this learn button momentarily. The indicator light will turn on and blink if Genie or otherwise stay lit. For Genie systems, go back to the in-car transmitter button you programmed and press this button 3 or 4 times, or until the door starts moving. This should set your in-car transmitter to your garage door opener. For Liftmaster, Sears, or Linear Megacode press and hold the in-car button you programmed until the garage opener light flashes. Your in-car is now programmed to operate your door. Programming a Fixed-Code Device (Majority of units made prior to 1996) These devices have internal dip-switches located near the battery of your remote.
This may take up to a minute. (In most cases, the key should be on auxilary, and/or the car door must be shut). Press and hold the in-car button you want to use to operate your garage door while simultaneously pressing and holding the button to your hand held remote until the LED on the in-car remote flashes rapidly. Test the in-car remote by pressing the button you chose to operate your door. When the door operates your in-car remote is programmed. UNIVERSAL HOME REMOTE FOR HOMELINK (UHR) OR CAR2U IN-CAR SYSTEM Programming a Rolling Code Garage Door Opener If your in-car (UHR) remote has 3 LED lights, one above each button, you should follow the instructions below to program your Rolling Code Garage Door Opener. Press the outer two in-car (UHR) buttons simultaneously for 2 seconds and release (In most cases, the key should be on auxilary, and/or the car door must be shut). Place the garage door opener into “learn” mode by pressing the small square colored button, or the small round black button on a Genie, located behind the light bulb globe in the garage.
This may require the use of a ladder, follow all safety precautions. The LED on the garage door opener will go on immediately. For Genie openers the LED will begin blinking. Press and hold the button on the in-car (UHR) remote that you want to use for operation of the garage door to activate. Watch for the garage door to activate. When the garage door activates, release the button and depress again the selected button to lock in the program. Programming of Rolling Code garage door opener is now complete. Programming a Fixed Code Device (Majority of units made prior to 1996) Below is a picture of a typical 12-switch DIP switch layout located on your hand-held remote control under the battery cover (your remote may have 8-12 DIP switches). Note: Genie, Linear, Multi-Code and Stanley have only 2 position switches: up or down. LeftLeftLeftLeftLeftLeftLeftLeftLeftLeftLeftLeftUP, "+" or On Middle, neutral or "0"Middle, neutral or "0"Middle, neutral or "0"Middle, neutral or "0"Middle, neutral or "0"Middle, neutral or "0"Middle, neutral or "0"Middle, neutral or "0"Middle, neutral or "0"Middle, neutral or "0"Middle, neutral or "0"Middle, neutral or "0"Middle, neutral or "0"

RightRightRightRightRightRightRightRightRightRightRightRightDown, "-" or off Press all three in-car (UHR) buttons simultaneously and release (In most cases, the key should be on auxilary, and/or the car door must be shut). Enter your corresponding DIP switch settings into your in-car (UHR) by pressing and releasing the buttons corresponding to the settings you show on your hand held remote or on the receiver, located on the ceiling of your garage, based on the above chart. For example: if the first switch is “UP” or “+”or “ON,” press the left button. If the 2nd switch is “Down” or “-” or “OFF,” press the Right button. When you are done entering all the DIP switch settings, press all three in-car (UHR) buttons simultaneously and release. Press and hold the button that you want to use for operation. Watch for the garage door to activate. When the garage door activates release the button and depress again the selected button to lock in the program.