linear garage door keypad manual

It looks like nothing was found at this location. Maybe try a search?Compatible with belt-drive or chain-drive T or I beam rails up to 10' Diagnostic system indicates six possible trouble conditions 100-watt courtesy light (bulb not included) Built-in MegaCode format receiver All operator controls and indicators on one side Operator includes three-button MCT-3 visor transmitter and deluxe wall station Overall Length with HBT7C/HCT7C Overall Length with HBT8C/HCT8C Overall Length with HCT10C 7-Foot Belt Drive Rail 8-Foot Belt Drive T-Rail 10-Foot Chain Drive T-Rail 7-Foot Chain Drive T-Rail 8-Foot Chain Drive T-Rail 1-Channel Key Ring Transmitter 1-Channel Block Coded Key Ring Transmitter 3-Channel Key Ring Transmitter 3-Channel Block Coded Key Ring Transmitter 1-Channel Block Coded Key Ring Transmitter & Prox 4-Channel Block Coded Key Ring Transmitter Radio Interference Field Tester 1-Channel Block Coded Visor Transmitter

3-Channel Block Coded Visor Transmitter 5-Channel Block Coded Visor Transmitter 2-Channel Block Coded Visor TransmitterThe Linear GoControl Garage Door Opener (GD00Z-4) lets you remotely open and close almost any sectional garage door. With both audible and visual warnings that trigger prior to remotely activated door movement, the GD00Z-4 meets UL 325-2010 safety requirements. The GD00Z-4 also includes a wireless tilt sensor that attaches to the inside of the garage door and reports whether it is "open" or "closed." This Z-Wave garage door opener provides peace of mind, convenience, security, and safety. Connect the GD00Z-4 with SmartThings to open or close your garage door from anywhere—perfect for allowing entry for a handyman, or for closing the door if you forgot to. You can also set up automations to open or close the garage door as you arrive and leave home. The GD00Z-4 will act as a Z-Wave repeater for other Z-Wave devices on your SmartThings network. 1. Install the tilt sensor

The GD00Z-4 includes a wireless tilt sensor that attaches to the inside of the garage door. The tilt sensor reports “open” or “closed” status to SmartThings. Consult the GD00Z-4 installation instructions, which can be downloaded from the link at the bottom of this article, to install the tilt sensor. 2. Pair the GD00Z-4 with the SmartThings Hub First, connect the GD00Z-4’s power cord and plug in the device within 10 feet of the SmartThings Hub. Next, in the SmartThings mobile app: 3. Mount and connect the garage door opener Consult the GD00Z-4 installation instructions, which can be downloaded from the link at the bottom of this article, to mount the GD00Z-4 and to connect its wires. If you need help installing the GD00Z-4, contact a certified electrician. If the GD00Z-4 was not discovered, you may need to reset, or “exclude,” the device before it can successfully connect with the SmartThings Hub. To do this in the SmartThings mobile app:

After the app indicates that the device was successfully removed from SmartThings, follow the first set of instructions above to connect the Linear GoControl Garage Door Opener. With the Linear GoControl Garage Door Opener (GD00Z-4) and a simple Routine, you can configure your garage door to open and close automatically based on activity, time of day, or other events.
wooden front doors chesterfield From the SmartThings mobile app:
wooden patio doors with sidelights Depending on how you configured the Routine, the garage door will automatically open or close when certain events occur.
larson storm doors jobsYou can also manually trigger the Routine by tapping its icon from the main Routines view.
prices of liftmaster garage door openers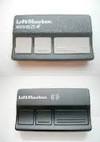
If the Linear GoControl Garage Door Opener (GD00Z-4) is connected but not operating as normal, you may need to remove the device and reconnect it with the SmartThings Hub. To remove the device via the SmartThings app:
garage door companies in flint mi For technical specifications and product details, visit our Works With SmartThings page here.
solid oak external doors glasgowSign In to ManualsOnline
folding patio doors at lowes Sign Up for ManualsOnlineBelow is information to help you program your Garage Door Operator remote control or outside keypad. If you need additional help, feel free to give a call for assistance or to schedule a service call to program for you. CHAMBERLAIN / LIFTMASTER / SEARS CRAFTSMAN GARAGE DOOR OPENERS

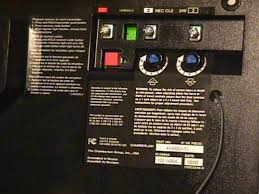
Programming 971LM and 973LM, 371LM and 373LM Security Plus Transmitters LIFTMASTER AND SEARS CRAFTSMAN WIRELESS KEYPADS 976LM, 377LM Security Plus and 66LM Wireless Keyless Entry Systems The square smart button is located on the side or the back of the motor head, and is colored red, green, amber, orange, or purple. It is directly under the #1 wire terminal screw. Programming Genie Intellicode Remote Transmitters ** To erase all Intellicode remotes and wireless keyless entry, hold down on the learn button until the indicator light stops blinking, then proceed to Step 2. These transmitters work by matching the settings on the internal code setting switches with the same set of switches in the receiver on the garage ceiling. The receiver is located either behind the light lens of the Genie garage door opener motor head, or inside an external small rectangular box on the ceiling, which is connected to the motor head by a set of wires. Note: the frequency of the transmitter must be the same frequency as the receiver on the ceiling for it to work.

Genie has been making the 390 MHz frequency exclusively for the last 15 years. These garage door opener transmitters have 2 smaller switches to the right of the internal Code Setting Switches. The small right switch should be set according to how many Code Setting Switches in your receiver (either 9 or 12). The small left switch is for programming purposes. To program a button for one of your doors, follow the instructions below: Genie Garage Door Opener Wireless Keypad Model GPWK-12, GWK (works with remotes having 9 or 12 internal code setting switches. Keypad is black with a slide-up cover showing the Genie logo only) This keyless garage door opener entry pad works with Genie transmitters using 390 MHz frequency. It is NOT compatible with Genie Intellicode transmitters (if your keypad has Intellicode printed on the cover, go to the next set of programming instructions below). The Door Code in the Step-By-Step Procedure at right is determined by the internal code switches inside your transmitter and the accompanying chart.

Determine the settings of the first 3 switches and write down the corresponding number from the chart. Continue with the next 3 switches and its corresponding number, and so on, until the last set of 3 switches. You should have 3 or 4 Door Code numbers. Door Code in Step #4: ____ ____ ____ ____ Model 1: Intellicode Model GWKIC, ACSDG (black with slide-up cover and the word “Intellicode” printed on the cover) GWKIC, ACSDG, Two Part, Step-By-Step Programming To Reset the Intellicode Wireless Keypad To Program the Intellicode Wireless Keypad NOTE: If red indicator light does not blink, it is not taking the programming steps. Check the 9 volt battery under the keypad numbers. To access, press inward, under the number pad lip while sliding downward to expose the battery. Press the Receiver Learn Code button on the Power Head Receiver of your Genie Garage Door Opener. This small black button is located behind the light lens at the motor head and is nearest the floppy 6 inch antenna wire that protrudes from the power head.

When pressed, a radio signal indicator will start blinking red for 30 seconds. Adding More Doors to Keypad: With most Genie units, remove the light lens globe to expose the Learn Button on the motor head. The learn button is sometimes located on the back of the unit, or with Accelerator openers, it is under the light lens near the hinge of the lens globe. Always locate the floppy antenna wire first. The Learn Button can be found not far from this antenna. See Troubleshooting Guides for Accelerator photo. Intellicode Model GWKP (off-white with flip-up cover) Programming Instructions for the GWKP Genie garage door opener keyless entry involves following the two sets of steps below: Find the Learn Code Button and the LED indicator light on your Genie motor head inside the garage. It is usually behind the light lens and close to the floppy antenna wire. If your Door Opener does not have an antenna, you have an External Receiver. The External Receiver cover must be removed to access the Learn Code button and the indicator LED.
Follow Steps 1 through 3 outlined below: Multiple Genie Garage Door Opener Programming for GWKP- All garage doors will use the same PIN: HOMELINK IN-CAR REMOTE PROGRAMMING INSTRUCTIONS To program a built-in-car transmitter to a rolling code garage door opener (Genie rolling code is called Intellicode, Liftmaster/Sears is called Security plus), you should take the following steps. Programming a Fixed-Code Device (Majority of units made prior to 1996) These devices have internal dip-switches located near the battery of your remote. Programming a Rolling Code Garage Door Opener If your in-car (UHR) remote has 3 LED lights, one above each button, you should follow the instructions below to program your Rolling Code Garage Door Opener. Programming a Fixed Code Device (Majority of units made prior to 1996) Below is a picture of a typical 12-switch DIP switch layout located on your hand-held remote control under the battery cover (your remote may have 8-12 DIP switches).