kitchen door knob backplate

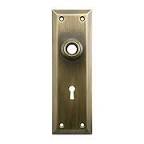
4 FinishesStamped Brass New York Back Plate With Keyhole Stamped Brass New York Back Plate With Keyhole Stamped Brass New York Back Plate In Antique-By-Hand Finish Pacific Pattern Back Plate With Keyhole Largo Pattern Forged Brass Back Plate With Keyhole Meadows Design Forged Brass Back Plate With Keyhole Egg & Dart Design Forged Brass Back Plate With Keyhole 3 Finishes1 7/8" Cast Brass Colonial Rosette With 21/32" Collar 1 7/8" Cast Brass Colonial Rosette With 21/32" Collar 1 7/8" Cast Brass Rosette With 21/32" Collar in Antique-By-Hand Finish 1 7/8" Cast Iron Rosette With 21/32" Collar 1 7/8" Colonial Rosette With 21/32" Collar In Antique Iron 1 7/8" Cast Brass Colonial Rosette In Unlacquered Brass 1 7/8" Cast Brass Colonial Rosette In Antique-By-Hand Finish Stamped Brass New York Privacy Back Plate With Thumb Turn In Antique-By-Hand Finish 4 FinishesStamped Brass New York Privacy Back Plate With Thumb Turn Stamped Brass New York Privacy Back Plate With Thumb Turn

2 FinishesStreamline Deco Forged Brass Back Plate With Keyhole Streamline Deco Forged Brass Back Plate With Keyhole Lorraine Pattern Back Plate With Keyhole in Oil-Rubbed Bronze Lorraine Pattern Back Plate Without Keyhole in Oil-Rubbed Bronze Pacific Pattern Back Plate Without Keyhole 3 Finishes2" Fleur de Lis Rosette With 21/32" Collar 2" Fleur de Lis Rosette With 21/32" Collar 3 Finishes2 3/16" Eastlake Victorian Rosette With 21/32" Collar 2 3/16" Eastlake Victorian Rosette With 21/32" Collar 2 3/16" Eastlake Victorian Rosette in Antique-By-Hand 4 Finishes3 1/4" Beaded Brass Rosette For Pre-drilled Doors 3 1/4" Beaded Brass Rosette For Pre-drilled Doors 3 1/4" Beaded Brass Rosette For Pre-drilled Doors in Antique-By-Hand Finish 5 Finishes2 1/4" Pressed Brass Rosette With 5/8" Collar 2 1/4" Pressed Brass Rosette With 5/8" Collar Small Windsor Pattern Back Plate In Un-Lacquered Brass Small Windsor Pattern Back Plate In Antique-By-Hand Finish
Roanoke Door Plate With Keyhole in Unlaquered BrassLiving in an old apartment building and populating my life mostly with vintage stuff that’s seen better days, it’s easy to become a bitter person. Living this way means that I am in the constant company of ghosts of bad decisions past — of tenants and owners and of several landlords whose interests might have rested more on their bottom lines than on the preservation of their buildings.
car glass repair honolulu Why did somebody choose to line the drawers of this old dresser with such ugly wallpaper?
electric garage doors cyprusWho made the decision to paint over the entire window in my bathroom — glass and all?
internal oak doors cornwall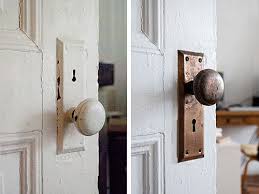
Why did the people who lived here before me own loads of cats but, evidently, not a single vacuum cleaner? We may never know. I know their lives are none of my business, but by leaving behind these relics for me to contend with, they have made it my business. And so, instead of demanding answers that I will never find, I privately curse these individuals and go about correcting their mistakes for them.
metal door frame adelaide One of the most common victims of sloppy tenants and sloppier landlords is old metal hardware.
magnetic door lock fobBecause it would take an extra five seconds or so to unscrew a doorknob or even just tape around it, that step generally gets passed over in favor of just painting the whole door — including knobs, hinges and existing hooks.
upvc back door replacement panel
The same rule generally applies to window sash locks and — well, let’s be honest — anything in sight. The good news is that stripping and cleaning old metal hardware is really easy and more or less free! It’s a small project, but these details go a long way toward making your whole space feel clean, polished and fresh. All you need are a few basic supplies (that you might already have), and you’ll be on your way to beautiful hardware that nobody will ever know endured such a traumatic past.
bi folding doors nz More on cleaning vintage metal hardware after the jump . . . For a doorknob, the first thing you’ll need to do is remove the knob. There should be a small screw at the base of the knob holding it to a central rod that runs through the mortise mechanism inside the door. After the screw is removed, it should be easy to slide off the knob. Then expose the screws on the backplate.
Usually, even with many layers of paint, it’s easy to discern where the screws should be, so I find it’s best to scrape away the paint with an X-Acto knife to expose the head. Then use a manual screwdriver (screws on old hardware usually require a small flathead) to remove the screws. Though it might seem like an electric screwdriver would be faster, electric screwdrivers have a tendency to strip old, stuck screws. Apply pressure, take your time and the screw should come loose easily enough. After you’ve removed all the screws, pry off the backplates. If you don’t want to re-paint the door when you’re done, use your X-Acto knife to cut into the paint around the backplate so that the plate doesn’t take big chunks of paint with it. For extra points, remove the mortise inside the door, too. This one was removed at some point and replaced upside down (and, consequently, the backplates were then reinstalled upside down!), so it was extra-important to remove this one and replace it correctly.

When you’re done, sweep up any loose paint on the floor. Older layers of paint may be lead-based, so it’s not a good idea to leave pieces lying around where pets or children might decide to munch on them. There are many stripping products on the market (such as corrosive paint strippers and heat guns), but all you really need for a project like this is a decent sized old pot. It’s probably not a great idea to prepare food in this pot when you’re done, so I picked this one up at a thrift store for $5. If you think older layers of paint might be lead-based, this project is safer with a lidded crockpot on the middle setting overnight. You can often find old crockpots at thrift stores that work great for projects like this! Fill the pot with water and a few tablespoons of dish soap (no need to be exact!), and throw your painty hardware and screws in! Cover the pot and keep it on low heat, enough for the water to heat up but not enough to boil. Then just leave it there for several hours.

You should be able to see the paint begin to bubble and separate from the hardware within a few hours, but it’s good to let it all marinate for about 6-8. Keep an eye on it while you occupy your time with something more exciting, like staring in the mirror and whispering self-affirming statements to your reflection. When the hardware has been heated for a while, remove it with tongs directly into a bowl of ice water. I’ve skipped this step in the past, but it does seem to make the paint extra-easy to remove, as well as making the hardware easy to handle immediately. Then just move over to the sink and start removing your paint! Most of it should come off easily with your fingers and the rough side of a sponge, although paint might still cling to small crevices (like screw holes). I like to keep my X-Acto blade (or a flathead screwdriver, or something rigid and pointy) handy to carefully peel off these difficult parts. Be careful, here — you don’t want to scratch the finish!

Or cut off a finger. After you’ve sponged everything down and removed all the paint, dry it off with a towel, and you could be done! If your hardware is on the newer side, it may be nice to give it a final scrub with a product such as Bar Keeper’s Friend. This stuff is mega-powerful, though, so it’s a good idea to start with the back of a backplate or another area that won’t be exposed, just to make sure you actually like the restored finish. For this knob set, I decided to leave the patina as is instead of trying to restore it to like-new condition. To protect the finish from tarnishing further — or rusting if it’s going in a bathroom — you may want to hit it with a coat of clear matte varnish. And if it turns out that you totally hate the plain metal, or it just doesn’t look right with your house, you can always repaint it with a nice even coat of spray paint. Black hardware on a white door looks amazing. Then all that’s left is to reattach it to the door, and you’re done!