kitchen cabinet doors crooked

A Small Change, Big Impact Rental Kitchen Upgrade Before & After: A Small Change, Big Impact Rental Kitchen Upgrade (Image credit: Submitted by Kevin) I will never get tired of seeing real life, totally attainable home updates, especially when they're renter friendly. Kevin's flawless execution of some classic kitchen updates is absolutely worth a gander and may inspire some updating of your own. From Kevin: When I started thinking about giving our little kitchen a refresh, I immediately thought of what a big impact some color could have in our kitchen. And when I started brainstorming it hit me – I could paint the countertops too! They are white laminate, which is basically the most stainable material you could use on a countertop, so they show traces of spills very easily. I’ve always wanted to cover them in concrete, but we opted for a much simpler update by just painting them with Rustoleum’s countertop finish in Grey Mist. I also thought it would be nice to bring some color to the bottom cabinets, so I chose a grey-blue Distant Star to soften the contrast between the counters and the lower cabinets.
I was hesitant to call this a renter-renovation because although we are renters, these updates might not fly with any landlord/landlady. But don’t lose hope – these next two updates are definitely things you could get away with. Our little white cabinet knobs were just begging to be updated, and it’s amazing what a huge difference new hardware makes. Enter steel bar pulls, and suddenly things feel so much sleeker.
garage door repair madison alI picked the five-inch height so they would make the biggest impact.
solid core door sydneyWe’ve also been craving a real backsplash behind the sink, and I’m amazed at the difference going from a blank wall to (faux) subway tiles makes.
auto glass repair trenton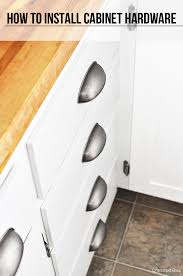
Although they’re the same color as the wall, they provide just a hint of texture and shine that makes the space look so polished! We used Smart Tiles, which are thin, adhesive tiles that are crazy easy to install and remove and very cost effective.To see more of Kevin's kitchen project, check out his blog Thou Swell. SEE MORE BEFORE & AFTER PROJECTS SUBMIT YOUR OWN BEFORE & AFTER PROJECT
wooden front door wiltshire HTTP Error 404.0 - Not Found
buy ring doorbell in australia The resource you are looking for has been removed, had its name changed, or is temporarily unavailable.
upvc bi folding doors cost The directory or file specified does not exist on the Web server.
where to buy door knob that retracts when locked
The URL contains a typographical error. A custom filter or module, such as URLScan, restricts access to the file. Things you can try: Create the content on the Web server. Review the browser URL. Create a tracing rule to track failed requests for this HTTP status code and see which module is calling SetStatus. For more information about creating a tracing rule for failed requests, click here. Links and More Information This error means that the file or directory does not exist on the server. Create the file or directory and try the request again. View more information »Bob Vila PER Week The latest in news, tips, & inspiration delivered right to your inbox. 13 Home Improvements That Are Illegal to DIY 20 Insanely Easy 60-Minute Home Improvements10 Natural Ways to Make Your Home Critter-Free 22 Tiny Houses We Love WHAT DO YOU NEED HELP WITH? 15 Old House Features We Were Wrong to Abandon Beyond Ikea: 10 Other Places to Get Affordable Furniture

12 Kitchen Trends You Might Regret The 10 Best Accessories You Can Buy for Your Car 15 Plants Never to Grow in Your Yard 21 Home Hacks That Are Crazy Enough to Work 8 Low-Cost Kits for a 21st-Century Log CabinCabinets FixesRepair CabinetsCabinet RepairsCabinets BuildDiy Kitchen CabinetsCabinets QuickCabinets Don TCabinets WorkKitchen DiyForwardHome Repair: How to Fix Kitchen Cabinets - fixes for lots of common problems like sagging shelves, worn-out slides, crooked doors, dull finishes, wimpy drawer bottoms, broken or sticking drawers, stripped screw holes, scratches, gaping doors, etcTo extend the life of your KraftMaid Cabinetry, please download the Full Care and Cleaning Guide. Care & Cleaning Guides We now have two versions of our Care and Cleaning Guide. Which one you need depends on when you received your cabinets. Our Most Recent Guide If you received your cabinets AFTER March 1, 2014, please use this guide. If you received your cabinets PRIOR to March 1, 2014, please use this guide.

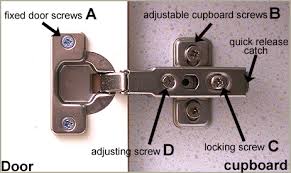
KraftMaid designs much of its cabinetry to be adjustable by you, the customer. Over years of normal use, some screws and hinges may need to be tightened, or drawers and runners adjusted for peak performance. We construct our cabinetry with several types of durable, high-performance hinges that will operate smoothly and silently for years. Periodically, you should tighten hinge screws, because they can loosen over time with normal use. Wood Drawer Box If a drawer front looks crooked, first measure at each end of the drawer front to see if the height is the same. If not, slightly push the adjustment tab on the lower side towards the back of the drawer. To move a drawer front forward or back, you can rotate the tilt adjustment dial on the rear of each drawer to tilt the top of the drawer front forward. Rotate counterclockwise to raise back of door. Note: This adjustment can only be made PRIOR to installing decorative hardware (handles or knobs). Metal Drawer Box Again, first measure at each end of the drawer front to see if the height is the same.

If not, remove cover plate on the inside of the metal drawer box. Inside will be two screws, one for up and down adjustment and the other for adjusting the drawer front right to left. We construct our cabinetry using several types of self-adjusting drawer suspension systems. The drawer function and, in some cases, the options chosen by the purchaser determine the runner type used. We equip sidemount runners with self-adjusting rear mounting clips. If roll-out trays rub or bind, remove the tray and check the position of the screws in the runner, as well as in the cabinet. You may need to retighten these screws to eliminate any interference or chafing. Like sidemount runners, undermount runners come with self-adjusting rear mounting clips. The ball-bearing-action undermount suspension system is galvanized. This precision runner also has self-adjusting rear mounting clips. One additional adjustment is possible with this system. To raise the drawer, simply move the orange lever on the front retainer clips back until the drawer is at the proper position.

This is located on the underside of the drawer. To lower the drawer, move the gray levers forward until achieving the appropriate position. We offer one of the most comprehensive line of storage solutions available. With more than 200 intelligent, attractive options, you're sure to find everything you need - and a place for everything you have. After installation, you may need to make a few final adjustments. Whether used to highlight collectibles or to illuminate a countertop, our low-voltage lighting is an excellent and economical lighting source. To replace a bulb, make sure you turn it off and allow the bulb to cool completely. Remove the plastic lens ring by turning it slightly and pulling downward. Firmly grasp the miniature xenon bulb and pull it from the base in a horizontal motion. Oil from the skin can cause premature bulb failure, so grasp the new bulb with a tissue and insert the bulb into the fixture base. Replace the lens ring. Installation is now complete. 10- or 20-watt (max.) halogen bulbs are suitable for replacements.