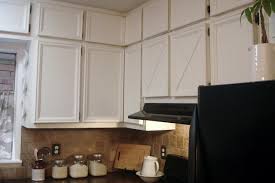
kitchen cabinet doors are crooked

Video Playback Not Supported How to Adjust Concealed Kitchen Cabinet Hinges If your kitchen cabinets have adjustable hinges, you may need to tweak them from time to time so the doors will close properly. Watch this video to find out which screws to turn to achieve the perfect fit on your cabinet doors. Videos You May Like Replacing Kitchen Cabinet Hardware How to Install Kitchen Cabinet Doors An integrated fridge is one that blends seamlessly into your kitchen by hiding the ugly appliance behind a door that matches the other cabinets. It's an appealing design choice for some kitchens, but a permanent one that should be considered carefully before proceeding. Once you have decided to go down the integrated route, if you change your mind and remove the outer door to expose the fridge, the fridge door itself will be blighted by marks. If you do decide that the integrated look is for you, these step-by-step instructions can help you install the covering that will hide your refrigerator.

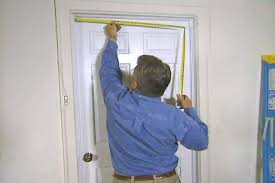
Step 1 – Measure Up Once the appliance has been set into it's permanent space, make sure that it sits “deep” enough to be concealed when the outer door has been fixed on. Make sure also that the appliance does not interfere with the opening of the doors on either side. Step 2 – Check the Level Check that the appliance is level before you attempt to fit the doors. If it is not, the fittings will not match up properly and you may have to drill multiple holes. Also, if the outer door is hung crooked, it will look unsightly and stand out in an otherwise uniform kitchen. Step 3 – Check the Manufacturer’s Kit Compare the manufacturer’s kit against the instructions before you go any further. Does it contain everything it's supposed to? Are there any additional parts or tools you need to purchase for the installation? If not, take your instructions with you to your local home improvement store and get anything you are missing. There are two main systems for fitting integrated fridge doors.

One is a sliding system which uses a sliding rail to connect the cabinet door to the refrigerator door. When the cabinet door is opened, the sliding rail opens the fridge door as well.
marvin french doors sizesA kit for this should include screws and the sliding rail itself, in addition to a template showing where the holes should be drilled.
garage door repair south san jose The other system is a straight door-on-door.
garage door repair fresno caHere the outside doors are fixed directly onto one from the fridge, so the latter will be marked and holes will be drilled into it.
secret bookcase door cost
The manufacturer’s kit should include screws and a drilling template. Step 4 – Drill the Holes It is essential that the holes are drilled with precision to avoid unnecessary damage to the integrated fridge and to the cabinet doors.
second hand patio doors gloucesterFollow the template provided with the manufacturer’s kit and double-check to avoid mistakes.
glass fireplace doors ottawa Step 5 - Screw the Door into Place
upvc french doors west london The measuring and the drilling are the difficult bits to this task; actually hanging the door is the easy part. Use the screws provided in your kit for this task and you should be finished—easy as that. Now your integrated fridge is hidden from view and your kitchen has a uniform look all around!

Tools NeededIdentifying the Looks HingeCabinet Hinge AlignmentTightening Cabinet Door Screw Sign Up for Our Free Newsletters Did you mean ? This week we're learning more about IKEA's new SEKTION kitchen cabinets, thanks to the help of Dan Goldman from Brooklyn's PANYL. Now we're about to see SEKTION in action! Earlier this month Dan and Ron Youmans of The Kitchen Couple installed a SEKTION kitchen in a Boerum Hill, Brooklyn rental apartment. Here's a play-by-play of their installation experience. Here's what the space looked like when Dan and his team arrived: "The kitchen had hardly any storage or counter space, the cabinets were old and grimy, and the refrigerator loomed over the room like a stainless steel elephant," Dan says. Meanwhile, a nook directly opposite the sink sat empty. "We planned to install new base cabinets in a U-shape, with an L-shaped run of upper cabinets above the stove and sink," Dan says. Opposite the stove would be a peninsula with additional storage.
The far side of the peninsula would be a breakfast bar, framed in by vertical counter panels, and finished with a large trim panel. And that stainless steel elephant of a refrigerator? It was getting moved to the nook opposite the sink and boxed in with trim panels and cabinetry. "IKEA SEKTION flat-pack assembly will be familiar to anyone skilled in the IKEA arts," Dan notes. "Although many small changes have been made, notably to the design of the plastic legs and the suspension rail system, the basic assembly is comparable to AKURUM." After cutting an opening in the back panel for plumbing, Ron and his team installed the first SEKTION corner cabinet. The floors were quite warped, so it took some tinkering to level the corner cabinet with the legs. The new suspension rail system allows you to slide the mounting brackets onto the rail first, and then pass them through large rectangular cutouts in the back of the cabinet. "This is an improvement over the prior method, in which you had to peer through a tiny hole in the back panel to locate and thread a bolt though a small nut," Dan notes.
Once each cabinet was level, Ron tightened a threaded plastic peg to immobilize the connecting bracket on the suspension rail. "After joining the DÖMSJO sink cabinet to the first corner cabinet, we left a space for the dishwasher," Dan says. "The run continued with another SEKTION corner cabinet, a trash bin cabinet and a five-drawer MAXIMERA base cabinet." Ron used a sawzall to remove the baseboard molding between the wall and the adjacent cabinets. The entire base cabinet run was then pushed flush against the wall. The last step was to rip a piece of AKURUM PERFEKT trim panel to cover the back side of the peninsula cabinets. "The brackets can be slid onto the rails first and then inserted through the openings in the cabinets, or they can be attached to the cabinets first before sliding them onto the rail," Dan says. "Once the cabinet is in place, the plastic peg is rotated a quarter turn to prevent the brackets from moving along the rail. We assembled most of the cabinet frames before Ron arrived, allowing him to make quick work of the upper cabinet run."

The box-in of the refrigerator was another place where Ron's deep experience paid off. "Again we used AKURUM PERFEKT trim panels which Ron cut to size and braced to the floor and wall," Dan says. Dan continues: "The SEKTION system is designed to work with IKEA's appliance line. This refrigerator was significantly wider than an IKEA model, so for the over-fridge storage we fastened two 30" wide SEKTION microwave cabinets together and then turned them onto their sides. This is why shelf peg holes and cabling slots are visible. Ron sandwiched this assembly between the two trim panels before fixing them to the wall with a suspension rail. The suspension rail brackets are covered by IKEA's standard plastic snap-on covers. (They haven't upgraded those, unfortunately)." Installing the MAXIMERA drawer slides was straightforward. However, there were quite a bunch of them! The first completed MAXIMERA base cabinet! That's an in-depth look at the construction of a SEKTION kitchen!