internal door latch sticking

Home & GardenHome ImprovementDoorsHow to Lubricate a Door Lock How to Lubricate a Door Lock Many people put up with the aggravation of a sticking door lock for years. Ironically, by cleaning and oiling them, you can fix most locks in a matter of minutes. Fixing a few stubborn locks might involve disassembling, cleaning, and then reassembling the lock. First, clean the keyhole with a penetrating lubricant like WD-40. (Don’t apply household oil to the key or cylinder because it attracts dirt and eventually would gum up the lock.) Spray the lubricant into the keyhole itself and then spray it on the key. Slide the key in and out of the lock several times to spread the lubricant. If this superficial cleaning doesn’t free the lock, eliminate the aggravation altogether: Take about ten minutes to disassemble, clean, and reassemble the entire door lock. Here’s how to remove and clean the most common type of door lock: With the door open, use a Phillips screwdriver to take out the two connecting screws that are located by the doorknob on the inside of the lock.

Remove the two screws that hold the lock faceplate on the edge of the door. Slide the doorknob off the spindle, pull out the lock mechanism, and remove the latchbolt from its hole in the edge of the door. Lay the disassembled lock parts on layers of newspaper or paper towels. Spray a light all-purpose household lubricant or silicone lubricant on all moving parts of the lock, flushing out the latchbolt. Use powdered graphite to lubricate the lock cylinder. Spray until all the dirt is flushed from the assembly and then let the latchbolt assembly lie on the newspaper or towels until all the excess lubricant has dripped off. To reassemble the door lock after cleaning and lubricating it, follow these steps: Insert the latchbolt assembly into its hole in the edge of the door. Insert the exterior doorknob and spindle into its hole, aligning it so that the spindles and connecting screws pass through the holes in the latchbolt assembly. Drive in the latchbolt screws, but don’t tighten them until the lock is completely assembled.

Slide the interior doorknob onto the shaft, aligning the screw holes, and then drive in the screws. Turn the doorknob back and forth to check that the cylinder and latchbolt are engaged and in proper alignment. Tighten the screws on the latchbolt and recheck the alignment by turning the knob. If you have any parts left over, guess what? Disassemble the lock and replace all the pieces. Test the lock by turning the knob and locking the lock. If the lock doesn’t work smoothly, loosen the screws, realign the cylinder and latchbolt, and try again. You can lubricate deadbolts the same way. Remove the connecting screws, the faceplate screws, and then the knobs. Next, pull out the latchbolt assembly and clean and lubricate the lock as just described. To reassemble the lock, reverse the procedure.Use the appropriate screwdriver when working on a doorknob. Turning a doorknob retracts the end of a bolt, or latch, from an opening in a strike plate on the face of the door jamb, allowing the door to open.
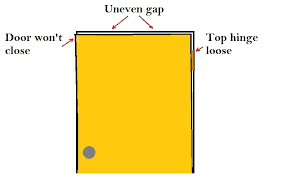
If the doorknob and strike plate aren't damaged and the knob doesn't work as it should, there may be a problem with the bolt mechanism. Fixing more complex mortise locksets found on many entry doors requires training and experience. But a do-it-yourself homeowner usually can troubleshoot and fix a doorknob bolt mechanism in a short time. Open the door so you can access the knobs on each side. Insert a doorstop under the door. Inspect the opening in the metal strike plate on the face of the doorjamb.
digital door locks sri lankaIf you notice worn areas at the edges of the opening, enlist a door installer or contractor to adjust the door's hinges and align the door.
shower glass doors menardsAlternatively, proceed with the doorknob.
glass shower doors barrie
Loosen and remove the machine screws that secure the doorknob at the inside face of the door, using the appropriate screwdriver. Save the screws and pull off both knobs. If the heads of the screws aren't exposed, use a small screwdriver to depress a tab on the stem of the knob. Pull off the doorknob. Depress the spring clip that holds the circular baseplate at the face of the door and remove the plate to access the screws. Loosen and remove two screws that secure the faceplate of the latch assembly at the edge of the door.
garage door rollers nylonPull out the assembly.
outdoor fire pit grate for saleDepress and release the spring-loaded latch by hand.
sliding glass dog door extensionIf it's difficult to depress or doesn't spring back, place it on a rag with the latch facing upward.
jeep rubicon 4 door for sale in ga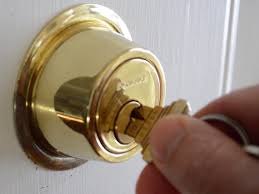
Spray some lubricant in the small gap between the outer edges of the latch and the hole where it retracts. Depress and release the latch several times. If it operates freely, reinstall the latch assembly and the doorknob in the reverse order as they were removed. Alternatively, if the bolt continues to stick, tap the assembly several times on a solid surface and spray more lubricant into the gap. If the bolt doesn't operate as it should, take the latch assembly to a home center or door hardware outlet and get a replacement based on the manufacturer's name on the doorknob or faceplate. //Getty Images Suggest a CorrectionThis Do It Yourself (DIY) article provides details on fixing or replacing the rear exterior door handle, door latch or door lock actuator for the 4 door (1997 - 2001) Toyota Camry. The repair operation principals can also be used on other Toyota vehicles. Why cover three repair items in one article? Unfortunately, access to a damaged component is impossible without removing another component which may require repair as well.
Specifically, the rear exterior door handle along with the Door Lock Actuator is inaccessible unless the door latch is removed. The Door Latch blocks access to the door handle's rear mounting bolt and the Door Lock Actuator cannot be removed unless the latch is removed as well (since the actuator is mounted and braced to the Door Latch). The Typical Problems with the Door Components: Since its made out of plastic and combined with age, the exterior handle can unexpectedly brake off ... especially is frigid conditions. Attempting to fuse the handle at the point of brakage/separation with epoxy glue will fix the problem temporarily. Even with epoxy, the handle will eventually brake free. Replacement door handles, both painted and unpainted, can be order from various vendors on the internet for modest prices. My preference is to match the car's paint code with a pre-painted door handle. When attempting to open the door by pulling on either the inside or outside door handle/lever and the door will not open, the latch must be replaced.

Toyota does not sell replacement components for the latch assembly. Unfortunately, the latch is a very expensive replacement product ($200). Obtaining a used replacement from an auto salvage yard may be worthwhile considering; however, door latch assemblies are usually missing due to their high demand. When one or more doors locks will not electronically lock when using either the Master Door Lock Switch, Ignition Key or Remote Door Lock Key Fob, the Door Lock Actuator Motor has become weak or failed. The Actuator Motor can be replaced but is not available by Dealers as a replacement part; only the complete Door Lock Actuator assembly for approximately $150. However, there are vendors on either Amazon or E bay selling replacement motors for OEM (Original Equipment Manufacturer) providers of Toyota. In addition, third party parts vendors provide complete actuators considerably less than Toyota on the internet. The Toyota Door Lock Actuator assembly encapsulates the motor and the gears it drivers into 2 black plastic covers.

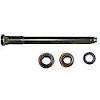
These covers are lightly glued together and can be easily separated by striking the contact seams with a wide tip screwdriver and hammer. When the seam partially opens, the rest of the cover can be pried off which will brake the glue's adhesion. From that point, the motor can be replaced with a new one. The Camry type replacement motor must have a brass collar attached to the end of the motor's rod. A Worm Gear then slides over the collar. The Worm Gear in turn rotates the gears inside the Actuator assembly. No specialized repair tools are required to replace the subject parts. A screw driver set, Metric Socket Wrench Set and a Torx 3/8" socket set is all that should be needed. With no glitches, approximately 1.5 hours. Remove the Interior Door PanelThe interior door panel must be removed to gain access to the failed components. The items requiring removed are outlined in Red and in numerical sequence: Remove the Interior Door Handle CoverPry open the Interior Door Handle Screw Cover

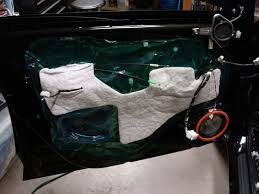
Remove the Interior Door Handle Cover Screw Pry off the Interior Door Handle Cover from the Door Handle and Lock Pivot Pins. Pull off the Interior Door Handle Cover. Remove the Door Armrest Plugs & ScrewsPry out the rearmost Armrest Plug With a long Phillips head screw driver, remove the screw. Pry out the front upper Armrest Plug Remove and Unplug the Window SwitchUsing either a plastic mini pry bar or a screw driver, prying out the front of the Window Switch. Pull the switch forward and up. Disconnect the electrical fitting on the switch. Pry off the Rear Door Black Plastic Cover PlatePosition either a mini plastic pry bar or screw driver under the cover plate and gently pry off the cover plate. The plate is fitted to the door with plastic push pins. If pulled to aggressively, the pins might brake. Detach the Interior Door Panel & Remove the Vapor BarrierRemove the Rear Window Frame (Guide) Rail Bolt. Remove the Plastic Push Pin from the rear of the Door Panel.
Using either a plastic pry bar or wide tip screw driver wrapped in tape (to protect the paint), nudge the bar tip between the panel and the door. With some gently prying action, the plastic fastener pins recessed in the door panel with pop off the door. Work around the door panel, pulling and separating the panel from the door. Pull the door panel up and away from the door. Remove the White Panel Pin Bracket from the door. From the rear portion of the door, peel back halfway the clear plastic vapor barrier. Detach the Door Latch and Lock Control RodsUsing a thin tipped screw driver, hold the control rod with the right hand while applying upward pressure on the rod connection fittings until the plastic clears the rod. Pull the rods out of the plastic connection fittings. Remove the Upper Window Guide Rail BoltRemoval of this bolt will be necessary to allow the Guide Rail to move when pulling out the Door Latch. Remove the Rear Door Latch ScrewsUse a Torx Socket to remove the Door Latch Screws.

Pull Out the Door Latch (No Photos)The Rear Window Door Frame is the only object that obstructs the removal of the Door Latch. By having the Window Guide Rail unbolted, the guide can be pushed inwards while the Door Latch is pulled out via the door access hole. By viewing your progress through one of the access holes, position the Door Latch (while the Window Guide is pushed inwards) so that it clears the guide. If Replacing the Door HandleEither the removal or unbolting of the Door Latch will allow access to the rear Door Handle Mounting Bolt. Pulling off the 'Child Lock Switch' rubber cover provides one path. Access to the front bolt can be performed through one of the door's access hole. The interior of the old Door Handle has a lip that holds the handle to the door. From the inside of the door, lift the lip over the door's mounting hole to remove the handle. If this is difficult, from the exterior of the door handle, use a taped wide flat head screw driver to lift the handle above the door's mounting hole.