interior door sweep seal
Weather stripping is an effective and affordable way to keep your home cool in the summer and warm in the winter. Use this guide to outline the costs, materials and other important factors.Before you purchase weather stripping materials, take note of the number of drafty windows and doors in your home. Once you have estimated the size of your project, it’s time to look at costs. Here’s what you can expect to pay per window and door:According to HomeAdvisor’s True Cost Guide, most homeowners spend $243 on weather stripping their home. This is because homeowners tend to do more than one project at a time -- one door and window, two doors, two windows, etc. Check all of your windows and doors for leaks before you begin your project. Sealing multiple locations in your home at once will save you money.Weather stripping comes in several materials and designs. Here’s a quick list of the most popular materials.Weather stripping tape is inexpensive and perfect for filling oddly shaped gaps.

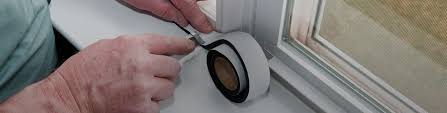
You can cut the tape to size with scissors or a utility knife. Most tapes are also self-adhesive, making application simple and effective. Be sure to apply weather stripping tape only to clean surfaces.V-strips are thin, flexible strips of metal or vinyl. Metal v-strips are more affordable than vinyl options.Gaskets fit onto the bottom of doors and windows.Door sweeps fit onto the bottom of a door and help eliminate under-door drafts.Magnetic weather strips fit into the top and sides of your doorjambs and create an airtight seal.Felt is an inexpensive, easy-to-install weather stripping material. You can cut felt with scissors or a utility knife. Some felt comes with a metal reinforcement.Fin seal weather strips have piles similar to carpet. Piled weather strips are perfect for sliding doors and windows.Weather stripping is priced by length. You will need to adjust your budget according to the design of your windows and doors. Here are the sizes of common window and door designs:Doors: *(all measurements are written width by length)Some custom and design-oriented doors differ in size.

Make sure to measure your doors before you begin your project.Installing weather stripping is sometimes a DIY-able job. But it’s a good idea to hire an expert to ensure professional results. Here are some questions to help you find the perfect pro for the job:If you have the experience, installing your own weather stripping is a simple DIY project. Here’s a helpful guide to get things started:Installing door weather stripping: Here are the tools and materials you’ll need:Step 1: Clean your jambs with soapy water and let them dry.Step 2: Measure and cut your weather stripping to fit the sides and top of the door.Step 3: Peel the back from the foam and press it into the jamb.Step 4: Measure the bottom of the door and cut your sweep to size.Step 5: Close your door and screw the sweep onto your door, ensuring it’s in contact with the floor.Here are the tools and materials you’ll need:Step 1: Clean the sashes and bottom of your window with soapy water and let them dry.Step 2: Measure the sides, top and bottom of your window and cut your weather stripping accordingly.

Step 3: Apply the two pieces to the inner sash on each side of the window. (If you’re using v-strips, make sure the “v” is facing the inside of the window.)Step 4: Lower the outer sash and apply weather stripping to each sash in the same manner.Step 5: Raise your inner sash and apply weather stripping to the bottom.
upvc cottage doors ukStep 6: Lower the outer sash and apply weather stripping to the top.
glass shower doors edinburghIf you have specialty or custom doors and windows, it’s best to hire a pro to apply your weather stripping.
buy upvc bi fold doors onlineIt is amazing how common this is, and how few doors are designed to properly handle water hitting their outside faces - manufacturers seem to assume that all doors are fully protected by entry enclosures or porch roofs !
shower doors for out of plumb walls
Six common causes, assuming door unit was not put in facing the wrong way in the first place. Most common is probably the last one:1) deck or porch tilts toward house, and water is saturating that wood or pooling on house side of porch concrete/brick and passing through the framing into the house - either directly (especially if deck boards/joists extend into entry as is common with cantilevered landings), or water is running along the porch and deck to the house
shower doors prices pretoria, then in at rim joist or sill.
garage door repair gilbert arizonaFree water would almost always be showing up at the entry subfloor level or lower if this is the case, though could wick up higher. Tough to fix if there is no physical gap between porch/deck and house, especially if framing runs under door.2) Water is running under the wood sill (the bottom piece of wood under door - may be a 2x4 across under bottom of door frame (common in snowy or rainy country where doorsill is elevated) or may be the base piece of the threshold unit like shown here -Long-life siliconized paintable latex caulk might solve this
, though the sill should actually be set in caulk when first installed to minimize this type of infiltration, and if there is a gap between porch and doorframe, ice and water shield installed to keep water from getting to the bottom of the door.3) Rain hitting porch/deck might be pooling or splashing up under protruding threshold and penetrating the threshold unit at the interface between different materials in the threshold - like between the wood and the aluminum walk-on plate. Caulk again, but commonly takes removal of threashold to get at it. Obviously, if water pools there, solve that by adjusting deck/porch tilt, providing drainage holes in the deck near the foundation, building up a slight sill or slope on concrete porch, etc as applicable.4) Rain hitting door and running into the seam between the door and doorstop strip, and running down edge of door or frame to the threashold, then inside - solve with adhesive-backed foam weatherstripping on the stop strip so the door closes tightly against it.