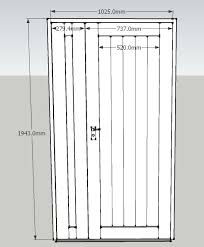
interior door hinge placement
The information on door hinges below applies to hinges for residential homes and not for commercial applications. The hinges on our website that we call “Architectural Hinges” are the ones most people want to use when upgrading the hardware in their home or when installing new custom doors. Architectural hinges are a higher quality hinge, made of heavier grade material than Residential hinges. They are available in all hinge sizes from 3″ x 3″ up to 6″ x 6″ and larger. Architectural hinges are available in a wider choice of finishes than are Residential hinges. They are also available with an NRP feature (NRP means non-removeable pin). An Architectural hinge with NRP is recommended on a door which swings outward. An outward swinging door has its hinge pins exposed and can be removed by unauthorized persons. When you upgrade existing hinges from Residential grade to Architectural grade keep in mind that you must increase the mortise depth on the door and jamb because Architectural hinges are thicker.

An upgrade to the plain bearing Architectural Hinge is the Ball Bearing Architectural Hinge. Hinges do wear out over time. Heavier doors and wider doors put more stress on the hinges and they tend to wear on the hinge knuckles. The ball bearings are placed between the knuckles to reduce friction. Ball bearing hinges increase the life of the hinge, tend not to make a creaking sound, make the door easier to open and are a good choice anytime a door closer is used. Residential Hinges are the door hinges that are used in most tract type housing today. They are lighter in weight and they are only available in a limited number of sizes and finishes. They are generally only available in 3 sizes (3″ x 3″, 3-1/2″ x 3-1/2″, and 4″ x 4″). They are best used in lightweight doors. The above comparison between Architectural and Residential hinges is a general guideline. Some hinge manufacturers may use slightly different thicknesses, screwhole patterns, etc. The top hinge should be located 5″ from the rabbet in the door frame (measure to the top of the hinge barrel).

Wide Throw Hinges position the door out further when it is open than conventional hinges.
garage door threshold heightThey are used when a door is set back in a reveal (or where a door has a wide door jamb) and is required to open 180 degrees.
car window repair tucker ga Swing Clear Door Hinge Wide Throw Door HingeEdit ArticleHow to Install or Replace Door Hinges Two Methods:Installing Door HingesReplacing Door HingesCommunity Q&A Door hinges play an important role in our everyday lives; they support your exterior doors, providing the first line of safety for the family inside, and offer protection from the elements. Inside the home, they offer privacy to family members. Installing door hinges, whether new or replacement ones, is an easy skill to master and can be invaluable for many homeowners, especially ones who enjoy D.I.Y. projects.

Place your hinges in the correct location. Assuming you’re installing a new door, you’ll need to find the precise location on the wall for your hinges. Most doors require a minimum of two hinges: one hinge is located 7-inches from the top of the door frame, and the other hinge is located 11-inches from the bottom of the door frame. Measure this distance and mark the location on the frame, and then do the same on the door that you’re hanging. If you have a third hinge (typically used for heavy doors), it will be placed directly in the middle of the other two hinges (this will put it slightly off-center). Trace around the hinge. Put your hinge in place on the door and the jamb, and use a carpenters pencil to carefully trace around the hinge. Additionally, make note of the depth of the hinge on the jamb. Double check to make sure that your outlines match the same location on the door and jamb, before moving to the next step. Then, use a box-cutter to score the outline;

this will make it easier to cut the mortise.The term ‘cut the mortise’ is the professional term for cutting out the wood in the jamb in the shape of the hinge, so that the hinge will be inset in the jamb and provide more strength and aesthetic appeal. To cut the mortise, you’ll need a very sharp chisel and a hammer. Carefully tap the chisel into the jamb from the side, to remove thin strips of wood. Make sure not to cut the mortise too deep, as this will cause the hinge to become loose over time. Cut out only the outlined area and the marked depth. Using a dull chisel will make it more difficult to cut the mortise, and cause you to use more pressure with the hammer (which could cause a slip). If you cut the mortise too deep, you can place a small slip of cardboard in it before installing the hinge. Mark the location of the screws. Replace the hinge back in the jamb where you cut the mortise. Use your pencil to mark the location of the screws in the jamb. Do the same with the location of the hinge on the door.

Remove the hinges when you’re done marking. Drill the pilot holes. Use your screwdriver to drill the pilot holes in the location of the screws you marked on the jamb. Tap them lightly in first, to make sure the screws don’t accidentally move out of place. Install the individual hinges. Put the hinges back in their places, and use a screwdriver to secure them individually into the jamb and the door. Connect the door to the jamb. Hold the door in place, using shims under the bottom to support it if necessary. Line up the two hinge plates so that the ones on the door match the ones in the jamb. Slide the hinge pins into place, and remove the shims from the door. Test the door to make sure it works, and you’re finished! Use shims to steady the door. Move the door so that the entire hinge is exposed, and place shims under the door to steady it. When replacing a door hinge, you won’t remove the door. Placing shims underneath will help support the door and prevent it from falling over.

Make sure that your new hinges are the right size, and match the measurements of the old hinges. Additionally, use a measuring tape to verify that the current hinges are in the right locations. The hinges should be placed so that one is 7-inches from the top of the door frame, and the other is located 11-inches from the bottom of the door-frame. If these are incorrect, you’ll need to go about the aforementioned steps on cutting the mortise and preparing the door jamb for the new hinge. Remove one of the old hinges. Start at the top hinge, and remove the screws holding the hinge leafs in place. Carefully pull them away from the door and the jamb, and check to make sure the wood under the hinges is in good condition. Prepare the jamb and door for the new hinge. If the old door hinge had been attached for some time, you may need to do a little repair work on the jamb and door. Sand down the wood if necessary, and add a new coat of paint or stain to match the pre-existing wood.
If the replacement hinges are sized differently from the old ones, fill in the mortise holes in both the door and the door frame with wood putty. Use a metal scraper to fill in the screw holes. Allow the putty time to dry, and sand it smooth and flush with the surface. Paint or stain the repair to match the rest of the door and trim. Install the new hinge. Place your new hinge over the location of the old one. Use a screwdriver and the package screws to secure the two sides of the hinge to the jamb and the door. Place the hinge pin in the hinge to secure the new hinge. Repeat the process on the second hinge. Move to the next hinge, and use a screwdriver to remove it. Replace it with the new hinge and new screws, holding it in place to make sure the hinge doesn’t get jostled out of location. Insert the new hinge pin when the new hinges are secured. If you have a third center hinge, you should replace it at this point as well. Test the new hinges. Remove the shims from under the door, and try opening and closing it multiple times.