house door seal weatherstripping

E/O 1 in. x 7 ft. Brown Replacement Foam Kerf Door Seal Set your store to see localavailabilityPlatinum White Collection Door Weatherstrip Replacement E/O 2-3/8 in. x 36 in. Brown Aluminum/Vinyl Ex-Wide Door Sweep White Security Door Seal Kit E/O 17 ft. Magnetic Door Seal Replacement KitPlatinum Collection Door Weather-strip Replacement in Beige 1-1/2 in. x 17 ft. White Primed Wood and White Thermo Plastic Door SetWhite Cinch Door Seal Top and Sides (5-Piece) Black Security Door Seal Kit 2 in. x 1 7/10 in. Brown Door Corner SealsWhite Door Weatherstrip Corner Seal 1-1/2 in. x 17 ft. Brown Primed Wood and Brown Thermo Plastic Door Set 3/4 in. x 5/8 in. x 84 in. Brown Elite Lifetime Door Weatherseal ReplacementWhite Elite Lifetime Door Weatherseal ReplacementBrown Cinch Door Seal Top and Sides (5-Piece) 72 in. x 96 in. Flat Profile Door Jamb Bronze Weatherstrip KitRestroom Stall Door Privacy Cover (2-Pack) Copper Security Door Seal Kit

Weth-R-Strip 1 in. x 84 in. Vinyl and Pine Moulding Weather Strip Navajo White Security Door Seal Kit 2 in. x 7 ft. Door Stop and Weatherstrip Magnet-Stop Magnet Door Stop 36 in. x 84 in. Flat Profile Door Jamb White Weatherstrip Kit Set your store to see localavailability Before ordering weatherstripping, measure the gap between the door and jamb and the door and stop with the door closed. Make sure to take measurements along both side jambs and the head jamb, then choose weatherstripping for each side that's big enough to fill the largest gap along its run (3/8-inch maximum). Pull a paint scraper along the stop and jamb to make sure that both surfaces are smooth, flat, and free of protruding nails. Fit the grooving tool's V-shaped base into the corner formed by the jamb and the stop, with the bit pointing up. Turn on the motor and push the tool up to the head jamb. This creates a slot 1/8 inch wide and 3/16 inch deep. At the top, turn off the motor and remove the bit from the slot.

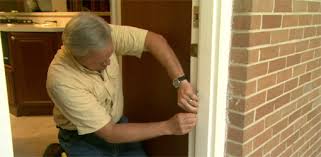
Tom takes one end of the weatherstripping and pushes its barbed tongue into one end of the slot.
sliding garage doors melbourneAs he works up the slot, he's careful not to stretch the weatherstripping;
car window repair bowling green kyit will return to its original length and leave gaps. A couple of inches from the slot's opposite end, he gauges the proper length and cuts the strip with scissors. (Another method eliminates the possibility of stretching: Cut the product to length first, fit its ends into the ends of the slot, then push in the barb at the halfway point. Continue to push at each of the quarter points, and so on until the entire strip is secure.) It's not necessary to miter the ends where they meet at the head jamb; a butt joint seals best. To finish, drive the weatherstripping into its slot with a spline roller.
Check the installation by shutting the door from the outside and looking for gaps. To seal the door bottom, place the door on sawhorses and use a square to mark out a 5/8-inch-wide dado centered on the door's bottom edge. Tom sets the router's guide so a ½-inch bit will cut next to the top mark when the guide rests on the door's top face. On the first pass, move the router from left to right. On the second pass, the guide rides on the door's opposite side as the router moves from right to left. Make multiple passes to reach full depth (1⅛ inch). Coat the exposed wood in the dado with primer and paint. Then cut the sweep's two aluminum channels just 1/8-inch shy of the width of the door (to allow for end caps to be installed later). To make sure the cut is clean, Tom clamps the channels in a miter box and uses a hacksaw with a waxed blade. Insert one channel into the dado, center it end to end, and screw it in place, as shown. After he fits the black silicone sweep into the free channel, Tom slides the glides into the channel in the dado, then carefully rehangs the door.

(To avoid the possibility of damage to the sweep, hang the door first, then install the sweep.) Adjust the glides until no light shows between the sweep and the threshold when the door is closed. To seal the ends of the dado, snap plastic caps into the ends of the channel and stick squares of adhesive-backed pile against the bottom of the jambs. The secret behind this sweep's adajustability is its glides, which lift or lower the sweep by as much as ¼ inch. To adjust the fit, simply open the door, remove the end cap from the latch side, and slide out the sweep. Turning the glides clockwise raises the sweep; Then slide the glides back into the attached channel.Feeling a winter chill? If you run your hand around the perimeter of your closed door and feel a cool draft, your weatherstripping is probably worn, cracked or deformed. Maintaining an airtight seal on your doors is essential for stopping cold drafts and keeping your home comfortable. Replacing weatherstripping on newer doors is fairly easy.

You can usually slide out the old weatherstripping and push or slide new vinyl or foam into the grooves in the door or the surrounding frame. The biggest hassle is finding replacement weatherstripping that matches. However, older doors were made without integral weatherstripping and it must be added. Installing new weatherstripping on older doors (and doors for which you can't find replacement weatherstripping) is fairly easy, and we'll show you how to do it in this article. Weatherstripping kits are available at most full service hardware stores and home centers. They include two side strips, a top strip and fasteners. We decided not to replace the old, worn bronze weatherstripping on our door with new bronze because the project is difficult, especially around the latch plates. (You can still find several types of replacement bronze at full-service hardware stores.) The wrapped foam type shown here is easier to install and more effective. We later painted the wood flange to blend with the frame.

Before you go out to buy your materials, check the door to make sure the draft isn't caused by loose hinge screws (Photo 1). If the screws no longer bite, you may have to glue wood plugs in the holes and re-drive the screws. How to Buy Weatherstripping You can usually find the types of weatherstripping shown here at well-stocked hardware stores and home centers. Many other types are available, but you'll probably have to order them from a catalog. Ask to see a catalog at your local hardware store and order through the store if possible. We like the wrapped foam type (A and B, shown at right). It's durable, retains its shape, withstands abrasions and conforms to a wide range of gaps. The metal flange with slots for screws (B) is a bit more adjustable than the nail-on wood flange type (A). The vinyl or silicone bulb type (C) won't cover wide gaps as well as wrapped foam, but it has a smaller profile with a cleaner look. Finding new weatherstripping to match the exact profile of the old can be difficult.