home depot solid core door
Cost to Install an Interior DoorUpdated: January 2017 Interior Door Installation Cost CalculatorZip Code Doors Interior Door Cost1 door$38.62$58.99 Interior Door Labor, Basic1 door$38.62$58.99 Interior Door Job Supplies1 door$38.62$58.99 Interior Door Equipment Allowance1 door$38.62$58.99 Totals - Cost To Install Interior Door Average Cost per Door Get an INSTANT, detailed estimate of the cost to Install an Interior Door! Our free calculator uses up-to-date, trusted data to estimate typical subcontractor costs for a Interior Door Installation project. For a basic 1 door project in zip code 47474, the benchmark cost to Install an Interior Door ranges between $249 - $384 per door. To estimate costs for your project:1. Set Project Zip Code Enter the Zip Code for the location where labor is hired and materials purchased.2. Specify Project Size Enter the number of "doors" required for the project.3. Re-calculate Click the "Update" button. Do you need professional help for your project?
The FREE homewyse hiring guide helps you find and hire great help, get quality craftsmanship and create a fair contract. Cost to Install an Interior Door - Notes and General Information These estimates are for BASIC work performed in serviceable conditions by qualified trade professionals using MID GRADE materials. Work not mentioned on this page and/or work using master craftsman, premium materials and project supervision will result in HIGHER COSTS! Explore the full range of interior door new installation labor options and material prices here.These estimates are NOT substitutes for written quotes from trade professionals. Homewyse strongly recommends that you contact reputable professionals for accurate assessments of work required and costs for your project - before making any decisions or commitments. The cost estimate includes: Costs for local material / equipment delivery to and service provider transportation to and from the job site. Costs to prepare the worksite for Interior Door Installation, including costs to protect existing structure(s), finishes, materials and components.

Costs for job cleanup and debris removal at project completion. Labor setup time, mobilization time and minimum hourly charges that are commonly included for small Interior Door Installation jobs. The cost estimate does NOT include:Costs for removing, relocating, repairing, or modifying existing framing, surfacing, HVAC, electrical, and plumbing systems - or bringing those systems into compliance with current building codes.Costs for testing and remediation of hazardous materials (asbestos, lead, etc). General contractor overhead and markup for organizing and supervising the Interior Door Installation. Add 15% to 23% to the total cost above if a general contractor will supervise this project. Sales tax on materials and supplies. Permit or inspection fees (or portion thereof) required by your local building department for your overall project. Cost to Install an Interior Door - References Unit Pricing Data: Lowes Cabinets Lowes , Jan 2017, Website

Unit Pricing Data: Home Depot Cabinets Home Depot, Jan 2017, Website , Jan 2017, Website Unit Pricing Data: Reeb Millwork Price Lists Reeb Millwork, Jan 2017, Website Unit Pricing Data: Trimco Millwork Price Lists Trimco Millwork, Jan 2017, Website Carpentry,4th Edition Amer Technical Pub; 4th edition, Sep 2003, Leonard Koel, ISBN 826907385
barn door hardware charlotte NKBA Kitchen Planner the National Kitchen and Bath Association, Jul 2012,
outdoor floor mats lowes Carpentry and Building Construction, Student Text Glencoe/McGraw-Hill;
sliding doors for egress6th edition, Jan 2003, Mark Feirer, John Feirer, ISBN 007822702X
garage door companies bend oregon
Cabinetmaking and Millwork MacMillan Publishing Company; 5 Revised edition, Jul 1989, John Feirer, ISBN 25373552 Interior Door Installation - Average Cost Per Door Expect to pay in the higher end of the price range for a licensed, insured and reputable pro - and for complex or rush projects.To lower Interior Door Installation costs: combine related projects, minimize options/extras and be flexible about project scheduling.
french door blinds houzz Help the homewyse Community
garage door company hudson wi We're a cooperative community that values and depends on your input. So, let us know - how can we improve this site? Would your friends and online contacts benefit from homewyse information? Make homewyse better for everyone - send your feedback or share this page. Send your feedback or questions.
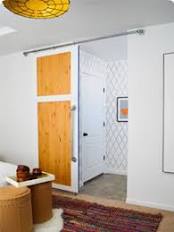
Share homewyse on Facebook, Twitter or Google+ using the buttons below:** Check out for an updated (and more detailed) lightweight version of this tutorial! Including how to make your own door! How to make a Sliding Barn door was hands down the most requested tutorial from The Epic Room Makeover 2012, which I was SUPER excited about, cause it is one of my favorite projects too…. DIY Sliding Doors are fantastic. They can also be very not thrifty depending on the hardware that you use to hang them. They don’t need to be expensive. Kelsey’s was done for under $75 my friends. How do you feel about that? There are a few measurements you need to get right off the bat. You need the length of the pipe for the door to slide on (make sure you give it enough room to open!) and you need the width of your door opening. Now that you have your measurements, you need a door. Measure the space you need to fill and add at least a 2” overhang to each side. We ended up at Restore and played Let’s Make A Deal with Randy, the Restore employee.

I wish I could say he loved us like everyone else we had video taped that weekend, but notsomuch. Cause we are PRETTY dang loveable. This is the door I fell in love with. It was solid wood and it may or may not have been covered in bird poop and feathers. We got it for $40. Here is the problem. Though we THOUROUGHLY measured the door opening when we found this great door we were so excited that we accidentally forgot to measure the door. But we totally fixed it, so its fine. (I know I had you worried for a second.) The first item of business was to cut the length of the door down 6”. (The door was 8’ and so was the opening, we needed to make room for the casters and eyehooks.) You can determine the amount you may or may not need to cut the door down by adding the height of the casters, eyehooks, and where on the wall it will be mounted. Did you know that if you have something huge like this door to cut that you can take it over to Lowes and they will cut it for you?
Even if you didn’t buy it from them! Originally I was all for jigging it out, but to get a perfect line in about 2 minutes is a MUCH better option. Once the door arrived back at Kelsey’s we needed to expand the width (remember the whole not measuring at the store thing? We used 2×2 premium pine slats to do this. (Premium means that they are not as warped. They are a little bit more expensive than the cheap pine but totally necessary in this type of project.) Start by drilling your pilot holes through the 2x2s and into the door. If you don’t there is a great chance that the solid door will stop your screw in its tracks, and/or strip it. You will need screws that are long enough to get a good grip in your door. We used 2 1/2” wood screws. When its time to attach your casters and eyehooks the biggest thing that you need to remember is that they need to be PERFECTLY centered/even especially the eyehooks. I would recommend getting stationary casters that don’t swivel, we did not get them and its fine but when I do this project in Ivie’s room I will for sure be doing that.

You will pre-drill your pilot holes and screw them on! We used metal casters from Lowes. If I remember right they were around $4 each. We used the largest eyehook that Lowes had for the guides on the top of the door. If I were to do it over again, I would use larger hooks (you can probably find them at a specialty store) or a thinner piece of pipe. Though it will slide there is room for play, so if you eye hooks arent perfectly centered on each other then it will rub. This is where we took a sleeping break. And now its morning! Oh the power of the internet. Use wood filler to fill your gaps. I would not use regular wall spackle especially if your door has a clear coat on it. It wont adhere the way that it needs to and will probably crack. When its completely dry its time to sand. Make sure that you are wearing a mask when you are sanding wood putty, because it is a lot harder than spackle you will be sanding a lot longer. Therefore breathing it in longer.

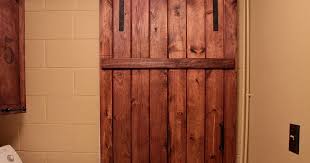
And no one wants a black lung from wood putty. Just to be safe, next time you are at Lowes grab a pack of 3M masks for $5. They are SO important to have on hand. Once your surface is smooth and gap free (hooray!!) its time to paint! Don’t forget to put your ScotchBlue down to get perfect edges and protect the parts you don’t want painted! To get our bright blue edge I bought a sample pot from Lowes in a great cobalt color and used this technique. Now lets get into the pipe aspect of the door. There are 2 types of conduit pipe that they sell at Lowes. They have electrical conduit and pluming conduit. You want the electrical. Go into the store with the measurements that you need for the handle and for the length of the sliding rod. They will cut and thread the pipe for you for free, then all you have to do is screw it together! To make your handle and your sliding rod you will need (4) floor flanges, (2) Connecting Nipples, (2) 1” Connecting Nipples, (4) 90 degree elbows, and the pieces of electrical conduit pipe in your preferred length.

The pipe we used was 3/4”. To make the rod that the door slides on you use the exact same set up and the handle pictured above. The only difference is that you use a 1” connector nipple between the flange and the elbow (it will give you a little more length from the wall.) When you are mounting your flanges to the wall, do everything you can to get it into a stud. It will make it MUCH more secure. This door is heavy and you need to be safe. Put the door on the pipe and determine where it needs to attach to the wall. (You obviously determined this before you had the door cut down but do a dry run before you start screwing things to the wall.) Attach your first flange to your studs with the pipe on it. The put your door on. Screw your other elbow flange combo on and mount it to the studs on the other end. You need to remember that the door is not hanging from the rod/eyehooks. They are simply a guide. All of the weight of the door should be on the casters at the bottom.