home depot door ramps
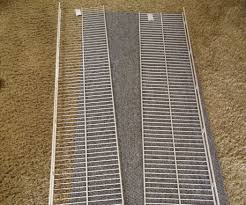
Show All ItemsA PET RAMP FOR BOO Pet ramps are expensive! I looked at the cost of these things and thought that $100.00 to $180.00 was too much to pay so I thought that I'd design my own with common items found at Home Depot. My intention was to be able to use the ramp to get our Shar-Pei, Buster (otherwise known as "Boo") in and out of our pickup truck so that he could have some relief from his tennis elbow and not have to deal with the constant impact on his joints. My dog is a darned good tennis player BTW.So my wife and I walked the aisles of Home Depot looking for parts and pieces that we could use to make a ramp for our dog, We found six foot closet shelves that went for ten bucks each and bought two of them to interlace, zip-tie and use as the ramp structure itself. We also purchased a six foot by two foot piece of outdoor carpet for the main anti-slip surfacing for the ramp assembly. By the way, if you want the carpeting to completely cover the assembly, then you will need to purchase a piece that's about two feet-eight inches wide.
Additionally, you can also make the ramp wider by about four inches by simply spreading the wire shelves apart and zip tying them at that wider point. Step 1: Show All ItemsWe also bought the rubber end covers for the exposed wire rod ends. These slip on covers serve to protect our hardwood floors and the fabrics of our pickup truck seats. We simply used an awe and poked holes in the carpet at about every fourth spacing in the wire itself and zip-tied the carpet to the ramp wire rods. Eventually, the ramp was completely wrapped and all of the zip-ties were cut off and their edges rolled to be in positions so as to not be a cutting danger to anyone handling the ramp. Those zip ties can slice you open if you are not careful, so make sure you position those cut ends so as to be completely safe for you and your pet. « PreviousNext »View All Steps DownloadSurfacing can be the most expensive part of the ramp, it is also the first part of the ramp that gets ruined by weather if not protected properly.

You should plan ahead when surfacing the ramp, you would not want to let your ramp sit in the rain after putting down only the plywood or unpainted massonite (the massonite expesially will begin to warp the first time it gets rained on). The first two layers of the surface should always be 3/8" untreated plywood. There are three main options for the top surface:
fingerprint door lock scanner If you use skatelite (note there are other $100+ per sheet skate surfaces out there like ramp armor) you do not need to protect the surface, since skatelite is water and sun resistant.
solid wood interior doors new jerseyYou might want to lay tar paper under the skatelite ( instructions ), to protect the plywood from the water that seeps through the cracks.
garage door parts littleton co
If you do not use skatelite (either massonite or no top surface), it is a good idea to use water resistant paint to protect it from sun and rain. Two types of paints that work well for this is Spar Urethane and Polyurethane Paint. In addition to painting the ramp, a giant tarp is also a good idea, the last thing you want is water pooling up on your ramp (painted or not).
shower door seal melbourne My recommendation for surfacing an outdoor ramp is to use two layers of 3/8" untreated plywood, paint the top layer of plywood with polyurethan paint (maybe the underneath side as well), then use a layer of 1/4" massonite for the top surface (smooth side up), painted with spar urethane, and a giant tarp to cover when you are not skating the ramp.
6 panel moulded smooth door I made an online ramp tool that you can input different height, transition radius, flat bottom length, and platform lenghts and it will give you a preview with the total length, this should help you figure out what you can fit.
glass door fridge for sale sydney
I've been getting a lot of emails from people trying to squeeze a halfpipe in a small space. I'll do a length breakdown of the smallest 3 foot halfpipe I can think of. Each of the transitions needs to be about 6 feet long (when using a 6' 10" transition, you could make this length smaller by using a steeper transition).
door frame pull up bar amazon caFor a 3 foot high pipe, the ideal flatbottom is about 8 feet in length, I can see this being reduced to 4 feet, but only if it is absolutely necessary. Then the smallest platforms I would recommend building is 1 foot, which brings the total length of the pipe to 18 feet (17.88 to be more precise). As far as width goes, the plans show an 8 foot wide halfpipe, the smallest width worth building is about 4 feet (in my opinion). I seem to have left screw details out of most of the plans (sorry). Use 2.5 inch deck screws except for the plywood.

For the surface plywood you can use drywall screws around 1.5 inches (these are less expensive), and note that you do not have to put a ton of screws into the bottom layers of plywood, just make sure to put a lot of deck screws on the top surface, which will hold all the layers down. This is one of the more difficult parts of the ramp building process. First off make sure you bend the plywood the way it is being bent in the picture below Second make sure you are using 3/8" plywood, anything thicker you will have a very difficult time bending. If you are having difficulties, make sure to take your time, you do not want to mess up the surface by screwing in the plywood in the wrong spot, or breaking it. As in the picture above, it is generally easiest to start from the bottom and work your way up with the plywood. Get friends to help you, have them slowly put pressure against the plywood with their foot as you screw it in. This is a very crusial step in building any ramp, make sure to read the Drawing Transitions Section.