hollow wooden doors home depot

Comes with hinges in it's own frame, ready to fit into your doorway A great option for closets, bi-fold doors fold in or out to open up space Just the door- no hinges, knobs, or frame. A great blank slate for quick updates. Fun and functional, a sliding barn door can elevate the look of any room. Make it your own with the right color, look and hardware. Shop All Barn Doors At The Home Depot, we have a huge selection of interior doors available to you. Here you'll find innovative closet door ideas. Sliding doors can save you space. Enhance your decor with a traditional or modern interior doors. You can also build and design your door from a variety of manufacturers to get the special look you want.The most common and popular sizes are available online. Or, you might want to get something special for your rooms, like an interior glass door or special-order wood door. Any door you can't find online, visit your local store to discuss custom options or for installation services.

Learn how to transform ordinary wooden doors into chic bathroom décor! For these bathroom corner shelves, we’ll start with an unfinished bi-fold door, give it a beachy, distressed look with chalk finish paint, and add some decorative hardware. Just follow our step-by-step tutorial from Plaid FolkArt Paint. Remove the hinges from your bi-fold door. Lay the fronts of the door together, and replace the hinges on the backside. To create the distressed look of these corner shelves, start with the craft paint in Java and brush it onto the door on areas where you want the paint to show through. Repeat the same steps with the Cascade paint. Rub the clear wax heavily on the edges and section of the door you want distressed. Now add a coat of the White Adirondack paint to the doors. When the top coat is dry, sand the paint– unevenly and in random patches– to allow the Java and the Cascade to show through with a rustic, distressed look. Apply a thin coat of clear wax over the entire door and allow it to dry.
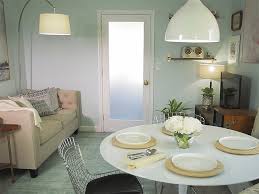
Follow our Easy DIY Projects board on Pinterest for more DIY ideas and inspiration.33.5 in. x 81.75 in. Primed Craftsman Smooth Surface Solid Core Interior Door Set your store to see localavailabilityAn interior door upgrade can rejuvenate any space, especially when it brings in natural light, as does this Masonite Door with Privacy Glass.
bi-fold door hardware heavy dutyIt’s not hard to install an interior slab door (as opposed to a pre-hung door).
aluminium windows and doors price list in nepalFollow our step-by-step tutorial and learn how to give any room a whole new look. Here is a before and after shot of the room where we’re adding the new door. As you can see, this one simple DIY can make a huge difference. Measure for the new door slab by checking the old door’s width in three places — across the top, middle and bottom of the door.
Jot down the widest dimension. Next, measure the door’s height and thickness. Before removing the old door, remove the knob and any hardware off the old door frame using the appropriate screwdriver or drill and drill bit. To remove the old door, start by backing the screws out of each hinge on the door slab with a screwdriver or drilling and pulling it away from the door frame. Next, dry fit the new interior slab door in the opening, using shims to hold it in place if needed. If the new door doesn’t fit, the old door can be used as a template to indicate where the new door slab should be trimmed. Simply place the new door on a flat work surface, then place the old door on top of it, making sure to align both doors in the same direction (right side up, opening to same direction, etc.). Mark the bottom of the old door on the new door with a pencil. Next, with a utility knife, score along that line, then using a circular saw, trim the new door slab to size.
Sand any rough edges as needed with an orbital sander. Note: Be sure to wear appropriate safety glasses and protective work gloves when using power tools. Again, using the old door as a template, with a pencil, mark on the new door where the hinges and door knob will be located. Score the line around the hinges with a utility knife, then notch the perimeter and interior of hinge area with a hammer and chisel. Next using the chisel, gradually skim off the notches. Once notching is complete, attach the new hinges to the new door. Secure the door lockset kit onto the door using the provided screws, then using the hole saw bit, drill into one side, then the other. Next, drill into the side edge of the door to create a hole for the latch. While the door is lying flat, install the latch portion of the new knob by tracing around it, then scoring with a utility knife and chiseling it out using the same method from Step 7, so that the latch lays flush against the door edge.

Once the latch is in place, move the new door to its location, add shims to adjust the door’s height and attach the other side of all hinges to the door frame. Hang the door and check the fit. If adjustments are needed, remove the door and sand or trim the door with a planer, as needed, then reinstall the door. If the fit is good, leave the door in place, and move on to finishing the lockset installation. Install the lockset using a Philips screwdriver. Follow the instructions that came with your particular lockset. Install the latch plate into the door frame by lining it up with the latch from the door knob, then scoring/chiseling as we did in Step 10 with the hinges. If your door features glass, be sure to leave the protective plastic on until you’ve finished painting your door. Allow the paint to dry completely, and you’re done! Browse our selection of Masonite Doors at The Home Depot. Take a look at more DIY projects here on The Home Depot blog, and follow our Easy DIY Projects board on Pinterest.