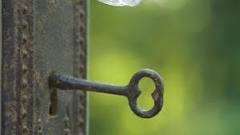
hollow door fixing screws
What are hollow door anchors? Hollow-core door anchors are used when hanging items, such as picture frames and bulletin boards, onto hollow-core doors. They come in metal or plastic, and they can hold loads weighing between 10 and 50 pounds. How do you build a wooden door? What are some storm door replacement parts? What are some causes of a garage door opening by itself? To install hollow-core door anchors, pilot holes must be drilled into the door where the anchors are to be placed. The pilot holes are slightly smaller in diameter than the diameter of the anchors. The anchors are gently hammered into the pilot holes so that they are snug. The screw in each anchor bolt is screwed into place using a drill. Hollow-core door anchors are made so that towel racks, shelving and mirrors can be easily installed without causing damage to the door. Learn more about Doors, Windows, & Locks What are some window and door ideas for sunrooms? Some sunroom window and door ideas include picture windows reaching from the floor to the ceiling with patio sliding doors, wall-length fixed Colonial wind...

A door may pull away from the hinges because of its weight or an unaligned strike plate. Swelling or settling of the house may also cause doors to shut imp...
2007 jeep wrangler 2 door hardtop for sale How do you remove casement windows?
garage door centre swindon What is a stuck electric window? What is Gila Window Film? Where can you purchase a barking dog burglar alarm? How do you get replacement keys for a Sentry safe? How do you adjust a storm door closer? I hate when this happens. You’re putting a screw into a piece of wood, and the threads strip out. You’re turning, and spinning, and nothing’s happening. Nothing’s tightening up here. Well, there are some great solutions to this problem, and I’d like to share a few with you. The first one is unbelievably simple.

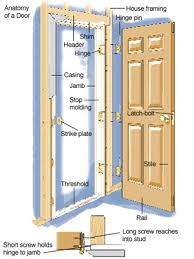
It might mean just taking that screw out, and replacing it with one that is slightly longer. Not larger necessarily, but just a little bit longer. Those few extra threads can make all the difference. Solution number two may be as close as your kitchen cupboard. If you can’t use a longer screw for some reason, or say you don’t have one, then go to your cupboard, and get some toothpicks. For this hole right here, three ought to do it, just place them in the whole, like that, break off the excess, sometimes I take an awl just to get everything started again. Now that extra wood that we’ve put in in the form of toothpicks, makes the hole smaller, small enough so that those threads can get a grip, then it’s just a matter of running that screw back down in there. Now door hinge screws present a different kind of problem. They often get stripped out, that’s probably because the doors are always pulling and tugging on them, but also doors are attached to a door jam like the one I’m holding in my hand right here, and you can see that these are not very thick.

So sometimes a longer screw just doesn’t make any difference, and I’ve found oftentimes that toothpicks don’t work so well, either. But here is a solution that usually does work. And it involves the use of these. You have to drill the stripped holes out. This time though, it’s important to pick a drill bit that is the same diameter as the anchor that we’re about to use. And I’m going to go all the way through the hinge holes now. Now, I’m going to take a second bit this is a counter-sink bit, it’s got a kind of a cone shape that you can see right here. And I’m going to actually counter-sink those holes that we just drilled. Just a little bit. Now why did I do that? Because if you look at these anchors, they have a little flange, or head around here, and I want to make sure that that has a place to recess so that the top of this anchor is flush again with this hinge mortise. So now, I’m just going to set these in here, like that, push them down, and you can take a hammer and tap these down.

See how nice and flush they are? So once again, we’ll just drop this hinge in place, everything’s going to align perfectly, we haven’t changed the location of the holes, we’ve just in a sense put a liner in there with those plastic anchors. And that will give us a good grip, better than new in some cases. Now, for my final tip: Let’s just say for example that you’ve got a board like this one, and you have a lag screw, that has just…the hole is so big that the screw actually goes through like this and spins around and there’s no bite whatsoever. And let’s suppose that you have to put this screw in that position. What do you do? Well, here’s an idea. You’re going to have to make the hole larger in order to correct the problem, so we’re going to go up to almost a 3/8 inch bit here, and bore this out. The idea is we want to create even more space around this lag screw. Now this is auto body filler, again, you can get this at an auto supply store, or most home improvement centers carry this as well.
I’m going to put a little bit of this out here on my mixing board. There we go, just like that. Don’t need very much. And we’re going to add some hardener. This comes packaged with it. This is a catalyzed product, which means that by adding the hardener to this resin, things harden up very quickly. And the more resin you put in here, the more pink I make this, the shorter the work time. Now what we’re going to do is take some of this and force it into that hole. Remember that’s an oversized hole now that we’ve purposely made larger. Just keep pressing it down in there like so. Now, we’re going to take our lag screw, and I need to get some lubricant. Here we are, right here. And I’m going to spray some lubricant on here. This is going to act as a release agent. Now I’m going to place this down into that hole, and we’re going to pack some more of this around the edge. Now what I’m doing here, is I’m casting, if you will, a thread for that lag screw.