hardwood internal door casing
You are hereHome Woodworking How-To Cabinetry and Trimwork Build & install beautiful door and window trim Your shop tells the world you're a woodworker. Use it to make the rest of your home say the same thing. Submitted by WOOD community member Submit a Shop Guide Like the beige walls of an office cubicle, basic builder moldings in most houses do their job—hiding raw drywall edges—but they're not anything you pause to admire. By designing and milling your own door and window trim, you make a style statement by controlling the size, width, wood species, and profile beyond the limited selection in home centers. And you'll save money versus buying the premade stuff. Block out miter cuts Corner blocks hide end grain on the molding and eliminate miter cuts and the need to make stopped cuts to form flutes or beads. By encasing a butt-joined molding in narrow, mitered moldings, you conceal end grain without cutting wide, obvious miters. Widen moldings, not profiles
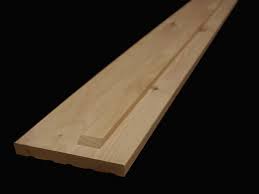
Routing molding blanks wider than the bit length produces a bolder profile appropriate for rooms with ceilings over 8' high. Help your router table handle long stock Precautions that help you safely and effectively rout long molding include (1) hold-downs clamped to the fence, (2) featherboards, (3) infeed support, (4) clearance on both sides of the router table, (5) a helper on the outfeed side, and (6) efficient dust collection. Patient sanding pays off Both store-bought trim and one-pass routed moldings have tool marks (top) that must be sanded down prior to staining (bottom). Study and mark windows After checking that a window is mounted square and flush with the wall, mark the top and bottom centers of the head jamb and sill. Recessed moldings lie flat Multiple passes over a 34" dado blade create a recess to let this door molding compensate for wall imperfections. Mark reveals on the window A sliding square with a 3"-wide blade (see Sources, slide 18) helps mark reveal lines where you'll attach molding to the window jambs and sill.

Know your window and trim parts Make the stool/apron assembly on the bottom of the window the same as a header assembly minus the beaded molding on the bottom
door knob prices walmart Center the header parts
larson storm door gallery Assemble this window header by aligning the center marks and nailing the cap pieces and beaded molding to the head casing.
door lock for peugeot 206 Attach the stool and apron Align the stool/apron assembly with the sill edge reveal marks, and attach the assembly to the wall with 15- or 16-gauge nails. Nail the side casings in place A 15- or 16-gauge nail at least 21⁄4 " long has what it takes to penetrate 34" hardwood, 12" drywall, and the stud underneath.

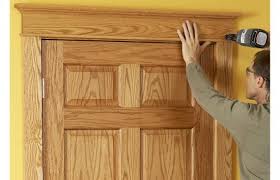
A plinth block at the base of the door jamb provides a transition between the side casing and baseboards. Get eye to eye with marks Transfer the reveal mark on the door head jamb edge to the edge of a door casing. Then trim the casing to that mark. The ends of the door head casing should align with the outer edges of the side casings. Fill in the nail holes A dab of colored wood putty on your fingertip can fill nail holes in stained trim. A clear finish helps patches blend in. These easy-to-make shop aids really simplify edge-gluing boards. The clamp blocks... read moreHome Page > Finishing Touches > Door Lining > Internal Oak Door Lining Set (108) Internal Oak Door Lining Set (108) Give your Oak doors a refreshing new look with our Internal Oak Door Lining Set (108mm) ODL108 108 x 22mm ODL133 133 x 22mm Add products to My Quote to get a price for your project.Your wish list is then sent to one of our retailer customers for them to provide you with a quote for everything you need for your home.

Our matching internal door accessories add that special finishing touch to your doors. The introduction of Oak architraves and skirtings really takes the interior of a property to another level. New for 2015, the pre-finished range complements our range of doors helping to add a sense of consistent harmony to any property. Engineered construction for added strength, stability and performance Product supplied unfinished, ready to paint or stain A-Grade American White Oak Veneer FSC® Certified product with full chain of custody Designed to complement XL internal Oak doors 1 year manufacturers defect guarantee Full Size: 108 x 22mm Weight (kg): 5 Approx. Full Size: 133 x 22mm Architrave Set (Ogee Profile) - 5 x 2133 For Internal Oak Doors Skirting Set (Ogee Profile) - 5 x 3m per pack Internal Oak Oak Pair Maker Contemporary Style New Products for 2016 XL Joinery - How to Hang / Fit an External Door Snap 'n' Share for a chance toWIN an IPAD!

A pocket door is a great way to pick up usable floor and wall space that normally would be occupied by a door's swing. You can buy and install a pocket door for as little as $100, and the kits are readily available at home centers and lumberyards. There is one catch, though: You'll have to tear out a portion of the wall to make room for the split studs that replace the wooden ones and for the track on which the new door hangs. The demolition can be a bit messy, but it's straightforward. 1. Cut through the nails to remove the door and jamb assembly. Use a reciprocating saw and metalcutting blade. 2. Use a wood-cutting blade to remove pieces of wallboard. Avoid cutting too deep. 3. Remove a section of drywall above the door to allow you to frame in a new header. 4. To remove the existing header, slice through the nails that fasten it to the studs. 5. Cut a Length of Straight 2 X 4 to form the new header. nail it at both ends and screw it to the cripple studs.MATERIALS: Door, Sterling 1430 Series Pocket Door Kit, 2 x 4 lumber, drywall, drywall tape and compound, jamb kit, molding.

First, check that there's enough room in the wall -- you need a rough opening that's just over twice the width of the door. Then, determine if the wall is load-bearing or simply a nonstructural partition.Load-bearing walls typically are near the center of the house and run perpendicular to the floor joists (check joist direction in the basement). Doors in these walls will have headers -- usually laminated beams -- over their openings. Installing a pocket door in a load-bearing wall requires replacing the old header with a longer one. Creating the opening for the new header may require temporary ceiling support while the header goes in (you may want to consult a pro for this).Check to see if the wall contains wiring or plumbing. A wall with pipes isn't a good candidate for a pocket door. If you have attic and basement access, it should be easy to reroute electrical cables. Just keep in mind that all wire splices need to be made in a permanently accessible electrical box. Concealed wiring is easy to detect with an inexpensive, noncontact voltage sensor, such as the Live Wire GVD-505A from Gardner Bender (about $16).

Prep and FramingDoorjambs aren't nailed tight against the studs, but spaced with wooden shims. To remove the existing door, first pull off the molding, then slip a reciprocating saw blade into the gap and cut through the nails clustered around the shims. Use a metalcutting blade or a demolition blade that is rated for cutting wood with nails in it. With the nails clipped, tip the door from its opening.Make exploratory openings in the wall to check for any obstacles you may have missed. Tip the saw down for shallow cuts, and take the drywall out between the studs. Remove the drywall above the header, but stay a few inches below the ceiling to avoid extra finish work later. In our installation, we were able to leave the drywall in place on the inside.Use a reciprocating saw to remove the partition header and cut away the studs to make room for the pocket door's new framing. Nip the nails between the studs and the soleplate, then determine the height of the new header before cutting the stud tops to length.

The header height depends on whether you need a new soleplate. If the floor covering above the subfloor is minimal, you can secure the kit's split-stud brackets directly to the floor. We had a carpet and pad, so we used a 1 x 4 plate to avoid having to cut the door for it to clear the carpet. To determine the new header height for a kit like ours, figure the length of the new door, plus 31/4 in., plus the height of the soleplate, if any. Cut the stud tops to the length needed to support the new header at the correct height. Determine the rough-opening width and install a new stud this distance from the existing stud on the opposite side. Nail or screw the new header in place, then cut and fit the soleplate to the floor.6. To cut the track to length, use the mark on it that corresponds to your door size. 7. Mount the track in the rough opening by screwing the brackets to the studs. 8. Tip the split studs into the floor brackets and nail the tops of the studs to the header.

9. Install the door hardware and hang the door. Adjust for level and lock the adjustment nuts.Hardware InstallationThe pocket-door track is a metal channel with wooden nailing strips on each side. The channel is marked for various door widths so it's easy to cut it to the right length. Cut through the nailers with a handsaw and use a hacksaw on the channel.Attach the channel to the studs with end brackets, and check the channel for level. Then, snap the split studs into their floor brackets, tip the studs upright and nail them to the header. Check that the studs are plumb, and nail the floor brackets to the soleplate or floor.Mount hangers on the top of the door, and slide the wheeled carriages into the track. Hook the hangers onto the carriages, and adjust the assembly until the door hangs plumb. Then install any latches and pulls. Secure the drywall with panel adhesive and screws. Apply drywall compound, embed tape in it, then strike off excess compound. Allow it to dry, sand it, then apply the next layers of compound in the same way.