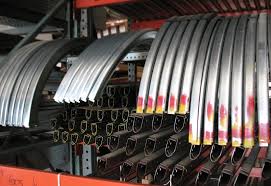
garage door track angle iron

Garage Door Rear Track Hanger Kit Mounts to garage ceiling and securely to track Easy to install with pre punched holes Provides rear track support The Clopay Rear Track Hanger Kit allows for garage door track to be securely mounted to your garage ceiling. It comes as a kit with all the parts you need to assemble the rear track hanger. Works on most residential applications. Can be used on garages with up to 2 ft. of headroom Galvanized construction for durable and long lasting performance Pre punched holes allow easy attachment to ceilings with various joist spacings Durable and long lasting what are the lengths and gauge of the angle iron 6 pieces, (ceiling mount, drop, and diagonal bracing for each side of the track) with the holes spaced at 1" . Longest piece goes to the ceiling and is a minimal 24", in order to grab wood in the ceiling spaced at 24" spreads with 2 lag bolts. The other 2 pieces appear to be approx. 13" and 18" in length from the picture, usually plenty for standard install.
If your new door is the same width and height as your old door, then the main thing left to verify would be your headroom. That is the distance at the very top of the door to the ceiling. Approximately 13" is needed above the door, at least, for a standard install.
sliding glass door extrusionsTypical residential garage doors are 7' in height with 4-ea 21" panels.
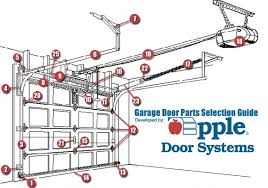
garage door repairs denton txIf you measure floor to ceiling, then at least 8'1" would be needed to install w/no modifications. These door track hangers (punched angle) are usually not required if the old ones are in decent shape and usually the new track bolts right back on to the existing hangers. Bottom line is everything that is needed for a standard height garage should be in that one box. Check for damages previous to purchase, even if the box is not beat up.
Those parts are packed tight as sardines, and you'll get some freight damage every now and then that isn't seen from the outside. I've been there and done that, so FYI... Garage Door Rear Track Hanger Kit Reviews - page 2You might also like: Do Your Own Garage Door Opener Repair and Troubleshooting Check out these expert tips for easier installation and trouble-free operation. We'll clarify the instructions that are most important and pass along some pro advice that you won't find in the manual. Tip 1: Make sure the door parts are working If your garage door is opening slowly or making a lot of noise, the problem may not be your opener. buy a new one, check for broken or wobbly rollers and the bottom roller bracket yourself—the cable attached to it is under extreme tension. You'll need to call a pro. If you're replacing the rollers, get nylon rollers. They operate quieter than steel rollers and cost only a few bucks more.

Next, check the torsion spring (mounted on the header above the door opening) to see if it's broken. breaks, you'll see a gap in the coils. pro to replace a broken spring. Read more on garage door opener repair and troubleshooting. Tip 2: Check the door balance Make sure the door is balanced. door and pull the emergency release cord (always close the door first so it can't come crashing down!). about halfway up and let go. If it slides up or down, the torsion spring needs to be adjusted (or maybe even replaced). Adjusting the torsion spring is dangerous, so don't attempt it yourself (you could get seriously hurt). Tip 3: Choose the right opener When buying an opener, choose a 1/3 hp or 1/2 hp opener for a single garage door (1/3 hp can be hard to find at some home centers). Go with 1/2 hp for a double door and 3/4 hp for a door that has a wood or faux wood overlay (they can be heavy!). Openers have a set

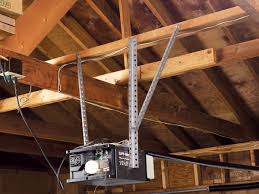
opening speed, so installing an opener with a higher horsepower won't open your door any faster. Openers are available with a chain drive, screw drive orChain drives (a long chain pulls the door open and closed) are the least expensive, but they're loud. Screw drives (a long threaded rod drives a mechanism that opens and closes the door) are priced in the mid-They require the least maintenance, but they're not as quiet as belt drives. Belt drives (a rubber belt opens and closes the door) are the quietest, making them the best choice if you have living space above theThey're also the most expensive. Tip 4: Set the opener on a ladder for easier installation Follow the manufacturer's instructions to assemble the opener and mount the rail to the header bracket above theThen set the opener on a ladder where you're going toThe ladder (usually an 8-footer) holds the opener in position while you measure for your lengths of angle iron.

If necessary, put boards under the opener to raise it. Have the door open when you install the opener (clamp locking pliers onto the roller track below a roller to keep theIt's easier to align the opener with the center of the door when the door is open. Tip 5: Buy heavy-duty angle iron Garage door openers come with everything you need forBut the mounting straps that are included are often so flimsy that you can bend them with your hands. buy slotted angle iron at a hardware store. Cut it to size with a hacksaw. Angle iron provides a stronger installation and reduces vibration, which helps extend the opener's life span. unfinished garage, attach the angle iron directly to the face of a joist with 1-in. lag screws. For finished ceilings, attach angle iron along the bottom of a joist with 3-in. lag screws. Hang the opener using two more lengths of angle iron andUse lock washers or thread-locking adhesive to keep vibration from loosening the nuts.
Tip 6: Replace all the components Don't be tempted to reuse the old photoelectric eyes and wall button (opener button). The new photo eyes and wall button are designed to work with your new opener. If the wires that run from your opener to the photo eyes and to the wall button are exposed, replace them, too. wires have probably been in your garage for 10 years or more, and they may be nicked or worn. extremely sensitive and won't work if a wire is damaged. only takes about 15 minutes to run the new wire, so it's timeIf the wires are protected inside the wall, you don't need to run new wire. Tip 7: Check the door's opening force Your instructions probably don't cover checking the opening force. If your door encounters more than about 5 lbs. of resistance when it's opening, you want it to stop. The “resistance” could be your finger caught in the track. To check the opening force, rest your foot on the door handle near the floor and open the door using the remote control.
When the door lifts against your foot, it should stop with very little pressure. If the door continues to open, adjust the force. Tip 8: Fine-tune the opening and closing force The opener's instructions probably tell you to place a 2x4 on the floor under the center of the door, then close it. the door contacts the wood, it should stop and then reverse. Proper closing force ensures that if something is in the door's path, the door won't crush it. The locations of the opening and closing force adjustmentOur unit has two screws on the front. adjusting the opening or closing force, turn the screw only about 1/8 in., then recheck the force. If the door starts to open and then stops on its own, increase the opening force. Likewise, if it stops on its own while closing, increase the closing force. You might have to make several small adjustments to get the force exactly how Tip 9: Use bulbs that handle vibration Garage door openers vibrate, so you'll need special light-

bulbs that can handle it. Look for “rough service” or “garage door” on the label. Be sure to use the wattage specified in your manual. use a higher wattage, the heat could melt the plastic cover over the bulbs or even damage the circuit board inside the This is one place where LED or CFL bulbs aren't the bestLEDs have a low light output, and CFLs aren't designed to handle the vibration. And since the lights are on only briefly, the energy saved with these bulbs would be Tip 10: Fix a reversing door The most common problem with garage door openers is the door reversing when it's closing, even when there's nothing obvious obscuring the photoelectric eyes. force is adjusted correctly, then the problem is almost always the photoelectric eyes. The eyes are very sensitive— even cobwebs can interfere with them. First make sure the eyes are still in alignment (some- thing may have knocked them out of whack).