garage door track adjustment diy

Ownership, Installation, and Operation Is SimpleRYOBI strives to not only provide the best garage door opener on the market, but also the best ownership experience. This product was specifically engineered to reduce installation time by decreasing parts and simplifying the installation process.Best in-class support and tutorials make installation easy, and ensure that your garage door opener is operating in no time.Quick Reference Guide (3.7MB)The garage door is the single largest moving part in your home, and should be inspected and maintained every year. Whether you have a belt-drive, chain-drive, or screw-drive opening system, maintenance issues and steps to lubricate garage door tracks are virtually the same: • Inspect the tracks to make sure there is no debris to catch the rollers. Wipe them out or vacuum if needed. • Lubricate the rollers with regular engine oil. Put a drop on each roller and allow the rolling action to draw it into the bearings. Don’t use grease, it will just gum up the tracks and collect hair and debris.
• Check cables for any sign of fraying and make certain that springs are tight and connected. • Lightly lubricate any bearings and garage door hinges. • Check the spring to make sure that it is “wet” or lightly lubricated. If it gets dried out, it will clump and jam up your system. With a chain-drive system, check to make sure the chain is greased. Aside from that, the door is your final moving part and should be checked for tight screws and lightly oiled connections. The garage door opener itself controls a number of features that require monitoring. Basically the system is designed to shut down in the case of malfunction. While this is an opener’s greatest safety feature, the cause may not be readily apparent. Troubleshooting Garage Door Problems Any garage door opener installed today must, by federal law, have optic sensors to detect any person or object in the pathway of the door. This is usually the cause for a non-functioning door. Optic sensors must be aimed at each other so that they can send and receive an uninterrupted beam of light.
If these eyes get out of alignment, the system will shut down. First check to see if there are any obstructions or items blocking the eyes. If not, check to see if the eye has become misaligned. Jiggling the eye or rotating it slightly usually brings it back into line with its partner. The more sensitive the garage door opener, the greater the chance of shutdown. This is intentional, but owners need to know the signs of trouble. Newer openers feature diagnostic lights that flash a code to tell the owner of the problem. Dirty tracks, misaligned rollers, broken springs — all cause the opener to shut down. Get to know your system and check it regularly for force of operation and automatic return. Most garage door companies suggest that you test your system every month or two months to be certain it is functioning properly. The force with which the door closes can be adjusted. To test its sensitivity, place a two-by-four in the opening and close the door. The door should return or bounce back on contact.
As for springs, there is no foolproof test for strength or remaining life.
craftsman garage door opener lockThere’s comfort in the fact that they virtually never give way when the door is raised, because there is no tension then.
genie garage door opener repair partsTo be safe, make sure that your springs are on safety cables so if they do snap, they won’t hit people or vehicles. Another test is to disconnect the opener and raise the garage door manually. If it can be raised by an older child, the springs are fine.Instructions for Installing a Wayne Dalton Garage Door Wayne Dalton sells garage doors directly to authorized dealers and retailers. For general public sales and installation of our products, please contact an authorized Wayne Dalton dealer from our dealer locator or call our residential door division at(800) 827-3667.

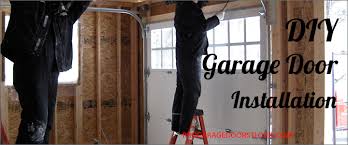
Sign in or Create an account High Lift Garage Door Conversion Kit 36" Garage Door Torsion Spring Clopay Window Insert Short Panel Colonial 4 Piece Set. Window Frame and Retainer Garage Door Torsion Springs Replacement Kit Clopay Window Insert Short Panel Charleston 4 Piece Set. Clopay Window Insert Short Panel Prairie 4 Piece Set. Clopay Window Insert Short Panel Sunset 503. You are hereHome » Blog Get Started with Your Eze-Breeze DIY Project Keep your Eze-Breeze products looking new! Check out our Care & Cleaning Tips for helpful Do’s and Don’ts, then download our Eze-Breeze Cleaning Guide for more detailed instructions to make sure your Eze-Breeze porch/patio enclosure or garage door screen stays in great shape.DIY Garage Door Installation Having a well maintained and properly operating garage door will let your family enjoy the convenient access from your home to your vehicles. A strong and sturdy garage door is also an important factor to keep your place secure and protected against bad elements.
A typical double-door for a garage can weigh between 250 and 450 lbs. It is probably the biggest moving object in your house. If you want a do-it-yourself garage door installation, you can certainly do it. You just need a manual for garage door installation, proper tools, and the appropriate mechanical skills. Before considering a garage door installation as your latest DIY project, take the time to consider hiring a professional garage door installer. An expert will have more experience and knowledge to know what’s best for your garage door. Also, you will enjoy warranties on certain parts that the garage door experts will use for the installation of the door. So, why not let the experts do this challenging task for you? You just need to find a garage door installation company that has a good reputation and reasonable pricing. DIY Garage Door Installation So, you want the challenge of installing your own garage door? Perhaps, you are adept at having DIY projects and you have the necessary skills.
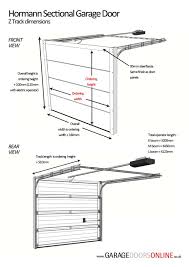
If you are confident that you can do this on your own, you can surely save money and feel proud after finishing the project of installing a new garage door. The most important thing that you have to do is to strictly follow the instruction manual on how to install your garage door. You should, at least, have the skills to understand and operate the different tools and machines for the installation. Check to see if the tools and equipment you need for the project are available. In case you are missing some items, you can borrow from neighbors or friends or you can buy (if you have the budget). Lastly, you will need an extra hand to complete the job because you can’t lift a heavy garage door on your own. How to Do a Garage Door Installation After studying your manual and having the right tools, you can now start installing your new garage door. One type of door is the sectional garage door that goes up and down through rollers and it moves lengthwise on both sides of the doorway.
In general, the door is furnished with a torsion spring. Do not attempt to remove or adjust your old garage door on your own because the torsion spring is under extreme tension which can be hazardous. It is recommended to hire a professional garage door installer to do this job. If you are planning to install a sectional garage door, make sure that you follow the instructions from your manufacturer’s manual and you can use the generic guidelines on how to install it which are the following: Once you are done with the attachment of the weather strip at the bottom edge of the door’s first panel, fix the panel in the doorway and set it in its place by pushing nails partly in every jamb at a certain angle so that the nails wedge the door in the right place. Different pieces should be assembled together for the horizontal, vertical and curved tracks. Follow the instructions written in the manufacturer’s manual. Follow the directions from your installation manual when mounting the brackets and rollers on the section of your garage door and any jamb-mounted or wall-mounted brackets.
At one side of the garage doorway, slide the vertical track on the rollers of the first section of the door. Do the same on the other side. The rollers are then installed in the door’s second section. This time, you need a helper to lift the second section and put it in place and then slide its rollers into the door’s vertical tracks which you have installed on the two sides of the doorway. You have to fasten the hinges of the door’s first section to the second one. In general, one can use a power drill that has a screwdriver tip. It makes the job easier and quicker. A nut driver can also be used. When installing the third section, you just follow the same steps. Find out the level and vertical track of the door for plumb. Then, you secure the top plates of the two vertical tracks to the garage wall. Ensure the lag screws sufficiently penetrate the framing parts because the door will have a considerable amount of force when it goes up and down. Install the jamb brackets to the tracks and attach them to the framing parts.

Confirm the lag screws are well attached to the sound framing. Do not tighten up the lag screws for now because there might be adjustments on the tracks later. When installing the horizontal and curved tracks, you need to bolt the pieces together. If needed, you can place a ladder near it so that the horizontal track can rest on its top. Examine the horizontal track to get accurate level and then proceed with cutting the hanger of the rear track based on the length required to get sufficient track support. Place neatly the last door section and take away the temporary nails. The sectional garage door usually needs the help of a torque tube for lifting. If you are planning to have an opener, you should put the tube in place first. In other cases, the manufacturer might have a different set of instructions for the installation of the “torque tube.” Now, you have to make sure the tracks are rightly aligned by rolling up the door by four feet. If all looks good, you have successfully installed a garage door.