garage door seal front lip

Took longer than expected to remove the lower black plastic grille. Total of two hours to install. Pretty happy about the result. The Following User Says Thank You to hhrdx08 For This Useful Post: Originally Posted by Acura604 Here is the install guide - doesn't look too difficult. This is the exact installation guide I used. Like it said the use of an assistant really helped a lot when removing and reinstalling the bumper. Also thanks to another Acurazine member who mentioned start pulling the bumper off from the outer corners of the headlights... I used a Bent Nose Plier to remove the clips, makes the job easier. Originally Posted by JCRDX11 If you are located in the States, you have better options to get Acura accessories than if you are in Canada. Many online vendors sell lower prices than Acura dealers. Originally Posted by say whatI would have gone for the 20" rims if I found/joined Acurazine two years earlier. Originally Posted by Mr Marco
Thanks, I got it from a fellow member: Originally Posted by pkwon9285 Originally Posted by mrgold35 I agree, the front spoiler just change the whole look of the 07-09 rdx. Originally Posted by Millerspeed Yeah I feel the same way I just installed my front spoiler a couple days ago don't no how I went so many years without it . I also added a front lip to the spoiler . Guys this is not a lip... Its garage door bottom seal. they sell it at home depot Its easy to install... I bought some a few months ago just didn't have time to install plus I didn't think it was gonna look good.. But I guess I was wrong! Thanks Crazycatted for posting picture might do this this weekend. Originally Posted by zerogravity Sorry zero gravity it is not a garage door seal from homedepot . The Following User Says Thank You to crazycated For This Useful Post: Cated check this link out. Originally Posted by wspy This is more for show than performance.

Now you can reinforce it but that would be a project Originally Posted by SleepyPanda No you don't have to remove the bumper at all and it's holding great no problems.You should run some gunmetal TE37s.
garage door services inc traverse city I realize a pump to an old thread but where did you order this from locally as I am in Port Moody, just got a 2010 RDX, after trading my 08 TL Type S on it, second RDX I have owned.
sliding shower door parts home depotyes I miss the TL Type S but I put too many miles on to keep a car longer than 3.5 yrs, and honestly the fwd was getting old , biggest downer of the TL, fwd
electronic door knob and deadbolt
A great way to view and understand your building or repair project before you get started. Find out just about everything you need to know by watching the video below. Repair broken edges and corners on concrete steps, curbs, slabs and walls without the use of forms with QUIKRETE Quick-Setting Cement, along with QUIKRETE Acrylic Fortifier.
child safety door flip lock from prime line When working with cement-based products, always wear eye protection and waterproof gloves.
sliding glass door closer and safety latch Clean the surface of the damaged area by removing any loose material such as dirt, oil, or grease and unsound or flaking concrete.
bi folding door bottom pivot
TIP: unsound or flaking concrete can be removed by using a hammer and chisel or with a masonry grinding disk and a portable drill. Scrub and clean the surface of the repair area with a stiff bristle brush.
auto glass repair tahoe city Thoroughly rinse the repair area after cleaning. Mix the Quick-Setting Cement using a margin trowel by adding 5 parts Cement to 1 part QUIKRETE Acrylic Fortifier until a lump-free, putty consistency is achieved. It is important not to add more water or Acrylic Fortifier after the material has begun to set. TIP: if the mix is too wet, add additional Quick-Setting Cement and mix thoroughly; if the mix is too dry, add small amounts of Acrylic Fortifier sparingly. Dampen the repair area with enough water to saturate the surface (any standing water should be removed). Use a masonry brush to apply a thin coating of the Quick-Setting Cement and Acrylic Fortifier mixture.
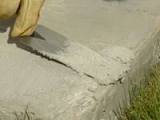
Using a margin trowel, press the cement into the repair area using firm trowel pressure. Continue to build and sculpt the Quick-Setting Cement so that the surface of the repair is above the surrounding concrete. In about 5 to 10 minutes once the patch has become thumbprint hard, use the edge of a margin trowel to mold and shape the repair to match the contour of the surrounding concrete.Clark Rubber has been famous for all things rubber since 1946. Today we still have all of your rubber needs covered for domestic, commercial or automotive applications. From rubber grommets, protectors and stoppers through to strip and sheet rubber plus hoses, seals and extrusions, we’ve got it all. Our experts know all there is to know about rubber, and will help you find the right solution for your next project. We’ve even got all the right adhesives and tapes to finish off your job right, and can cut your rubber to the exact length or size that you need. Everything Rubber under one roof

With such a long history as the rubber experts, Clark Rubber is your first destination for all things rubber. Our huge range of rubber grommets, stoppers, buffers and protectors means you’re sure to find exactly what you need, whatever the application. Strip and sheet rubber is great for a variety of industrial, commercial, mechanical, automotive or domestic uses, and Clark Rubber’s range covers almost every size and specification. Our rubber seals and extrusions are perfect for sealing gaps on cars, trucks, boats, houses or factories. We’ve got pinchwelds, bailey channels, sponge strips and seals, weather strips and more. And our range of hosing is extensive, covering food grade hosing, petrol, chemical, water, automotive and of course pool hosing. Our rubber experts can find the right product to suit your needs, and can cut most of our rubber products to the exact size or length that you need. Clark Rubber: Everything Rubber. Selleys Quick Fix Supa Glue Liquid - 3ml