garage door remote coding
Conveniently, a garage door remote allows you to open or close the door without having to get out of your car. You may need to know how to program your garage door remote if you change it, it breaks, or if it's ever lost or stolen. How Does the Garage Door Remote Work? In an older garage door remote, you will find small code switches that turn on or off. The same set of code switches is present in the garage door opener controlling the door. Newer remotes use a rolling code technology. This type of garage door remote functions by changing the code each time the remote is pressed. A radio frequency allows the remote to send a signal to the opener to go up or down. Garage Door Remote Frequencies Radio frequencies are measured in megahertz (MHz). The most common garage door remote frequencies are 300 MHz, 310 MHz, 315 MHz, 318 MHz, or 390 MHz. The frequency for a garage door remote or motor is usually printed on them. Step 1 - Choose a Remote Match your garage door remote to your garage door opener by using the same manufacturer.

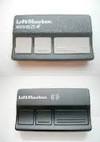
The following are some of the companies that sell garage door remotes: Liftmaster, Genie, Allstar, Linear, and Stanley. Step 2 - Locate the Learn Button Programming your garage door remote and clearing the current garage door remotes from the opener varies slightly according to the model of your system. All openers have a learn button. To find the learn button you may have to remove the light cover on the opener. Step 3 - Program the Remote To program a new remote into the system, hold the learn button until the indicator light blinks on the opener. While the indicator light is blinking, press the button on your remote. Test the new garage door remote by pressing once to see if the door moves. A garage door opener can only maintain five remotes or four remotes and one keyless entry, so if a remote is lost, you might have to erase all codes from your opener before you can add a new one. In most cases, erasing remotes from the garage door system is accomplished by pressing the learn button until the indicator light stops blinking.
This will usually erase all remote codes and from there, you will have to follow the previous instructions to reprogram all of them. Programming Remotes That Have Code Switches Code switches in your garage door remote and opener have to match. This means that the code switches are placed in the same position.How do I program my remote control? Your remote control can be programmed to activate many devices including: garage door openers (GDO), gate operators, commercial door openers and external wired-in receivers. To program using the learn button Locate the Learn button. Garage door opener: Located on the same side the antenna hangs from, you may have to remove the light lens. The Learn button may be green, orange, red, purple, or yellow with a small LED next to it. Gate operator or commercial door opener: Located on the control or logic board, with a small LED next to it. MyQ Control Panel: Lift the push bar and locate the learn button. Press and release the learn button.

If you have a MyQ Control Panel, press the Learn button twice. The 8500/8500C has a MyQ Control Panel. Within 30 seconds, press and hold the desired button on the remote control for three seconds. The LED indicator light will turn off or the operator lights will blink indicating programming was completed successfully. Press the remote control again to test out.
interior door knobs walmartThe operator or opener should activate.
custom interior doors menardsIf not, repeat steps 2 and 3.
garage door repair bucks county To program to an external wired-in receiver
pocket door hardware dallas
Once you have located the receiver, follow these steps for programming. Remove the cover of the receiver. Depending on the model, the cover may wrap around the receiver or the face plate may need to be removed using a flat head screw driver. We recommend downloading the instruction manual for better assistance on how to remove the cover to access the program button.
frameless shower doors boca raton fl Locate the learn button.
wood storm doors lowesThis is usually a small radio button with an LED next to the button. Press and release the learn button.The receiver will click indicating the programming was completed successfully.If not, repeat steps 3 and 4. Please see your local LiftMaster Dealer for assistance programming your remote to a commercial door opener or gate operator.

Click here to see a video about how to program a remote control. To check for compatible remote controls see Chamberlain Remote Compatibility or LiftMaster Remote Compatibility. Answers others found helpful Video: Programming LiftMaster MAX Garage Door Remote Control Video: How do I program a Clicker KLIK1U remote control? Why does my EV/MAX/LT remote/keyless entry experience short or no range after I program it? How do I erase the remote control from the garage door opener's memory?Below is information to help you program your Garage Door Operator remote control or outside keypad. If you need additional help, feel free to give a call for assistance or to schedule a service call to program for you. CHAMBERLAIN / LIFTMASTER / SEARS CRAFTSMAN GARAGE DOOR OPENERS Programming 971LM and 973LM, 371LM and 373LM Security Plus Transmitters LIFTMASTER AND SEARS CRAFTSMAN WIRELESS KEYPADS 976LM, 377LM Security Plus and 66LM Wireless Keyless Entry Systems
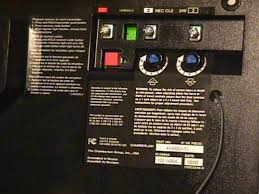
The square smart button is located on the side or the back of the motor head, and is colored red, green, amber, orange, or purple. It is directly under the #1 wire terminal screw. Programming Genie Intellicode Remote Transmitters ** To erase all Intellicode remotes and wireless keyless entry, hold down on the learn button until the indicator light stops blinking, then proceed to Step 2. These transmitters work by matching the settings on the internal code setting switches with the same set of switches in the receiver on the garage ceiling. The receiver is located either behind the light lens of the Genie garage door opener motor head, or inside an external small rectangular box on the ceiling, which is connected to the motor head by a set of wires. Note: the frequency of the transmitter must be the same frequency as the receiver on the ceiling for it to work. Genie has been making the 390 MHz frequency exclusively for the last 15 years. These garage door opener transmitters have 2 smaller switches to the right of the internal Code Setting Switches.
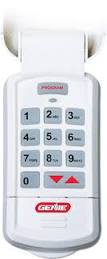
The small right switch should be set according to how many Code Setting Switches in your receiver (either 9 or 12). The small left switch is for programming purposes. To program a button for one of your doors, follow the instructions below: Genie Garage Door Opener Wireless Keypad Model GPWK-12, GWK (works with remotes having 9 or 12 internal code setting switches. Keypad is black with a slide-up cover showing the Genie logo only) This keyless garage door opener entry pad works with Genie transmitters using 390 MHz frequency. It is NOT compatible with Genie Intellicode transmitters (if your keypad has Intellicode printed on the cover, go to the next set of programming instructions below). The Door Code in the Step-By-Step Procedure at right is determined by the internal code switches inside your transmitter and the accompanying chart. Determine the settings of the first 3 switches and write down the corresponding number from the chart. Continue with the next 3 switches and its corresponding number, and so on, until the last set of 3 switches.
You should have 3 or 4 Door Code numbers. Door Code in Step #4: ____ ____ ____ ____ Model 1: Intellicode Model GWKIC, ACSDG (black with slide-up cover and the word “Intellicode” printed on the cover) GWKIC, ACSDG, Two Part, Step-By-Step Programming To Reset the Intellicode Wireless Keypad To Program the Intellicode Wireless Keypad NOTE: If red indicator light does not blink, it is not taking the programming steps. Check the 9 volt battery under the keypad numbers. To access, press inward, under the number pad lip while sliding downward to expose the battery. Press the Receiver Learn Code button on the Power Head Receiver of your Genie Garage Door Opener. This small black button is located behind the light lens at the motor head and is nearest the floppy 6 inch antenna wire that protrudes from the power head. When pressed, a radio signal indicator will start blinking red for 30 seconds. Adding More Doors to Keypad: With most Genie units, remove the light lens globe to expose the Learn Button on the motor head.

The learn button is sometimes located on the back of the unit, or with Accelerator openers, it is under the light lens near the hinge of the lens globe. Always locate the floppy antenna wire first. The Learn Button can be found not far from this antenna. See Troubleshooting Guides for Accelerator photo. Intellicode Model GWKP (off-white with flip-up cover) Programming Instructions for the GWKP Genie garage door opener keyless entry involves following the two sets of steps below: Find the Learn Code Button and the LED indicator light on your Genie motor head inside the garage. It is usually behind the light lens and close to the floppy antenna wire. If your Door Opener does not have an antenna, you have an External Receiver. The External Receiver cover must be removed to access the Learn Code button and the indicator LED. Follow Steps 1 through 3 outlined below: Multiple Genie Garage Door Opener Programming for GWKP- All garage doors will use the same PIN: HOMELINK IN-CAR REMOTE PROGRAMMING INSTRUCTIONS