garage door opener torque adjustment

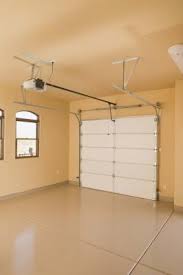
How do I adjust the travel and force limits? Limit adjustment settings regulate the points at which the door will stop when moving up or down. After adjusting the limit settings, check the Safety Reversal System and Test the Protector System. Note: Manual travel and force adjustments are adjusted using a flathead screw driver. To operate the opener, press the door control push bar. Run the opener through a complete travel cycle. Does the door open or close completely? Does the door stay closed and not reverse unintentionally when fully closed? If your door passes both of these tests, no limit adjustments are necessary unless the reversing test fails. Adjustment procedures are outlined below. Run the opener through a complete travel cycle after each adjustment. Step 1: Adjust the UP and DOWN Travel LimitsStep 2: Adjust the ForceStep 3: Test the Safety Reversal System Step 4: Test the Protector System Repeated operation of the opener during adjustment procedures may cause the motor to overheat and shut off.
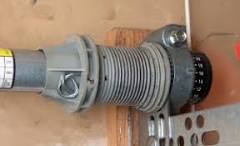
Simply wait 15 minutes and try again. If anything interferes with the door’s upward travel, it will stop. If anything interferes with the door’s downward travel (including binding or unbalanced doors), it will reverse. Without a properly installed safety reversal system, persons (particularly small children) could be SERIOUSLY INJURED or KILLED by a closing garage door. Incorrect adjustment of garage door travel limits will interfere with proper operation of safety reversal system. After ANY adjustments are made, the safety reversal system MUST be tested. Door MUST reverse on contact with 1-1/2" (3.8 cm) high object (or 2 x 4 laid flat) on floor. To prevent damage to vehicles, be sure fully open door provides adequate clearance. How and when to adjust the limits:Turn the UP limit adjustment screw clockwise. One turn equals 2" (5 cm) of travel. NOTE: To prevent the trolley from hitting the cover protection bolt, keep a minimum distance of 2-4" (5 cm - 10 cm) between the trolley and the bolt.

Adjust the UP (open) force as explained in Adjustment Step 2.Turn the DOWN limit adjustment screw counterclockwise. If door still won't close completely and the trolley bumps into the pulley bracket, try lengthening the door arm (page 18) and decreasing the down limit. If the opener reverses in fully closed position:Turn the DOWN limit adjustment screw clockwise. If the door reverses when closing and there is no visible interference to travel cycle: If the opener lights are flashing, the Safety Reversing Sensors are either not installed, misaligned, or obstructed. Test the door for binding: Pull the emergency release handle. Manually open and close the door. If the door is binding or unbalanced, call for a trained door systems technician. If the door is balanced and not binding, adjust the DOWN (close) force. See Adjustment Step 2. Step 2: Adjust the Force Too much force on garage door will interfere with proper operation of safety reversal system.

Make small adjustments until the door completes a close cycle. After each adjustment, run the opener through a complete travel cycle. Do not increase the force beyond the minimum amount required to close the door. Test the UP (open) force
2009 jeep wrangler 4 door soft top If the door doesn't open at least 5 feet (1.5 m), INCREASE UP (open) force by turning the control clockwise.
2012 jeep wrangler 4 door hardtop for saleMake small adjustments until door opens completely. Readjust the UP limit if necessary. After each adjustment, run the opener through a complete travel cycle. Step 3: Test the Safety Reversal System Safety reversal system MUST be tested every month.Door MUST reverse on contact with 1-1/2" (3.8 cm) high object (or 2 x 4 laid flat) on the floor
Press the remote control push button to close the door. The door will not move more than an inch (2.5 cm), and the garage door opener lights will flash 10 times. The garage door opener will not close from a remote control if the LED in either safety reversing sensor is off (alerting you to the fact that the sensor is misaligned or obstructed). If the garage door opener closes the door when the safety reversing sensor is obstructed (and the sensors are no more than 6 inches [15 cm] above the floor), call for a trained door systems technician. Answers others found helpful Why does my door open automatically after touching the floor? Why won't my garage door open all the way? How do I program the travel and force limits using black and purple or black and yellow buttons? GDO - Door only travels a little way and then reverses How do I program the Sec+2.0 travel and force limits using the UP and DOWN arrows?Adjust the tension so your garage door is balanced and operates correctly.

You need proper tension on a garage door to operate the door by hand or with an automatic opener. If the tension is too loose, the springs that help lift the door are ineffective and the weight of the door makes this unsafe. Too much tension equates to a door that doesn’t close all the way or remain closed. If your garage has torsion springs across the inside of the door opening, you need a professional to adjust the tension. Sectional doors and hinged doors are adjusted using a basic procedure for each type. Close the garage door. Position a stepladder at the area of the automatic opener. Unplug the power cord to the opener. Pull down on the emergency release cord to disconnect the door from the opener’s track. Lift up the door halfway from the inside, using one of the cross members. If the door remains at the halfway position without assistance, the tension is correct. If it lowers on its own, the tension is too loose. It's too tight if it raises beyond halfway without assistance.
Open the door fully by hand. Cut a two-by-four brace that installs vertically at the outer edge of the door, using a handsaw. Position the brace in place at the outer edge of the door. Move the stepladder to the area of an extension spring at the upper end of the door at the track on one side. Loosen the lock nut on the threaded adjuster stem at the outer end of the pulley and spring assembly with an open-end wrench. Tighten the adjuster three full turns clockwise to add tension if the door closed and did not remain open halfway. Loosen the adjuster three turns counterclockwise if the door raised without assistance. Repeat the same adjustment at the pulley and spring adjuster on the opposite track. Hold the outer edge of the door open with one hand and remove the two-by-four brace. Lower the door halfway and test the tension. Repeat these steps, as necessary, until the door remains open halfway. Lower the door by hand. Pull the disconnect cord to re-engage the closer. Plug in the power cord to the automatic opener.

Disconnect the door from the automatic opener, using the disconnect cord. Move to the outside of the garage. Raise the door using the handle on the outside. If the door is hard to raise, the tension at the hinge springs is too loose and the automatic closer must work too hard to raise the door. If the door raises too quickly, the tension is too tight and the automatic opener must work too hard to close the door. Open the door fully to relieve the tension on the hinge springs at each side of the door opening. Install a vertical two-by-four brace at the outer edge of the door to prevent the door from falling closed when the springs are adjusted. Ask an assistant to help adjust the tension on the springs. Put on work gloves. Start at the hinge and spring at one side of the door opening. Note the link in the anchor chain where the hook at the lower end of the spring is attached, such as the second or third link from the upper end of the chain. Grip the spring with both hands and pull downward so your assistant can disconnect the anchor chain from the hook at the lower end of the spring.