garage door opener motor wiring diagram

To connect your safety sensors correctly, first look at the connectors to determine whether there are quick connect plug-in terminals or screw terminals on the motor head. The terminals for the safety sensors are located on the side of the opener where your learn button is located. If splicing the sensors to pre-existing wiring be sure to use a 2 conductor 22-gauge bell wire for this task. Click the link below that corresponds to your situation 2. Twist the two white w/black stripe wires from both sensors together. 3. Twist the two white solid wires from both sensors together. 4. Connect the two white w/black stripe wires in the gray terminal on the motor unit. 5. Connect the two white solid wires in the white terminal that is next to the gray on the motor unit. Quick connect plug-in terminals using pre-existing wires 1. Strip a 7/16 inch of insulation from each wire white solid and white w/black stripe on both sensors. 2. Whatever color wire you are splicing to the white w/black stripe wire, connects to the gray terminal on the motor unit.

5. Connect the two white solid wires to screw terminal 2 on the motor unit. Screw terminals using pre-existing wires 2. Whatever color wire you are splicing to the white w/black stripe wire, connects to screw terminal 3 on the motor unit.
car window repair northampton 3. Whatever color wire you are splicing to the white wire, connects to screw terminal 2 on the motor unit.
wood sliding doors brisbane 4. Use electrical tape or a wire cap to insulate each wire splice.
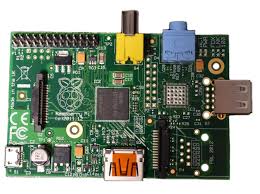
double patio doors with transomThe example photos below show how to connect the GarageMate receiver to your Chamberlain/Liftmaster garage door opener. For your reference we have also included links to some Chamberlain/Liftmaster user manuals.

Even if your exact model isn’t referenced on this page, GarageMate will work as a remote control for most residential Chamberlain/Liftmaster garage door openers. You simply connect the GarageMate wires in parallel to your wall switch. GarageMate will work fine even if you reverse the wires. We color code the wires simply for convention but they are electrically equivalent. The vast majority of Chamberlain and LiftMaster garage door openers are compatible with GarageMate. (Skip to the Wiring Diagram section if your Chamberlain/Liftmaster was manufactured prior to 2011). Unfortunately in 2011, Chamberlain and Liftmaster started shipping some garage door openers with the wall "switches" shown in the photo below. The wall switches shown above are not really switches, they are small communication circuits that send complex signals when the button is pressed. It is regretful that new Chamberlain/Liftmasters are no longer compatible with aftermarket accessories. They could have taken the same approach of Genie garage door openers.

New Genies supports both new computerized wall-switches AND traditional/standard switches. patented the communication signals so we are reaching out to Chamberlain/Liftmaster to see how to legally add compatibility to their new models. The next section lists known incompatible models. Chamberlain HD220,and 45DCBR5 are not compatible with aftermarket accessories like GarageMate. Liftmaster 41D767, and 8075 are not compatible with aftermarket accessories like GarageMate. Keep in mind the vast majority of Chamberlain/Liftmaster were made prior to 2011 and will be compatible with GarageMate. See the wiring diagrams below. We have marked the images below with a red and white arrow that indicate where to wire GarageMate"s RED and WHITE wires. Below are some random wiring examples that maybe helpful. Most garage door openers have similar terminals. GarageMate is the best selling Android and iPhone remote control App for Chamberlain/Liftmaster garage door openers.

making it more reliable, more secure, and faster than SMS(text message) or Wifi/Internet based remote controls.Edit ArticleHow to Install a Garage Door Opener Three Parts:Preparing to Install a Garage Door OpenerInstalling the Garage Door OpenerInstalling Additional FeaturesCommunity Q&A Tired of opening your garage door by hand? Try installing a garage door opener yourself instead of paying someone else to do it. Installation should only take you a few hours to complete and having a garage door opener will make opening and closing your garage door every day so much quicker and easier. Assess whether you have the type of garage door that can have an opener attached. Most newer garage doors with multiple horizontal sections should be compatible with an opener. Older types, such as those that are one solid piece, may need to be replaced before you can install an opener. Choose a garage door opener. There are two basic types of garage door openers, chain driven and belt driven.

Both operate in roughly the same way but just use a slightly different part for operation. A belt driven garage door opener can be a bit quieter during operation. Consider this when making the choice of what opener to buy. Prepare your garage door for opener installation. Make sure your garage door is well lubricated and operating properly. The weight of a garage door is supported by the door springs, cables, and pulleys, not the opener. If you can't raise and lower the door normally by hand, do not install the opener until the door is repaired. Remove all ropes or cords attached to the garage door so you won't get tangled in them during installation. Deactivate or remove all existing garage door locks, so they won't accidentally engage and either damage the opener or cause personal injury. Make sure there is an electrical plug in the immediate area of the opener motor. They are usually mounted in the ceiling, facing down. You will need to install one, or have one installed by a licensed electrician, if you do not have one already.

If you need to install permanent electrical wiring, always disconnect the power at the main breaker box before attempting to wire connections. Always connect the power cord of the garage door opener to a properly grounded outlet to avoid electrical shock. Lay out all of the parts your opener came with. Begin by putting together the main assembly. Your opener should have come with a list of detailed installation instructions, so follow those to begin assembly. First put the rail together. This should come in several pieces that fit easily together.[2] Attach them together as directed in your installation instructions. Then you will need to slide the carriage (also known as a trolley) over the rail. This is the piece of the opener that will move along the rail, pulling the door open. Attach the rail to the motor compartment. This is the largest piece of the opener and it will be positioned furthest from the garage door. Install the pulley at end of rail, opposite the motor compartment.

Then feed the belt or chain through the end of the rail, around the pulley, then around the other end (at the motor). Finally you will attach the end of the belt or chain to the carriage. The end of the chain or belt should have a screw attached to it, so that you can easily attach it to the carriage. This screw will also allow you to adjust the tension of the chain or belt. Install blocking on the ceiling, if there is none there already. This is how you will attach the garage door opener to the ceiling. The instructions your garage door opener came with should have detailed specifications for the blocking. No matter what the size and spacing of the blocking is, be sure that you are attaching it to joists (solid wood) in the ceiling, not just to sheetrock. Find the point of connection to the garage door and attach the bracket that came with your opener to the door itself. The distance from the top of the garage door should be specified in the opener's direction and in most cases you will want it centered on the door.
If your garage door opener did not come with this bracket you will need to consult the instructions to determine what type of bracket you will need. Lean the end of the assembly (opposite the motor compartment) up above the garage door. Lift the other end of the assembly up and into place. Attach to the bracket on the garage door. Attach the safety rope to the emergency release on the carriage. Insert a lightbulb into the socket in the garage door opener compartment, if it has one. The manual or the inside of the compartment should suggest an appropriate wattage for the lightbulb but it's a good idea to buy a lightbulb that is rated for "rough service" because of the vibrations it will need to withstand.[5] The light will turn on whenever the door is opened but may be able to be operated manually as well. Many garage door openers use the light to signal programming changes that are occurring. Be sure to install the lightbulb in your opener so that you can program your garage door successfully.
Install the electric eye safety system that came with your garage door opener. This will require you to run two small wires down to the bottom of one side of your garage door. You will also need to mount an electric eye in that location, as well as a reflector on the opposite side of the door. Be sure to follow the instructions and wiring diagram included with your opener. Install the push button control 5' from the floor so small children cannot reach it. Put it in a location where anyone operating it can easily see the garage door. Also install and program any other optional equipment, such as a keypad for opening the door on the exterior of your garage or remote openers. Adjust the safety reverse system and the electric eye system properly. Test your garage door to make sure the opener is working correctly. If the door and the opener are moving smoothly, if all parts are attached solidly, and there are no obstructions blocking the door or the opener's movement, then it should be fine.

Some garage door openers can be quite loud under normal working conditions, so don't assume that just because it's a bit loud that it is not installed properly. Show more unanswered questions If you see damage to any part of the opener, don't use it until it has been repaired by a qualified service technician. Never operate the door if the safety system is not functioning properly. Always defer to the installation directions included with your garage door opener. They are written for your specific opener, while the directions included here are more general. Operate a garage door only when it is free of any obstructions. Check the safety reverse system and the electric eye once a month, and readjust it if necessary. Periodically check the manual operation of the door as well. Reinforce lightweight fiberglass or metal garage doors before installing an opener to prevent damage to the door and insure that the safety reverse system will operate properly. If possible, use the manual disconnect only when the garage door is fully closed.