garage door opener circuit diagram

Whether you're rewiring or adding more wiring to an older garage, or running wires in a new garage, you have a decision to make. Do you plan to leave the walls open or close them up with drywall? If you intend to leave the walls and ceiling open, you have to follow the special rules that we show here. The same goes for sheds, workshops or other structures with unfinished walls outside the living space of the house. In a house or a finished garage, electrical cable is protected from damage by permanent wallcoverings like drywall, plaster or even wood, but that’s not the case in an unfinished garage. The key to safe, code-compliant exposed wiring is to use the framing members to protect and support the wires. That means not spanning stud or joist spaces with wires. Keep all the cables closely hugging the studs, plates and ceiling joists so they're not subject to abuse (see “Dangerous Wiring Mistakes” at the end of this article). In this story, we'll show you a common, cost effective and code approved way to run exposed electrical cable.

But there's one downside to this method: If you ever do decide to finish the area, you'll have to completely rewire because the surface-mounted cables will make drywalling impossible. In an unfinished garage, the trick is to follow the framing. Instead of connecting switch, light and outlet boxes by spanning framing spaces, route cable along studs, top plates and ceiling joists (Photo 3), along whichever framing member leads to the next box (see lead photo). That means you'll use a lot more cable, because the paths are rarely direct. But cable's cheap and quick to run. Keep all cables exposed and easy to see and never run cables on the tops of walls; keep them on vertical surfaces. That way the wires won't ever have anything resting on them like hooks or garden tools (Photo 6). Choose your product type Common number model plates Common model number plates View sample model numbers by selecting your product brand How to Replace the Logic Board on a Garage Door Opener

The logic board inside a garage door opener is the brains of the garage door opener. It contains the radio frequency (RF) receiver for the remotes and other control components. If the remote controls don't work or the garage door doesn't open and close properly, the logic board might have failed. Follow the steps in this repair guide to replace it using a manufacturer-approved replacement part. Less than 60 min. Logic board for a garage door opener For manuals, repair guides, and specific part recommendations, enter your model number. Help me find my model number Wear work gloves and safety glasses. Warning: Undertaking repairs to appliances can be hazardous. Use the proper tools and safety equipment noted in the guide and follow all instructions. Do not proceed until you are confident that you understand all of the steps and are capable of completing the repair. Some repairs should only be performed by a qualified technician. Use a step ladder to access the garage door opener’s power cord and motor unit.
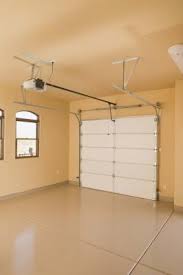
Unplug the garage door opener. Tip: You may want to have a helper assist you when pulling the garage door opener down. Position a work table near the area under your motor unit to hold the garage door opener during the repair. Pull the emergency release rope to release the trolley from the garage door.
where to buy jeld wen doors Shut the garage door if it's not already closed.
fire rated wood doors uae Remove the fastener ring from the straight door arm connected to the outer trolley.
outdoor gas fire pits toronto Pull out the clevis pin while supporting the straight arm to disconnect the garage door from the outer trolley.
hollow metal doors brooklyn ny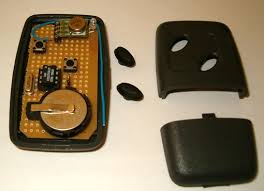
Lower the straight and curved arms down and rest them against the garage door. Open the light cover to access the wall control and safety sensor wires connected to the motor unit. Take a digital photo of the wall control and safety sensor wires connected to the motor unit. You'll refer to the photo later when reconnecting the wires.
automatic garage doors durban Disconnect the wall control and safety sensor wires from the motor unit.
screen door repair louisville ky Close the light cover.
car window repair overland park ks Remove the nuts, bolts, and lock washers that secure the motor unit to the ceiling bracket. Support the motor unit with one hand as you remove the last bolt from the ceiling bracket.

Carefully lower the motor unit down and rest it securely on top of the step ladder. Climb down the step ladder, lower the motor unit down and rest it on your work table. Move your step ladder by the garage door so you can remove the rail from the header bracket. Remove the fastener ring from the header bracket clevis pin. Pull the clevis pin out of the rail and header bracket while supporting the rail with one hand. Lower the rail and rest it on a rung of the step ladder so the rail is level with the motor unit on your work table. Tip: To avoid scratching a decorative garage door, remove the nuts, bolts and washers from the curved arm and carefully rest the curved arm against the door when disconnecting the garage door from the outer trolley. Remove the light cover and light bulb from the control panel. Remove the screws from the control panel and pull it out slightly to access the wire connections. Disconnect the wires from the logic board.

Remove the logic board mounting screws. Pull the logic board off the control panel. Thread the antenna wire through the control panel hole. Position the new logic board on the control panel. Install the mounting screws in the new logic board. Push the antenna wire through the hole on the corner of the control panel. Reinstall the control panel on the motor unit and secure it with the mounting screws. Reinstall the light bulb and light cover. Reconnect the rail end to the header bracket using the clevis pin and fastener ring. Position your step ladder under the motor unit ceiling bracket and carefully set the motor unit on top of the step ladder. Climb the step ladder and reinstall the motor unit to the ceiling bracket using the nuts, bolts and lock washers. Open the light cover to access the wall control and safety sensor terminals on the motor unit. Using your digital photo for reference, reconnect the wall control and safety sensor wires to the motor unit.
Reconnect the straight door arm to the outer trolley using the clevis pin and fastener ring. Tip: Reconnect the curved door arm to the straight door arm using the bolts, lock washers and nut if you disconnected the curved arm from the straight arm when freeing the garage door from the outer trolley. Plug in the garage door opener. Universal Garage Door Opener Accessores Enter your zip code Sears PartsDirect uses your location to provide local availability in your area. FREE Standard Shipping on orders of $90 or more Purchase requirement calculated before taxes and shipping charges and after other discounts have been applied and must be made in a single transaction. Cannot be applied to previous purchases and cannot be redeemed for cash. Valid for standard ground shipping within the continental United States and not valid for shipments to Alaska, Hawaii, Puerto Rico, Guam and the US Virgin Islands. Offer valid for online purchases only. In an event of a return, coupon savings may be deducted from your refund.

Discount will be automatically applied during check-out. Sears Holdings reserves the right to terminate or modify this offer at any time for failure to comply with its terms and/or due to any operational malfunction of the software, hardware or equipment required to process this offer. © 2013 Sears Brands, LLC. May not be used with any other coupon, associate discount, or during Family & Friends or Member events. Receive free shipping on all automatic reorders with subscription Note: This offer is only valid in the contiguous U.S. Chat is currently unavailableAll of our chat agents are currently assisting other customers. Please check back in a few minutes. Or call now for immediate assistance: 1-800-252-1698 new item(s) added to cart Recommended maintenance parts & accessories Subscribe today and receive: FREE SHIPPING on all automatic reorder subscriptions Save time without worrying about your next order (stays the same) Keep your water tasting great
Enjoy bottle-quality water without the added waste (stays the same) Get rewarded for shopping. As a member of Shop Your Way Rewards℠, you'll earn Rewards every time you shop. And the more you shop, the faster the benefits add up. It's super easy to use and best of all - free. Get all the details 365 Day Return Policy You may return an unused and uninstalled part in its original packaging. and chat with a Parts Trusted Advisor. We must receive the returned part(s) with the Return Authorization number within 365 days of your original order date. Exclusions apply to products with limited shelf life which includes but are not limited to batteries, smoke detectors or chemical-based products, which must be returned within 90 days of the original order date. Items received damaged must be reported within 10 days of receipt. Credit will be issued for the part(s) plus tax, minus shipping charges. Your satisfaction is important to Sears. Shop Your Way® members get $20 in points on PartsDirect purchase over $50 with coupon code SYW20.