garage door header block wall

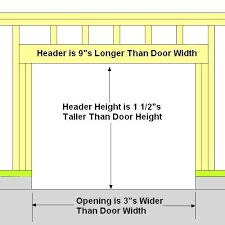
If you can cut a 2×4 and drive a nail, then you have all the skills you need to frame a rough opening for a door. As with most homebuilding tasks, however, there’s a fine line between getting it done and doing it efficiently, without causing headaches down the line. Whether framing a rough opening in a new home or on a remodeling project, I follow the same sequence. I always frame rough openings before I install the surrounding studs. This gives me plenty of room to nail the trimmers to the king studs and the king studs to the header. If the wall is load-bearing, I refer to the plans for the proper header size. If not, a 2×4 on the flat replaces the header. In this case, the plans called for a double 2×8 header. I added a 1/2-in. piece of plywood between the 2x8s so that the header width matches the 2×4 stud thickness. Most new doors are 6 ft. 8 in. tall. Add 3/4 in. for the jamb, 3/4 in. for finish flooring, 3/8 in. for underlayment, and 3/4 in. for wiggle room at the top of the door, and the top of the trimmer (the bottom of the header) needs to be 82 5/8 in. above the subfloor.

This height can vary slightly in a remodeling project depending on what’s happening with the existing floors. Door widths vary, but an easy way to size the rough opening is to use the door width plus 5 in. as the distance between the king studs. There are three simple rules to framing rough openings efficiently: Minimize layout marks; maintain a simple, consistent nailing pattern; and avoid toenailing when possible. Measure the distance between the king studs (door width plus 5 in.). For efficiency, I mark only the inside edge of the king studs on the bottom and top plates. To the inside of the marks, I write T for trimmer. To the outside, I mark an X to indicate the king stud. TIP: Mark and measure at the same time. The rectangular shape of a carpenter’s pencil makes it easy to hold against the end of the tape. Mark the cripple locations. I save myself a little time and the potential confusion of too many lines by marking the cripple locations only on the top plate.
The crow’s foot indicates the layout mark, and the X tells me which side of the line to locate the cripple. Later, I transfer these marks to the header.When assembling the king studs, the trimmers, and the header, I use my fingers, my eyes, and a Speed Square to keep all the edges flush. I alternate pairs of nails with single nails (like the #5 pattern on a domino) when nailing along the length of the trimmer or header. I separate nails by 16 in. for studs and by 8 in. for headers. Transfer the layout marks to the header. Before nailing the header in place, I align it with the king-stud marks I made on the top plate and transfer the cripple locations to the header. Is framing with a hatchet not for you? There are hundreds of hammers on the market with everything from skulls and crossbones on the side to $180 price tags. ) should fit the bill. The 21-oz. hammer has a strong fiberglass shank with a curved handle designed to resist arm fatigue. If your aim isn’t perfect, there is a high-impact overstrike guard under the head to protect the shank.

Again, I use the #5 domino nailing pattern. To stay friends with the finish carpenter and to avoid creating bumps in the wall, I keep the edges flush Add the cripples before the double top plate. Through-nailing is faster, stronger, and tidier than toenailing. Before adding the double top plate, I can through-nail into the king studs and the cripples. I nail the king studs on each side of the door before adding the cripples. Nail the plate next to the studs. To save the plumbers and the electricians from ruining their drill bits, I keep nails close to the studs when fastening the bottom plate to the floor. Magazine extra: Watch a video of Scott framing this rough opening and hear why he uses a rigger’s hatchet instead of a regular hammer. Photos by: John Ross, except where noted; drawing by: Dan Thornton Get home building tips, offers, and expert advice in your inboxImage 1 of 2 Garage doors are so leaky and difficult to insulate that it's almost always best to locate your home's thermal boundary at a wall or ceiling that doesn't include a garage door.

Two of the core questions an auditor asks during a home inspection are, “Where is the thermal boundary?” and “Where is the nearest Dunkin’ Donuts?” (Those two questions run neck and neck.) The thermal boundary is the demarcation line for energy movement between the unconditioned exterior and conditioned interior air. This can be a bit fuzzy sometimes and one part of that fuzziness can be the garage door on an attached garage. It’s odd when I find myself advising clients not to insulate, but that’s the case here. Normally, I can’t pile enough of the stuff in your house. Given my druthers, I’d probably spray 10 inches of closed-cell spray foam over your new dome house, add ventilation, and call it a day. But most folks are sticklers for windows and doors, so that won’t work. The question of garage doors comes up mostly in relation to attached garages with a finished room overhead. The arrangement integrates living and utility space in a way that needs some attention.

A building enclosure should be well insulated and nearly airtight. And you may have just thought to yourself, hell, garage doors are neither well insulated nor airtight. Yes, they make lousy components of the building enclosure. How to Heat a Garage Garage Door Openers Are Always On How to Insulate a Cold Floor Q&A: Best way to insulate a bonus room over the garage? BLOGS BY ERIC NORTH My First Energy Audit Energy Audits in New England The Worst House I Ever Audited Was Built in 2008 What is Thermal Bridging? Is R-Value Dead as a Dodo? Blower Doors Have Become Essential Flash and Batt Insulation Exterior Insulation Is Like Like A Sweater For Your House The door panels and contact edges are very leaky, and if you install foam board or fiberglass batts on the interior side of the panels, the insulation tends to chafe and fail over a not terribly long period of time. One can purchase a tight, well insulated garage door, but you know what is better insulated than any door?

Even if the garage door were insulated to some spectacular level, odds are that the concrete slab it is built on is not. So walls it is. The ceiling of the garage and the interior connecting walls need to be treated as the edge of your home's building enclosure. All too often, an attached garage is an intermediate space which is insulated and finished very haphazardly. Check out the photo at the bottom of this page — the one of a garage ceiling. That doesn't look good. The photo shows a garage ceiling under the finished room. If the camera's flash had lit inside the hole, you would have been able to see the underside of the plywood subfloor. The walls between your home's heated interior and your garage should be viewed as the building’s thermal and air boundary. All of the insulation should be well installed, and all of the drywall should be intact and taped. Treat it as carefully as you would any finished wall. Attached garages are all too often a weak point in the building enclosure.