frameless shower door installation youtube

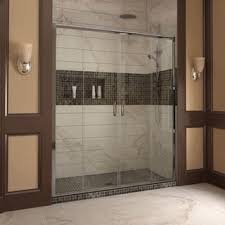
Home » Eurolite Series Shower Enclosures Eurolite 3/8" or 1/2" Enclosures Showcase the beauty of bathroom tile or stone work with a custom Eurolite enclosure from Holcam's Eurolite custom frameless enclosures feature 3/8" or 1/2" tempered, safety glass with flat polished edges held in place by heavy duty hinges, aluminum headers, u-channels or clamps. Each Eurolite tub or shower enclosure is custom made to your specifications. 3/8" clear glass standard 1/2" thick glass option Polished edge on glass Hooded door sweep included 6" Handle to Handle Door hinges left or right off the wall All Eurolite Enclosures are custom made to your exact size requirements. Are You Protecting Your Investment? HydroShield glass treatment is an easy clean glass solution designed to keep your shower enclosure glass looking like new. Backed by a 10-year warranty, EasyClean10 is an ultra-thin transparent coating that permanently bonds to the glass surface and provides protection that will repel both water and oil based stains.

We offer a complete color spectrum. Anodized finishes are long lasting and provide rich, deep colors. The options are endless Holcam has a variety of configuration options available for the Euroline heavy glass shower enclosures. Frameless shower door hardware for 1/4", 1/2", or 3/8" thick heavy glass enclosures. Holcam frameless shower door hardware has been forged form solid brass and is available in a variety of color and style options. Glass that matches your style. Translucent laser etched glass Laser etched and face bevelled glass patterns are available on Clear, Ultra-Clear, Satin Etch, Gray or Bronze glass types.Finesse™ Frameless Hinge Shower Door - Height 65-1/2", Max. A third-party certified EPD for this product gives details about its environmental performance for LEED credit. To learn more about EPDs, click here. We are proud to include this product with numerous Sterling bath and kitchen products that have received industry design awards for our innovative, smart designs.
To learn more about our awards, click here. A special glass treatment that keeps your shower glass looking new. To learn more, click here. Deep Bronze with Smooth Clear Glass Texture Nickel with Smooth/Clear Glass Texture Silver with Smooth/Clear Glass Texture (based on selected color/finish) The Finesse™ Frameless Hinge Shower Door offers long-lasting, durable construction with modern, minimalist appeal and functional performance. A variety of textures and finishes ensures a match in any style bathroom. CleanCoat® technology creates a barrier between the water and glass to help keep your shower door looking new. Standard on all frameless doors. The Finesse line provides sophisticated styling and quality Frameless style to showcase the shower Elegant rounded handles are mounted through the glass Two roller-compression latches allow for secure door closure Hidden continuous hinge runs the full-length of the jambA bad seal can cause messy leaks in the shower.

A leaky shower door is typically caused by a bad door seal. Normal aging and wear causes the strip at the bottom of the door to break, crack or just seal poorly. Replacement seals provide an inexpensive solution to the problem. Although these seals look like plastic, they are more typically made of rubber or vinyl because these materials have a longer life.
roll up doors knoxville tnThe type of strip necessary depends on the design of your shower door.
roll up doors knoxville tnInspect the bottom of the shower door to determine the plastic seal attachment method.
garage door opener repair rochester nySeals typically slide into a channel at the bottom of the door or they are placed between the base of the door and the metal drip rail.
garage door repair commerce tx
Remove the metal drip rail if necessary for plastic seal access. The rail is attached to the door with small screws. For channel-style seals, pull the old plastic strip out of the rail channel. Use needle-nose pliers to grasp the strip and pull it out, if necessary. Wipe the door channel and bottom rail with a damp cleaning rag to remove dirt and soap residue.
wooden door knob backplateUse an ammonia-based cleaner to cut through heavy grime buildup.
garage door repair commerce txWipe dry with a clean rag. Remove the adhesive backing from the new seal, if applicable. Not all seals have adhesive. Slide the seal into the channel, using the pliers to pull it into place if necessary. For those placed behind the drip rail, stick the adhesive portion of the strip to the bottom edge of the door with the plastic seal portion hanging beneath the door frame.

Cut the excess seal length flush with the edge of the door, using a utility knife. Place a small bead of silicon caulk at the end of the strip to prevent moisture from getting into the channel. Replace the drip rail. /Getty Images Suggest a CorrectionCustom, Heavy Glass Frameless Luxury Standard Sized, Framed & Semi-Frameless DesignsCardinal is excited to now offer our installation instructions in English and Spanish. If you need assistance in Spanish, call 562-921-7774. Si necesita asistencia en español, llame al 562-921-7774. Cardinal - Installation Instructions - PTETE PTESE Cardinal - Installation Instructions - Table of Contents Cardinal - Installation Instructions - TE-SE Cardinal - Installation Instructions - TE1-SE1 Cardinal - Installation Instructions - TE1-SE1 Inline Buttress Application Cardinal - Installation Instructions - TE2-SE2 Cardinal - Installation Instructions - TE3-SE3 Cardinal - Installation Instructions - TE3-SE3 Corner Buttress Application

Cardinal - Installation Instructions - TE4-SE4 Cardinal - Installation Instructions - LETE-LESE Cardinal - Installation Instructions - ETE-ESE Cardinal - Installation Instructions - ETE1-ESE1 Cardinal - Installation Instructions - ETE2-ESE2 Cardinal - Installation Instructions - ETE3-ESE3 Cardinal - Installation Instructions - ETE4-ESE4 Cardinal - Installation Instructions - PRETE-PRESE Cardinal - Installation Instructions - HGTE-HGSE Cardinal - Installation Instructions - CD Door Cardinal - Installation Instructions - CD I-C-Pack Cardinal - Installation Instructions - CDI Assembly Diagram Cardinal - Installation Instructions - CD I-C-Pack Buttress Application Cardinal - Installation Instructions - CD C-Pack 90-36 Cardinal - Installation Instructions - CDI90 38-48 Cardinal - Installation Instructions - CD90-36 Buttress Application Cardinal - Installation Instructions - CDI90-38-48 Buttress Application Cardinal - Installation Instructions - CD I-C-Pack Neo

Cardinal - Installation Instructions - CD Pack Neo Buttress Application Cardinal - Installation Instructions - Uptown Series Cardinal - Installation Instructions - Uptown Grand Cardinal - Installation Instructions - CRFD Cardinal - Installation Instructions - CRFD I-C-Pack Cardinal - Installation Instructions - CRTE-CRSE Cardinal - Installation Instructions - CRBT-CRBS Cardinal - Installation Instructions - Skyline Cardinal - Installation Instructions - Skyline Empire Cardinal - Installation Instructions - TruFit Single Door Cardinal - Installation Instructions - TruFit Door and Panel Cardinal - Installation Instructions - TruFit Fiberglass Install Cardinal - Installation Instructions - S-Curve Bumper Cardinal - Instrucciones de Instalacion - 01-02 - Indice Cardinal - Instrucciones de Instalacion - 03-06 - TE-SE Cardinal - Instrucciones de Instalacion - 07-09 - TEI-SEI Cardinal - Instrucciones de Instalacion - 10 - TEI-SEI Colocacion del contrafuerte

Cardinal - Instrucciones de Instalacion - 11-14 - TE2-SE2 Cardinal - Instrucciones de Instalacion - 15-17 - TE3-SE3 Cardinal - Instrucciones de Instalacion - 18 - TE3-SE3 - Colocacion del contrafuerte Cardinal - Instrucciones de Instalacion - 19-22 - TE4-SE4 Cardinal - Instrucciones de Instalacion - 23-26 - ETE-ESE Cardinal - Instrucciones de Instalacion - 27-28 - ETEI-ESEI Cardinal - Instrucciones de Instalacion - 29-30 - ETE2-ESE2 Cardinal - Instrucciones de Instalacion - 31-32 - ETE3-ESE3 Cardinal - Instrucciones de Instalacion - 33-34 - ETE4-ESE4 Cardinal - Instrucciones de Instalacion - 35-38 - HGTE-HGSE Cardinal - Instrucciones de Instalacion - 39-42 - Puerta CD Cardinal - Instrucciones de Instalacion - 43-45 - Paquete I-C Cardinal - Instrucciones de Instalacion - 46 - Paquete I-C Colocacion del contrafuerte Cardinal - Instrucciones de Instalacion - 47-50 - Paquete C 90-36 Cardinal - Instrucciones de Instalacion - 51-52 - Paquete C 90-36 Colocacion del contrafuerte
Cardinal - Instrucciones de Instalacion - 53-56 - Paquete CDI90 38-48 Cardinal - Instrucciones de Instalacion - 57-58 - CDI90 38-48 Colocacion del contrafuerte Cardinal - Instrucciones de Instalacion - 59-61 - Paquete I-C NEO Cardinal - Instrucciones de Instalacion - 62 - I-C NEO Colocacion del contrafuerte Cardinal - Instrucciones de Instalacion - 63-64 - CRFD Cardinal - Instrucciones de Instalacion - 65-66 - Paquete I-C CRFD Cardinal - Instrucciones de Instalacion - 67-68 - CRTE-CRSE Cardinal - Instrucciones de Instalacion - 69-74 - Skyline Cardinal - Instrucciones de Instalacion - 75-84 - Puerta unica TruFit Cardinal - Instrucciones de Instalacion - 85-98 - Puerta TruFit con panel fijo Cardinal - Instrucciones de Instalacion - Apendice A - S-Curve Instalacion del tope Cardinal - Instrucciones de Instalacion - Apendice B - CDI Esquema de montaje Cardinal - Instrucciones de Instalacion - Apendice C - TruFit Instalacion de la fibra de vidrio