frameless shower door and side panel

Strachman are experts at installing Framed and Frameless shower and tub enclosures. Let us help you reimagine and design your bathroom with our vast selection of different style enclosures available. Be sure to view our galley of custom installations, or read more about the services we offer. Tub & Shower Enclosures – FRAMED There are many various types and styles of shower enclosure available, which in simple terms, is the framework of the area in which you take your shower. Framed Shower Enclosures are shower enclosures where the glass is held in place by metal frames. Not all framed shower enclosures are completely framed. Some are Semi Frameless. Doors may sometimes be completely frameless as well. Framed shower enclosures can have swivel doors, swinging doors, or sliding doors. Brushed nickel and satin chrome will compliment just about any glass selection for bathroom remodelers. The pleasure of stepping into a shower enclosure rather than trying to step over into a bath tub wall enhances your showering pleasure immeasurably – particularly as they can accommodate a more powerful shower fixture or even a shower panel.

Framed Corner shower enclosures or Quadrant/Semi Circle enclosures are ideal for maximizing space in your bathroom. Tub & Shower Enclosures – FRAMELESS Frameless enclosures feature a unique rounded header design constructed of heavy gauge high polish chrome and gold anodized aluminum, fourteen standard painted finishes and custom matched colors to your decor. Steamline profiles and ease of installation adds to this elegant look. On frameless doors, the handles and hinges are mounted directly through the glass rather than being attached to the frames. Frameless doors have the advantage of giving a room a larger, more open feeling, and in being easier to clean. Fitted with clear glass, they show off a decorative wall tile or marble. Because they lack the protection of metal framework, they are usually made of thicker, heavier glass (3/8″ to 1/2″ vs. 3/16″ to 1/4″on framed doors); this gives a feeling of luxury and durability. When the doors have mounted side panels, those panels are often framed even when the door is not.

Frameless doors are no more dangerous than framed doors. Glass, while being quite fragile, is actually very strong on its edge. Thick tempered glass is extremely durable and difficult to break. It also becomes safety glass through the tempering process. Should it break, it will shatter into tiny pieces, thus reducing the risk of injury.
electric garage doors county durhamMeasuring for a frameless shower is not a rocket science, if you know how to read a tape measure you should be OK.
solid wood door edmontonThe measurement for your enclosure needs to be very précised up to 1/16” of an inch otherwise the door might not fit properly and you will end up with big gap between panels or doors.
automatic garage door closer lowes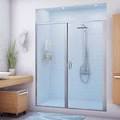
So first let’s go over the tools you will need to take exact measurements: Regular level or laser one (much better)Type measurePaper and pen We are going to take measurements for an inline shower enclosure, basically we will get all the numbers necessary to accommodate panel door in the middle and panel combination.
door pull handles south africaYou can apply all this to any enclosure neo angle, 90 degree and other. We are going to take measurement from wall to wall at the curb level. Put the type on the curb and measure the opening. Wright down what it is, in my case is 47-7/8”. Now move up about 6’ to 7’ from the curb and measure the opening at that level. For me this is 47-1/8”. This tells me is that my walls are not plumb (out of square). Our height would be 72” So let’s see which site of the wall is out of square. Take the level and place against the wall, look at the bubble in your level and determine which part of the wall is out or in.

In my opening this wall is OK, let’s move to the other site and I see that the top of the wall is leaning in about ¾”, that will explain the differences in numbers. Once you got all the numbers it is time to make calculations and deductions for your door. Remember we have two side panels and door in the middle. Standard size door is 26” and that leave us with 22- 7/8” for two panels, so let’s split this number in 2. That would be 11-7/16 per panel and 26” door. deduction goes as follow: ¼” for each panel (U-channel)3/16” space between door and panelsAll together our deductions are 7/8” Height is 72 for panels and 71-3/4 for door Our final measurements for left panel; Bottom = 11-1/4 Top=10-1/2” Height=72” Our final measurements for right panel; Bottom = 11-1/4 Top=11-1/4” Height=72” The following are some helpful hints to assist in measuring: 1) When measuring any shower that goes to the ceiling with bisecting angles involved, it's very helpful to have a plumb bob.

A plumb bob allows one to get the most accurate measurements possible. After doing the layout on the curb, use the plumb bob to find the bisecting point on the ceiling or tile lid. Once the plumb bob has stopped moving and is on the bisecting point of the curb, mark the corresponding point on the ceiling or tile lid. This point will be helpful in determining the center-line dimension on the ceiling or tile lid, as well as figuring the outage (if any) on the vertical wall. 2) When measuring a neo-angle, it's important to confirm the fact that it's a "true" 135 degree neo-angle. An angle measuring stick is the most certain way to determine any specific angle. There is, however, a way to visually inspect an opening to help assure that it is a true neo-angle.3) When measuring buttress heights, place a level horizontally on the buttress with a small portion of the level hanging off. Now a measurement can be taken to the bottom of the level to obtain the buttress height. 4) Place a level on the curb to determine if the curb is pitched properly inward for water drainage.

Although this would qualify as a tile installation mistake, guess who the customer is going to call if there is water leaking from under the door? If this problem is detected prior to glass sizing, allowances can be made for the corrective product. After deciding on the design and layout of an enclosure, the next step in transforming your vision into reality is the measuring stage. The most important aspect of installing a frameless enclosure is the accurate measurement of that opening. If a frameless enclosure is measured incorrectly or haphazardly, the chances of failure greatly increase. One could be the best fabrication and installation artisan in the world, but if the measuring information is inaccurate, all of that skill is wasted. Consequently, if an enclosure is carefully and thoughtfully measured and the glass sizes are mathematically sound, a marginal installer has a greater chance of success. These frameless enclosures aren't like the aluminum integrated units that have a great deal of adjustability.

When encountering an out of plumb/level condition, a notation must be made to ensure the proper glass sizing. If one places a level on the vertical wall and figures "It's not very far off", or "It's close enough", that person is planning for failure. There are so many variables that are out of one's control (such as poor fabrication of either glass or metal, poor installation and incorrect glass size deductions), that the importance of measuring is paramount. This is a step you can completely control. Before measuring the enclosure, it's imperative to define some terms and convey their importance. We've already referred to two important terms above. The terms "out of level" and "out of plumb" are different from one another. "Out of level" refers to the horizontal plane; whether it's a curb, sill, floor, ceiling or tub deck. "Out of plumb" refers to the vertical plane, walls, step-ups or buttresses. of the more misunderstood terms is the phrase "center-line". When measuring an enclosure that has an angle of any kind, bisecting points are necessary in determining angles as well as measurements.

When the term "center-line" is used, that term doesn't necessarily refer to the enclosure being placed in the center of the curb. The term refers to the imaginary line that would split the thickness of the glass. The importance of using this industry-accepted term is simple. When an enclosure is initially measured, it isn't always clear what thickness of glass or width of metal will be accounted for in determining the glass size. When the ever-ambiguous term "outside dimension" is used, it is hard to determine what the person measuring is trying to convey. Is it to the outside of the glass? Is it the outside of the metal? Is it the outside of the curb? The only time outside dimensions are appropriate is if there is an existing enclosure and outside dimensions are the only ones available. The tools that are necessary to measure a frameless enclosure are varied. There are varying degrees of importance associated with these tools. We will prioritize these tools into three categories;

tools you must have, tools you should have and tools you could have. We will now address the actual measuring of the enclosure opening. We will not be advising how to read a tape measure. Some things simply must be taken for granted. What we will relate are some of the important things to note. Always take complete and thorough measurements. Measure and make note of all outages no matter how seemingly insignificant. The reason we do this is to give the person figuring the glass sizes the best information possible to make glass sizing decisions. It is always better to provide more information, as opposed to less. Make sure to place a level on all mounting surfaces in order to note the various outages. One of the most problematic situations that one can run into is the vertical wall not being straight. A word of caution: Don't confuse the term straight with the term plumb. A wall doesn't have to be plumb to accommodate a wall mount hinge, however, it does have to be straight. When we refer to straight, the definition would be: A straight edge or level (being used as a straight edge) is touching consistently when placed against the wall that the door will hinge off of, or there are no gaps that exceed 1/32" (1 mm).

We can't emphasize the importance of the previous statement enough. If the straight edge is touching at the top and bottom and there is a concave (bowed-in) condition that leaves an 1/8" (3mm) gap in the middle, and an installer is going to use 3 hinges, failure is certain. This wall could be plumb and still be a major problem. The reason that this occurs is due to the fact that hinges operate on pivot points, and the pivot points must align with one another or they will work against each other. On bowed walls, the pivot points don't match, which causes the glass to slip slightly every time that door is opened. On the other hand, if a wall is out of plumb 1/2" (12mm), yet it's a straight outage, the pivot points will align with one another and the door will function properly. Another aspect that must be addressed is the relationship between measurements and outages. A great way to double-check the accuracy of both measurements and outages is to mathematically confirm the information by cross-checking.