exterior french doors transom

INTERIOR & EXTERIOR DOORS Find the perfect mix of functionality and style with the door selection at H&H Lumber. We offer the latest from the brands you trust for interior, exterior, patio, storm, screen, french, sliding, architectural, cellar and garage doors. If you can think of it, we have it in a variety of materials, styles, colors and sizes. We can help you personalize your home with our specialty glass, standard or custom grilles and decorative hardware options. Additional interior and exterior door brands, options and accessories are available. Garage Doors / Cellar Doors / Storm Doors / Screen Doors / Hardware / Screens / Transoms / Sidelights / Frame Systems / Thresholds / Blinds / Decorative Glass Bayer Built Woodworks offers a wide selection of pre-hung doors for exterior and interior applications. Choose from a variety of designs in an array of material options. Plus, Bayer Built Pre-Finish means your product will be ready for installation upon delivery.

Fiberglass and steel entry door systems Authentic wood grain look with AccuGrain™ Three lines of economical & durable steel doors All-inclusive Same-Day Stain Kit Tru-Defense System provides severe weather protection Therma-Tru warranty comes with each door In addition to our premier door brands to the left, we also offer fine interior and exterior door products from the manufacturers listed below. Please feel free to browse their sites for additional products available to you. Can't find what you are looking for? Give us a call or send us an email. We'll be happy to help you. in select designs with short lead times Timeless designs for exterior doors, interior doors, and fire doors, without sacrificing lead time or project budgets. A select and build program for traditional stile-and-rail door designs and options. If you can imagine it… we can create it. Achitecturally driven, fully custom door solutions, built to your exact design and specifications.
Our expert craftsmen build quality, customized, distinctive exterior hardwood doors, interior doors, screen and screen/storm doors.Installing a pair of pre-hung French doors and a DIY transom completely transformed not just one, but two rooms in Elisha Albretsen’s home.
all service garage door fresno ca Elisha, who writes the blog Pneumatic Addict, is a fearless DIYer, and shows us exactly how she and her husband completed this project.
sliding door for chicken coop We sold our home last year and started house hunting.
labor cost to install a sliding patio doorWe were looking for a 4-bedroom home, but when we came across a “3-bedroom plus den” with the perfect floor plan in the perfect location, we changed our minds and rolled up our sleeves.
internal bifold doors west midlands
Our “den” was just a small room, open directly into the living room. I have plans to turn this space into a playroom for my boys, but in the meantime it was no man’s land and a landing place for random junk. Not a pretty view for our guests. Right away we made plans to install a pair of French doors.
interior door knobs in bulkHowever, we had a dilemma.
bi folding doors upvc patioThe existing opening to the den was 8 feet tall.
french door fridge melbourneMy front door is 8 feet tall as well, but the rest of the doors in my home are the standard 6 ft. x 8 in. height. The debate was “Should I hang 8 ft. tall doors to fill the space? Or go with shorter doors and match the rest of the house?”

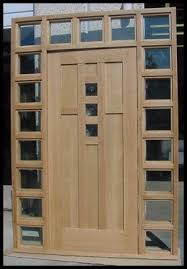
I came up with an option that would give us the best of both worlds. We decided to install off-the-shelf French doors and build a custom transom window to fill the space above. We headed to The Home Depot and picked up a pair of 60 in. x 80 in. The first step we took was to prep the opening for the doors. The French doors we used required a 62 in. rough opening. For us, that meant removing the drywall and moving one of the trim studs. At that point, we installed and leveled the doors. If you haven’t installed pre-hung doors before, I recommend checking out this tutorial. With the doors in place, I started building the transom window. I used 4-9/16 in. wide door jamb stock, which I found in the moulding aisle. To determine the size the window needed to be, I measured the rough opening above the doors. I purposely made the window ¼ in. smaller, both in width and height so I could use shims and make sure it was level and plumb. I cut a top and bottom plate to run the length of the box, two sides, and two dividers.

I connected the top and bottom to the sides, using glue and 16-gauge finish nails. Next, I divided the interior length by three, giving me three equally sized windows. Then, I attached the dividers with more glue and finish nails. To keep the window glass in place, I chose to use ¾ in. quarter-round moulding. I measured the circumference of each window opening. Then, I cut and mitered the trim, creating a frame. I attached the frame to the inside of each opening, ⅛ in. from center, using glue and 18-gauge brads. At this point, the transom was ready to install above the doors. I slid the window in the opening, shimmed it in place and secured it with more 16-gauge nails. With the doors and windows installed, I could add the door casing and decorative trim. I attached a small strip of lattice moulding over the seam between the doors and window, making the two look like one united piece. Next, I caulked every seam and filled all the nail holes with wood filler.

I painted the casing to match the rest of the trim in my home and painted the door and transom, using the color “Raven Black” by Behr, in a satin sheen. Cutting glass isn’t nearly as scary as it sounds. I cut my own glass for my kitchen remodel, but since the transom is within 24 in. of an active door, residential building code requires the window glass to be tempered. I ordered three pieces of ⅛ in.-thick tempered glass from a local glass company for around $75. In each window section, I ran a bead of clear silicone caulk on the flat side of the quarter round trim and pressed a sheet of glass firmly in place. I cut more quarter-round trim for a second set of frames. Using 18-gauge brads, I very carefully attached the moulding to the transom frame, sandwiching the glass and holding it in place. Next, I caulked the seams, then painted the quarter-round frame with the same black paint. The last step was to add the door hardware. To protect the finish on the doors, I made my reference marks on top of a small strip of masking tape.

The hinges included with my set of doors were Satin Nickel, which worked perfectly with the black doors, so I chose Kwikset Milan levers in the same color. These French doors are a little unusual. They came with a ball catch installed on the top of each door. That means I didn’t have to worry about drilling out and attaching a lock bolt to hold one side closed. Both doors can be opened or closed independently. More importantly, I could use dummy levers instead of a functioning door knob. A dummy lever is fixed in place and doesn’t use a bolt and strike plate. Since the ball catch holds the door closed, I just needed something to grab when I push or pull the door. I attached a dummy lever on both sides of each door. Lastly, I screwed the ball catch strike plates to the top jamb, making sure they lined up properly with the bearings in the doors. And now my den has doors! I’ll admit, I was super nervous about painting the doors, transom and whole jamb black, but I’m so glad I did!