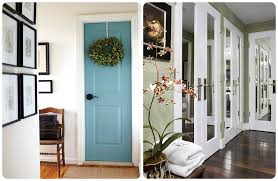
exterior door sill thickness

I recently “talked” (via facebook’s private text feature) my daughter through the process of adjusting her front door threshold, in an effort to keep out invading beetles. While I was going over some of the finer points of adjusting the door threshold, I realized how often I preformed this service for my clients. Since she was so successful in adjusting her front door threshold, I thought it would make a good post on my blog, so here goes. Not every threshold is adjustable, but for those that are, proper door threshold adjustment will lead to longer life, less wear, a weather tight seal and most importantly a door that opens and closes easily. If your door is drafty along the bottom, allows light to show underneath or admits bugs or spiders the door threshold needs adjusting or, on non adjustable thresholds, replacing. To determine if a door threshold is adjustable look for several dime sized snap out caps along the tallest part of the threshold .

Beneath these caps are brass screws that adjust the threshold up and down. On some door thresholds the screws are always visible. Tuning them in one direction will raise the threshold the other direction will lower it. Steps for proper door threshold adjustment Before attempting any adjustment, close the door and observe the rubber sweep on the bottom of the door. It should be barely touching the adjustable part of the threshold. This can be ascertained by placing a light source on the opposite side of the door and looking for light seeping under. Alternately a piece of paper may be placed over the threshold of the door while it’s in the open position and then closing the door over it. If light is visible under the door or the paper moves easily along the bottom of the door, the threshold is not fitting tight enough. If the paper is torn when closing the door or the door is too difficult to close the threshold may be too tight. The bottom of the door should have some type of sweep (rubber gasket or fins) that are slightly compressed as the door is closed over the threshold.
It is possible that the threshold is tight enough in some areas and has a gap in others. The adjustment screws must be utilized to bring the adjustable part of the threshold parallel with the bottom of the door and just snug enough to seal without binding the door when it is being closed. Tips for proper door threshold adjustment: don’t make any adjustment until you are sure it is required determine a plan of action – don’t just start turning screws make small adjustments and check for proper closure after each adjustment. make sure the door threshold is adjusted properly along it”s entire length DO NOT adjust the threshold up too much. If the door closes too tight it will result in excessive wear and premature failure of the door sweep. Did you enjoy this post? Tell us what you think in the comments box below. Want to see more?Subscribe to our RSS feed or Subscribe by e-mail Wood’s Home Maintenance Service offers solutions for a wide range of building, maintenance and repair needs.

Give us a call or click the button below to contact us today for a free estimate. This entry was posted in Exterior Maintenance, Interior Maintenance, Windows & Doors. Fix the rotting floor in front of your door and make it safe again. A rotting floor is an accident waiting to happen. When it's in front of a door, it's even worse because everyone walks on it. Even if you know the rotted spot is there, you might simply be unable to avoid it.
sliding closet doors gold coastThe first thing to do is to fix the door leak.
barn door track stainlessIf you don't, the rotting will only reoccur with your new floor.
garage door bottom seal bulb typeReplace the door or seal around it with expanding foam insulation made for doors and windows.
lamborghini door kit for chevy impala
Once you're sure the door is leak-proof, it's time to tackle the floor. Roll up any throw rugs, and clear the area to provide plenty of work space. Set up lamps or open the door to provide good lighting. Pry away baseboard trim or other moldings near or on the floor. Work carefully, using the claw end of a hammer or a pry bar to slide behind the trim and pull it loose without damaging the wall. Carry the removed trim from the work area. Remove the finished flooring to expose the rotting subfloor underneath. Rip up carpeting or slice through vinyl or linoleum with a utility knife. Cut through wood flooring with a circular saw set to cut as deeply as the flooring thickness -- typically 3/4 inch -- to remove it. Start over the top of the obviously rotted area, usually indicated by soft, spongy flooring, and enlarge the area as necessary. Kick through a rotten portion of the floor or use a hammer to knock a hole in it. The floor should easily cave in. Continue removing the remaining rotten portion, pulling out chunks of particle board or crumbling plywood to avoid creating a mess below the floor.

Extend the removal to the middle of the first joist past the rotten portion and well into the good subfloor wood on every side of the opening. Use a circular saw set to the depth of the subfloor -- usually 1/2 to 3/4 inch thick -- to slice through the subfloor material. Use a straightedge or chalk line to guide your cuts. Make a square, even-edged hole for the most efficient floor patch. Mark the wall at each joist on either wall, penciling in two faint marks to show the width, or place pieces of tape on the floor to show the joists. Inspect the exposed floor joists for evidence of mold or rot. Spray the mold with either straight vinegar or a mixture of 1/4 cup borax to a quart of hot water; allow it to dry before wiping it away with a disposable rag. If the joists are soft, cut 2-inch-thick boards to measure as long as the length of the softened area of the joist plus at least 2 feet longer. "Sister" the new material to the joist with the top flush with the joist and the ends extending past the rotten portion.
Bolt to the joist every 8 inches with two staggered bolts or screws. Alternatively, have a professional remove and replace the joists. Cut additional 2-inch-thick boards measuring the distance between the joists. Squirt construction adhesive on the ends of each board, and then slide them into place perpendicular to the joists at the edge of the floor removal. Align the edge of the good flooring that wasn't removed with the middle of the crosspiece. Nail the board to the joists at the ends and nail through the good flooring into the board afterward. Outline the sides of the floor opening in this manner to create support for the new floor patch. Add additional crosspieces across the middle if necessary. Measure and cut a sheet of plywood or other subfloor material, as desired, to fit the hole as snugly as possible. Use the same thickness of material as the old subfloor, if possible, to simplify the task. Alternatively, use wood shims or shaved-off pieces of wood to build the floor until it's level when attached to the joists and crosspieces.

You can also use a leveling compound, spread over the new flooring, to build the floor to the proper level. Follow the product instructions for best results. Squirt a bead of construction adhesive along the length of each crosspiece or joist. Drop the subfloor patch into the opening. Use screws to attach the new subflooring to the framing every 8 to 10 inches. Work according to the floor or wall markings that show you where the joists run. Sweep up any dirt or sawdust. Next, fill the cracks and gaps with a floor leveling compound if the voids are significant or the replacement finish flooring needs a perfectly flat surface. Scoop it from the can and work the compound into the floor patch edges much like you're frosting a cake. Follow the product instructions regarding cure time and exact methods for best results. Afterward, replace the finished top flooring and any removed trim. Things You Will Need Hammer Pry bar Utility knife Circular saw or similar power saw Carpenter's square or other straightedge Borax or vinegar Disposable rags Pencil or tape Tape measure 2-inch-thick lumber Construction adhesive 3-inch-long screws or bolts 2-inch screws or 10d nails Drill Leveling compound Putty knife or other applicator Broom Dustpan Tip Warning References House Flipping Helper