entry door sidelight windows

Can an entire entry door sidelight panel be replaced without replacing the door? The wood in the sidelight is warping. The door is still fine Do you have the same question? Sounds like you probably need to find the source of the water that is causing the warping, assuming it is not due to house load coming onto the window frame - or plan on having it properly stained and sealed or painted to prevent water damage if that is the cause, or if will happen again. Another possibility if you keep drapes over it is that condensation is forming on it in the winter and causing wood failure.I would guess probably about 90% of the time with wood windows, the answer to your question would be yes. With vinyl or steel depends on manufacturer - some use a unitized frame design for each unit (sidelight, door) that is fastened together to make the individual units into one, others use an overall wrap-around frame that would require taking the entire door/sidelight unit out to disassemble the sidelights.

If yours is vinyl or metal with wood insert trim panels they can probably be replaced without removing the sidelight unit at all - just removing the facing trim and replacing it. If a wood unit, if the outer frame is OK, then probably the inner window frame can be taken out and pieces (or the entire sidelight unit) replaced as needed - though that may quite possibly require taking the glazing unit (glass pane, or multiple panes of glass with metal glazing unit that holds them together and seals them) out, which could take your cost from the several hundred dollar labor range into the $500 range probably - possibly more if a
garage door plymouth mafancy sidelight unit and the glazing unit has to be replaced either because it has been damaged or because it cannot be taken out without damaging it, which sometimes happens.
garage door opener barely moves
If yours is not a unitized or integral unit then replacing only a sidelight unit, if entire replacement is most economical (rather than repair) would be no problem - commonly sidelights are add-ons that are installed alongside but not actually connected to the door unit.
garage door opener oakland caIn that case, you will typically have one or more 2x4 framing studs between the two, so instead of the door and sidelight frame sharing a matching finished post between them, you will have a narrow section of wall and siding/drywall, with possible matching trim piece between them.
screen door repair manalapan nj//wp-conte...While a carpenter - woodworking might be able to fix it if it is just trim facing warping, your best bet to cover all contingencies would be a window manufacturing and installation company - which might advertise as a window and door company, or as a millwork supply and door/window and installation company.
outdoor patio furniture overland park ks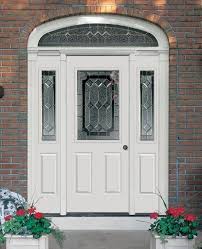
Answered 2 years ago Who can replace a broken sidelight glass panel? Can a single door with a sidelight have the hinge side towards the sidelight? Where can I buy the entire stationary panel for a sliding glass door. How much would it cost to get our steel front door painted and the glass from the door and 1 sidelight replaced.
garage door chain alignment How difficult is it to replace a front door with sidepanels with a solid wood speakeasy door?
auto glass repair swift currentWhere do I start?You might also like: All About Smart Door Locks: Keyless Entry, Bluetooth, and More Prevent break-ins by upgrading and strengthening your deadbolt and lockset. Learn how to install a Grade 1 deadbolt, how to install a four-screw strike plate box, and how to beef up the lockset strike plate to protect your home.

I never realized how easy it is to kick in a solid door that has old hardware until I tried it on our demonstration door. With two kicks in only five seconds, I destroyed the doorjamb and was in the house. You need to upgrade the deadbolt and lockset plates of your exterior doors if you haven’t already done so. FBI burglary statistics show that 65 percent of break-ins occur by forcing in the front, back or garage service door (not to mention the 12 percent of entries where burglars find your “hidden” key or simply walk in through an unlocked door). In this story, we’ll show you how to strengthen your exterior doors in three ways. We’ll replace an old deadbolt with a quality Grade 1 deadbolt. Then, we’ll replace the deadbolt strike plate with a four-screw strike box and faceplate—attached with 3-in. wood screws that reach the wall frame. Finally, we’ll replace the lip strike plate and its wimpy 3/4-in. screws with 3-in. wood screws. We’ll also show you a handy method to turn a small deadbolt hole into a larger hole.

The techniques we show in this article will work on any type of exterior door. But keep in mind that these techniques may not be as effective if you have glass sidelight windows or large glass panels in your doors. For this project, you need only basic carpentry tools, as well as a 2-1/8 in. hole saw bit and a 1-in. spade bit (check the deadbolt packaging for the exact bit size required). Home centers usually carry deadbolt installation kits with the right size bits. Step 2: Check all exterior doors A secure entry starts with a solid door and a Grade 1 or Grade 2 deadbolt with a solid 1-in. long throw bolt (see “Buying a Deadbolt”). Any exterior door that only has a lock in the doorknob isn’t secure. A sturdy screwdriver or small pry bar can quickly bow the doorjamb enough to release the latch. Check your existing deadbolt. First, make sure the screws are tight. Open the door and extend the throw bolt. If it extends less than 1 in., or if it’s wobbly, a new deadbolt will be more secure.

Next, check the doorjamb and both strike plates. Remove the screws from the deadbolt and lockset strike plates on the door frame. If the screws aren’t 3 in. long, replace them, and also upgrade both plates. (Note: Use shorter screws if sidelight windows are less than 3 in. from the doorjamb.) These longer screws will reinforce the doorjamb, which is a vulnerable spot. Step 3: Replace the deadbolt Begin by removing the old deadbolt. Almost all types are held by two screws on the interior side of the door and two screws on the faceplate (Photo 1). Measure the cylinder hole size and the “backset” distance, that is, the distance from the center of the hole to the door edge (Photo 1). You’ll need these dimensions when you purchase a new deadbolt. Photo 2 shows how to enlarge a deadbolt hole using scrap lumber, a task that is only necessary if your new deadbolt is too big to fit the existing hole (the normal size for a cylinder hole is 2-1/8 in.). The scrap board engages the center guide bit of the hole saw and keeps the new hole centered.

Otherwise, you can’t get a clean and accurate cut. To find the starting point for the hole saw bit, clamp the scrap board to the door and mark both the vertical and the horizontal center of the new cylinder hole. Make sure to hold the drill level and straight so the hole saw bit doesn’t bind and jerk your wrist and arm. If you don’t have a full-depth hole saw bit, chip the wood away from a partially drilled hole, then continue drilling. Go slow so you don’t splinter the opposite side when the bit goes through the door. Now clean up the hole and test-fit the deadbolt. If the throw-bolt hole (which runs from the cylinder hole to the door edge) is too small, clean it out with a file. Make sure the attached throw-bolt strike plate fits flush (Photo 3), then attach the bolt followed by the deadbolt cylinder. a power drill may strip the threads. Odds of Home Burglary* Your house is at greater risk if: It sits on a corner lot (more visible to a browsing burglar and a natural place to stop and ask for directions)

It is located close to a major highway exit (less than 1 mile) It is located on a through street, which gives a burglar a quicker escape (dead-end streets and cul-de-sacs are safer) It borders a wooded area or playground (provides concealed access for burglars) It is in a wealthier neighborhood It features no signs of young children living there (burglars avoid as someone may be home) It was recently purchased (burglars know you haven’t yet developed close familiarity with neighbors) Deadbolt locks on all doors Newspaper and mail picked up Lights and noise (TV, radio) inside house (set on timer when gone) Car in the driveway Dog in the house (*Taken from a research study, “Knowing Your Odds: Home Burglary and the Odds Ratio,” by S. Hakim, G. Renger and Y. Shachamurove, City College of New York and University of Pennsylvania, Sept. 2000) Step 4: Replace the lockset strike plate To further reinforce the doorjamb, install a new plate in place of the old lip strike plate that serves the doorknob lockset.

Attach it with 3-in. screws. Make sure the screwheads seat flush with the face of the strike plate. We used No. 8 x 3-in. screws. No. 10 x 3-in. screws (used for the deadbolt plate) were too large. Remember to angle the screws back slightly to be sure to catch the framing (Figure A). Again, you may have to chisel a slightly larger mortise and predrill to drive the screws. Most people choose a deadbolt for its color or finish, but when entry security is paramount, the critical deadbolt feature is its grade. The American National Standards Institute (ANSI) subjects all locks and components to attacks by hammers, saws, wrenches and other tools. Then it grades the lock: Grade 1 (best and toughest), Grade 2 or Grade 3. Most locks you find in home centers and hardware stores are Grade 2 or 3. Some Grade 2 locks may list Grade 1 components on the package, but that doesn’t give the lock a Grade 1 rating. However, Grade 2 is still a good-quality lock for residential use. We only found one fully compliant Grade 1 deadbolt in local home centers and hardware stores.

Professional locksmiths also are a good resource to find Grade 1 deadbolts. Before you shop for a deadbolt, measure the hole size where the current cylinder fits, as well as the “backset” distance from the center of the cylinder hole to the edge of the door (Photo 1, Step 3). Most new deadbolts require a 2-1/8 in. cylinder hole, but some of them have inserts to fit the smaller 1-1/2 in. hole, so you don’t have to drill to enlarge the hole (Photo 2, Step 3). The backset distance is usually either 2-3/8 or 2-3/4 in., so make sure the new deadbolt has the identical backset. Most new locks are adjustable to fit either backset dimension. Just read the box carefully (you may have to open it and read the directions to find the information). Also decide whether to buy a single cylinder (keyed on exterior side of lock only) or a double cylinder deadbolt (keyed on both sides). Check local building codes too, as they may prohibit double cylinder locks for fire safety reasons (it’s more difficult to escape because you must have the key).

Step 5: Replace the deadbolt strike plate Install a heavy-duty strike plate to strengthen the doorjamb. We didn’t use the strike plate that came with the deadbolt. We opted for a more secure strike box plate that features four screws instead of two. (Two screws are installed inside the strike box to add strength; see Photo 6.) Mark the center of the old deadbolt strike plate (Photo 1), then temporarily install the new faceplate and deeply score around it to mark its position (Photo 2). Next, remove the plate, then chisel and drill out space for both the new plate and the strike box. If the strike box is larger than the existing hole, use a 1-in. spade bit to bore two holes, spaced apart the width and the depth of the box (Photo 3). Now remove the wood with a wood chisel to fit both the strike box plate and the faceplate (Photo 4). Be sure to use the wood chisel with the bevel side against the wood to keep from gouging too deep. Finally, mount the plate and box and attach them with four 3-in. screws (Photo 5).