double glazed door barrel

Edit ArticleHow to Change a UPVC Door Lock Two Parts:Prepping to Replace the LockReplacing the LockCommunity Q&A Door locks are a reliable and universal method of added security. Some locks have extremely intricate structuring, while others can have a more simplified structure. Upvc door locks are an example of a basic locking arrangement, that still offers a dependable level of protection. Replacing a upvc door lock is a fairly easy process that simply requires a lone screwdriver and a new lock cylinder. Identify the kind of lock you have. There are different variations for upvc door locks, so initially, try to identify the brand of the lock on your door. Some common brands include Avocet, Fulltex GU Ferco, Mila, Roto, and Yale, just to name a few.[1] Knowing the brand of the lock will help tremendously in finding a replacement lock. Upvc door locking points can come in various styles (hook, deadbolt, pins, etc.). However, regardless of the intricacy and style of the locking point, the lock cylinder is normally the universal portion of the lock that gets replaced.

This is called the backset measurement. Some locks will have two spindle holes, but always take the measurement from the upper spindle hole.
andersen sliding patio door price A common example of measurement dimensions is 92 millimeters for the backset, and 35 millimeters for the PZ.
screen door handle lowes Depending on the width of the door, the length of the locking cylinder may vary.
accordian patio doors pricesTo measure the length of the cylinder, measure horizontally across the width edge of the door, from one keyhole to the other (interior keyhole to the exterior keyhole). Remove the retaining screw. Located in the faceplate on the side of the door, the retaining screw is usually even with the bottom of the lock cylinder and keyhole.
[3] Use a screwdriver to twist the retaining screw to the left, loosen it, and remove it from the faceplate. This screw is what holds the lock in place. The lock cylinder is the portion of the lock within the door. It is the encasing into which the key is inserted through the keyhole. Insert the key into the lock. Once the key is in the lock, turn the key either right, or left about 10 degrees. The direction of your turn will vary depending on which side of the door you’re on. You’re turning the key only about 10 degrees so you can line up the cam (the inner latch of the lock) with the body of the lock, and remove the lock cylinder smoothly. This part takes a little bit of trial and error, so try turning the key both directions.Experiment with gently wiggling and tugging on the key while it’s inserted in the lock and turned to both the right and left positions.[4] In one of the turn positions, the lock cylinder should start to come loose with moderate tugging.
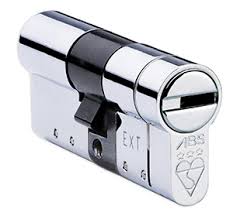
Once the cylinder comes loose, pull it toward you, out of its socket. Put the key into the new cylinder. Now that the original lock cylinder has been removed, take out the key from the original cylinder, and place it into the new lock cylinder. The new lock cylinder can only be secured into place with the key situated inside.Turn the key in the new cylinder so the lock cam is flush with the body of the cylinder. The cam needs to be flush with the cylinder body so it can fit smoothly back into the empty socket. Insert the new cylinder all the way into the socket, just as the old cylinder was positioned. Turn the key a little bit so the lock cam can correctly position itself within the socket. Leave the key in the lock. You are essentially reversing the steps you took to remove the original lock cylinder. Screw the retaining screw back into the lock faceplate. Insert the retaining screw back into the screw hole. Use a screwdriver to twist the screw to the right, and secure it back into place.

Test the lock by turning the key both right and left a few times, and gently tug on the key when it is turned to both the right and left position. This tests to see if the lock cylinder is secured in place. Only remove the key from the lock once the retaining screw is secured back into place. Show more unanswered questions If the lock cylinder seems particularly tight in the door, try slackening the exterior faceplate of the lock by slightly unscrewing the top and bottom screws of the faceplate. If you don’t have the keys to the lock, you may need a locksmith to snap or pick the door. Trying to remove the lock yourself carries the risk of damaging the locking mechanism.You may well have heard of “” or or eventhe term.Lock snapping is a very common method used by burglars to break into property that has a euro cylinder (e.g. almost all properties that have UPVC doors, although a significant number of composite & aluminium doors use them too, and they’re often used in commercial as well as domestic environments).

On This page we will cover: From the below image you can clearly see how fitting by a anti snap lock cylinder to these UPVC doors that a burglary attempt has been stopped. Burglary prevented with a Anti Snap Lock | The lock on the above door is a Sold Secure approved diamond standard cylinder – To get one of these fitted we recommend contacting your local MLA approved locksmith who will be able to advise you on getting one fitted for your front and back doors. Click here to Contact a MLA Locksmith to discussing fitting Anti Snap Locks The method of lock snapping involves breaking the cylinder to then manipulate the lock to open. Whilst you may think that all the multi locking points on your door make it secure, it’s important to realise they are all operated by the cylinder – this is the weakest point and if compromised all the locking points are rendered useless. Lock Snapping spreading further afield – Whilst it has previously been restricted mainly to the Yorkshire area we are now seeing Police further afield giving warnings.

For more information please see the Thames Valley Police providing advice on the issue. So it’s clear that lock snapping is a real threat, but the important thing to realise is that there’s a simple solution. It’s not something to be afraid of, simply something to be aware of and take action to prevent. Sold Secure the security product test house owned by the Master Locksmiths Association started work over 2 years ago on a test standard to cover this particular MO. Subsequent to the launch of other standards have been launched to address the issue but the is seen by most as the leader and therefore the approval to have. To protect yourself against lock snapping there are essential three ways to go. By fitting a Sold Secure Diamond approved cylinder ( SS312 ), your local professional, MLA licensed locksmith will help you minimise the likelihood of being burgled using this method of lock snapping. If a SS312 Diamond cylinder isn’t used then it should at least reach the 3star Kitemark standard to provide true resistance to snapping.

Don’t simply rely on the manufacturer stating it’s snap resistance, you should always look for 3rd Party approval to confirm a product’s performance. A 1 star kitemark cylinder with 2 star kite mark door furniture ( handle, cylinder guard ) The more of the cylinder that is accessible, the more prone it is to snapping, and a properly fitted cylinder (with no external overhang) will provide more protection against snapping, so size of the cylinder is vital too. Yet more reasons why changing locks isn’t a do it yourself job! The cylinder should not protrude more than 3mm from the handle and ideally should be completely flush. The pictures below show incorrectly fitted cylinders. unbelievably they are actual pictures from jobs our members have witnessed (and of course immediately suggested addressing!) This is how a correctly size specified and fitted cylinder should look. Don’t accept anything other than a correctly sized cylinder when having your locks changed and certainly don’t fall for the line that “the fact the cylinder is protruding is a special feature to help you feel where to put the key when it’s dark”!