cost to replace door and jamb
Edit ArticleHow to Frame a Door Opening Two Methods:Measuring and CuttingPutting It TogetherCommunity Q&A If you want to install a door in your house, you have to first frame the door opening to prepare it for the installation. With a ladder, some nails and a hammer, you're well on your way to outfitting your own rooms at a fraction of the cost. Decide whether to buy a frame or build one. Know what lumber to purchase. Determine the size of the framing members in the wall you are framing the door in. Wood studs are most often 2x4 nominal size, but 2x6 and other size studs are also used in residential framing. You can purchase the lumber you need at a lumberyard or home improvement warehouse store. In terms of the best type of wood to use, feel free to choose lumber based on aesthetics rather than strength. Interior doors and frames are not exposed to the same harsh elements as exterior ones, so your main concern should be picking a type of wood that you like and which goes well with the door you're planning to hang on it.

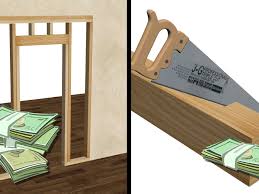
Common wood types used for interior frames are: Pine (the most popular) Determine the size of the door. Normal interior doors are 2' 6", 2' 8" or 3' wide and 6' 8" tall. Take into consideration what types and sizes of items you will be placing in the room. For example if the door leads to a laundry area, make sure the door will be large enough to fit a washer and dryer through, and preferably 36" wide. Determine the size of the door opening. The size of the door opening will vary depending on the size of the door you plan to install. A typical door opening is 2 inches (5.1 cm) wider than the door size being installed to allow for the thickness of the jamb material and shims to plumb the jamb. Measure your door carefully and cut the opening to fit. Make the opening the width of the door plus 2 inches (5.1 cm), and if additional studs are needed, a space for these, as well. Cut the studs and sill plate to the width required. Never cut a wall top plate!

The boards secured in an upright position along the sides of the frame are referred to as studs., and are used to support the wall. The board that transverses the top of the studs is called the top plate. To make the studs, measure the height of the door to be installed. Cut 2x4s to the height of the door plus 1 1/2 inches (5.1 cm) to allow room for the top of the frame and allowance for leveling the jamb.
interior wood doors tucson To make the door header, cut 2x4s to the width of the original opening.
cheap kitchen doors b&q A "king stud" is one that runs continuously from the top plate to the bottom plate.
barn door latches for sale The "jack stud" is nailed to the king stud, but it's shorter as it supports the door header.
doors for sale at wickes
Cut the door header. To make the door header (the top of the door frame), cut two 2x4s to the same length as the width of the original opening and nail them securely together. Insert the top plate. Nail the top plate through the ceiling into the ceiling joists or blocking using 12D nails.
solid oak internal doors sheffield Insert the sole plate.
car window repair davenport flNail the sole plate to the floor, driving the nails into the floor joists or blocking. Don't nail the sole plate to the floor between the jack stud locations because this portion of the plate will be removed before the door is installed. Use Tapcon screws (or other appropriate fastener) to insert the sole plate. Nail the king studs in place. Use 12D nails to nail the king studs in place. Drive the nails at an angle to make a toe-nailed joint, or you can attach the studs with metal connectors.

Nail the jack studs to the king studs. Position the jack studs against the inside of the king studs, and nail them in place.Take two 2x4s that are cut to a length that equals the width of the original door opening. Use them to make a header that will sit above the door. Once in position, nail these header pieces together to secure. [4] The header should fit between the king studs and sit snugly atop the jack studs. Insert a cripple stud. Measure and cut one (or two depending on the width of your door) studs to fit between the header and the top plate. This is a cripple stud. Use a toenail joint to secure the cripple studs to both the header below them and to the plate above them. Remove the sole plate. Saw through the 2x4 sole plate at the inside edges of the jack studs. Remove the cut portion of the plate.What is the Door Striker Plate all about? On the body of your car at each door is a hook or bolt known as the door striker. On some vehicles, a door latch is mounted inside an opening in the body of the door, and catches on the door striker when the door is closed for a tight fit.

On other vehicles, particularly some older vehicles, the door striker plate is mounted on the surface of the door frame and catches on the door striker. The striker plate is made of hardened metal to prevent wear and firmly catches the door striker to hold the door tightly closed. When the door handle is lifted, a mechanism releases the door striker from the striker plate, and the door is able to open. Most door striker plates have two catches. One is for a safety catch so the door doesn’t pop open in an accident or unexpectedly open when driving. The other is to hold the door for full closure. If the door striker plate is damaged or worn, the door may not hold tightly anymore. It may also be possible that the door striker plate needs to be adjusted as it wears. Sometimes a door striker plate can be adjusted to fit tighter instead of being replaced. If the door is difficult to close or not catching fully, it could pop open in a collision. The striker is unbolted from the door post, along with any cosmetic or friction plates, taking note of any alignment markings if applicable

If striker incorporates a switch, it is pulled out and the connector unplugged. The new striker with switch is reconnected to its wire and reinserted. The new striker bolted to the door post, aligned if required, and torque to specifications. The door is opened and closed several times to assure proper latching, and proper operation of switch as applicable. The door striker plate is a solid piece of metal that should not wear significantly, though it may be necessary to lubricate the striker plate annually for smooth operation. If the striker plate does wear out, or if it is damaged or bent, you should have it replaced by one of our expert technicians, who will also properly align the door when complete. What common symptoms indicate you may need to replace the Door Striker Plate? Door is loose and rattles Door moves up or down when it hits the striker Door is difficult to close How important is this service? The door striker plate is integral for safe vehicle operation on every door.