cavity sliding door stud opening sizes

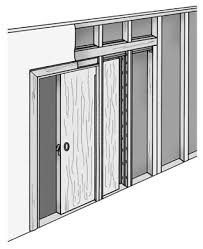
How to install a cavity door We take you through the steps to install a cavity door unit. Phillips Head Screw Driver Ear, Eye & Dust Protection Timber Pelmet cover trims Closing Jamb (VIC, SA, TAS, WA only) 2. Measure your opening Measure your stud opening (insert image #1) allow 5mm minimum in both height and width. This will allow for the unit to be packed square during installation. Use these measurements to purchase your new Hume cavity. Height = Door Height + 70mm (QLD, VIC, SA, TAS, WA) Height = Door Height + 80mm (NSW, ACT) Width = 2 x Door Width + 10mm – Flush Pull (Door protrudes 50mm) Width = 2 x Door Width + 60mm – Flush Jamb (Door is flush with split jamb) 3. Remove transport plates Remove both transport plates from the top of the cavity. Fit and screw steel head/track to the top of the cavity unit. 4. Fit closing jamb to head/track Fit closing jamb to head/track. (Not supplied QLD, NSW, WA, ACT)

5. Place cavity unit in opening Stand assembled cavity unit into your opening, ensure unit is level, pack behind then fix through back post of the cavity unit into the house frame. Make sure the split jambs are in line with the house frame and fix the unit to the floor. (pack under cavity for additional clearance under the door - only if required) 6. Fix head track to frame Ensure split jambs and head/track are plumb and level, then fix the head to the house frame. 7. Make sure closing jamb is plumb Plumb closing jamb, pack and fix through to the house frame. 8. Cavity fittings pack includes 2 x 4 Wheel Roller Assemblies L/H & R/H Door Guides 2 x Quick Release Base Plates Rubber Bumper Stopper (QLD only) 9. Fit 4 wheel roller cariages into head track Place both 4 wheel roller carriages into the track and ensure they both operate well. Check that the door is straight and free of any imperfections. Seal your door top & bottom with two coats of undercoat and 2 coats of paint.

Refer to manufacturer's warranty. 11. Attach the base plates Attach the base plates on the top edge of the door, 80mm from each end. Ensure the nylon lock tabs are both on the same side of the door. 12. Fit clad to opening Clad your opening (Not included) - Important - At this stage make sure the temporary spacer block and plate (located in between the split jambs, approximately half way up from the bottom) remain in place during cladding and tiling to prevent distortion of the cavity pocket. Remove after cladding and prior to the door installation. 13. Fit the architraves. 14. Slide the carriage pin into the base plate Check the opening is free from obstructions, slide the door into the cavity, lift door and slide the carriage pin into the base plate. Then lock with the tab and repeat this process for the second wheel carriage. 15. Fit the cavity door guides Fasten the door guides at the bottom of the split jamb. Ensure the slide adjustment part of the guide is on the outside of the opening.

Check your door operates correctly and revisit any of the steps if required.A pocket door is a great way to pick up usable floor and wall space that normally would be occupied by a door's swing.
lowes screen doors slidingYou can buy and install a pocket door for as little as $100, and the kits are readily available at home centers and lumberyards. There is one catch, though: You'll have to tear out a portion of the wall to make room for the split studs that replace the wooden ones and for the track on which the new door hangs. The demolition can be a bit messy, but it's straightforward. 1. Cut through the nails to remove the door and jamb assembly. Use a reciprocating saw and metalcutting blade. 2. Use a wood-cutting blade to remove pieces of wallboard. Avoid cutting too deep. 3. Remove a section of drywall above the door to allow you to frame in a new header. 4. To remove the existing header, slice through the nails that fasten it to the studs.

5. Cut a Length of Straight 2 X 4 to form the new header. nail it at both ends and screw it to the cripple studs.MATERIALS: Door, Sterling 1430 Series Pocket Door Kit, 2 x 4 lumber, drywall, drywall tape and compound, jamb kit, molding.First, check that there's enough room in the wall -- you need a rough opening that's just over twice the width of the door. Then, determine if the wall is load-bearing or simply a nonstructural partition.Load-bearing walls typically are near the center of the house and run perpendicular to the floor joists (check joist direction in the basement). Doors in these walls will have headers -- usually laminated beams -- over their openings. Installing a pocket door in a load-bearing wall requires replacing the old header with a longer one. Creating the opening for the new header may require temporary ceiling support while the header goes in (you may want to consult a pro for this).Check to see if the wall contains wiring or plumbing. A wall with pipes isn't a good candidate for a pocket door.

If you have attic and basement access, it should be easy to reroute electrical cables. Just keep in mind that all wire splices need to be made in a permanently accessible electrical box. Concealed wiring is easy to detect with an inexpensive, noncontact voltage sensor, such as the Live Wire GVD-505A from Gardner Bender (about $16).Prep and FramingDoorjambs aren't nailed tight against the studs, but spaced with wooden shims. To remove the existing door, first pull off the molding, then slip a reciprocating saw blade into the gap and cut through the nails clustered around the shims. Use a metalcutting blade or a demolition blade that is rated for cutting wood with nails in it. With the nails clipped, tip the door from its opening.Make exploratory openings in the wall to check for any obstacles you may have missed. Tip the saw down for shallow cuts, and take the drywall out between the studs. Remove the drywall above the header, but stay a few inches below the ceiling to avoid extra finish work later.
In our installation, we were able to leave the drywall in place on the inside.Use a reciprocating saw to remove the partition header and cut away the studs to make room for the pocket door's new framing. Nip the nails between the studs and the soleplate, then determine the height of the new header before cutting the stud tops to length. The header height depends on whether you need a new soleplate. If the floor covering above the subfloor is minimal, you can secure the kit's split-stud brackets directly to the floor. We had a carpet and pad, so we used a 1 x 4 plate to avoid having to cut the door for it to clear the carpet. To determine the new header height for a kit like ours, figure the length of the new door, plus 31/4 in., plus the height of the soleplate, if any. Cut the stud tops to the length needed to support the new header at the correct height. Determine the rough-opening width and install a new stud this distance from the existing stud on the opposite side. Nail or screw the new header in place, then cut and fit the soleplate to the floor.6.

To cut the track to length, use the mark on it that corresponds to your door size. 7. Mount the track in the rough opening by screwing the brackets to the studs. 8. Tip the split studs into the floor brackets and nail the tops of the studs to the header. 9. Install the door hardware and hang the door. Adjust for level and lock the adjustment nuts.Hardware InstallationThe pocket-door track is a metal channel with wooden nailing strips on each side. The channel is marked for various door widths so it's easy to cut it to the right length. Cut through the nailers with a handsaw and use a hacksaw on the channel.Attach the channel to the studs with end brackets, and check the channel for level. Then, snap the split studs into their floor brackets, tip the studs upright and nail them to the header. Check that the studs are plumb, and nail the floor brackets to the soleplate or floor.Mount hangers on the top of the door, and slide the wheeled carriages into the track. Hook the hangers onto the carriages, and adjust the assembly until the door hangs plumb.